Tuesday, March 13, 2012

Disguising the modern

Modern things can really kill the atmosphere in a camp or around a fighting field.  We've all seen someone (probably even me) in a beautifully made, wonderfully period outfit, ruin the whole thing by pulling our a cell phone or putting on a pair of sunglasses, or pairing it with glaring white sneakers.  Some of these things can't be avoided for one reason or another, but we can certainly make an attempt to cover them up as much as possible.

To whit, I present my latest woodworking project, the wax tablet kindle.  We got the idea for this at our local 12th Night, when my laurel's husband and I saw one of the other local laurel's running around with an iPad.  I'd seen several people with tablet computers at the last library, taking notes and whatnot, and suggested that it would be really cool if we could somehow disguise these really obviously modern, but ever so useful things as wax tablets.  Really, that is what they are standing in for after all.  Fast forward a little to a couple of weeks ago when we saw this very idea adapted to iPhone cases at the last event we were at.  

It turns out these are really quite easy to make, if you have even the most basic of wood working skills.  This particular case was cut using a scroll saw to cut out a kindle shaped hole from a piece of 1/2 inch wood which I then glued to 1/4 inch backing, but you could just as easily build up the sides like a small box.  Using the scroll saw method, unless you are really good with a table saw and stripping down lengths of wood (which I am not) you are a bit limited in case size by the widths of thin lumber you can get.  I was only able to get 1/4 inch and 1/2 inch wood up to 6 inches wide, perfect for the kindle fire but only just barely.  For those of you interested in such things, I made this case out of poplar, stained it with a light coat of English chestnut stain and then used paste wax to finish it.

For the next one (cuz why not?) I want to make a sewn leather hinge that wraps around and closes with a buckle.  I think this will work better, even it making it is a bit more fiddly.  The DH wants one for his phone too, which is promising.  At least he is on board with the minimizing the modern plan!

Thursday, March 8, 2012

Grain lines and gussets

I've finally started working on the G-63 for the DH, after a great deal of deliberation.  So far so good.  I got everything cut out yesterday and put the body of the gown together, only to discover after going back to Woven into the Earth that I had put the grain lines on the body of the gown in the wrong places.  If you look at the diagram to the right (a marked up version of Marc Carlson's pattern illustration) the reddish lines indicate where the straight grain or selvedge edges should be.  Arranged this way, the original has two straight edges down the front and two biased edges down the back, all other seams being the convention straight-to-bias. I got as far as getting two straight grain edges down the front, but ended up my bias-to-bais seams under the arm.  I'm chalking this up to a modern sense of the symmetrical, we tend to want to hide the odd seam out someplace we would view as unobtrusive, even if that does not make structural sense, as in this case. The whole thing would hang better arranged as the original was.  At least the gores are not terribly wide so the problem isn't very obvious, and I have learned something for next time.

In the process of putting this together I also realized it's basically a scaled down version of the Zhorelecky houppeland I posted about awhile back.  The similarity in drape is quite remarkable, and probably not something I would have picked up on right away if I had not just been talking about the houppeland this weekend and if I did not have it pulled out and handy for comparison.  The business with grain lines is really what gives both garments the beautiful rippled edges at the hem line, not a huge volume of fabric.

The other (and major) weirdness of the G-63 is the sleeve. It's very similar to the way the sleeve on the Charles du Blois cotte, at least in so far as there is a vertical seam cutting in two at the elbow.  The funky little gusset at the elbow was giving me fits, I understand why they used gussets at the armscye, but why the elbow?  Maybe whoever made this just ran out of fabric and this is the only way they could cut the sleeves? It wouldn't be unheard of, and it's not like we have a whole heap of sleeves from which to make well-grounded conclusions about tailoring at the time.  Well, I ran across this really great article article explaining the elbow hinge on the Charles du Blois cotte, and had a long conversation with Mathilde, and decided to do the sleeves with all it's gussets intact before I attempted to draft anything out.

Oh boy am I glad I did, and am I glad I went back to the book to check on the grain lines!  For a baggy sleeve, that little gusset makes a huge difference in how the whole thing hangs and how it will ultimately fit.  Because the armscye is so deep, the little tricks used to allow the arm to move in a very tight sleeve are actually needed to keep the whole garment hanging correctly, hence the hinged sleeve construction.  That little extra bit of bias stretch gives just enough movement in the elbow that, along with the added curve from the gusset, the whole sleeve stays in place when you move around even with a great big 25 inch (the same size at the original, the DH fits those measurements almost perfectly) arm opening.  So yay!  It's a very clever bit of shaping, the same sort of thing we do around bust lines today really, only applied to sleeves.  One wonders where all this sleeve fitting brilliance got lost, the way this sleeve is constructed is much more three-dimensional than a modern sleeve pattern, and this much better fitting and more functional.

Thursday, March 1, 2012

Sleeve sources

The sleeves for the 12 Hour dress are really simple - big rectangles with an s-curve cut into the top.  They probably should be a little narrower than they are, as cut there are 2 pleats just back of the top shoulder, which does not seem to be a typical style for women's sleeves of the period (1410 or thereabouts).  Whatever, it's not unheard of and it hangs well, which is really the main thing.

As far as sources, here are two.  There are more, but these are the on-line ones that I used:

April from the Les Tres Riches Heures du duc de Berry :

There is another very similar sleeve, but with dagged edges, in Bibl. de l’Arsenal, ms. 664. fol 47. which I cannot find a picture of to link to.  There is a picture of it here on page 7.

The 12 Hour Gown

Last Thursday I decided to drive up to the DC area for a an event in Fairfax with my laurel's husband.  After going through my pile'o'garb, I decided I didn't have anything to wear that would go with my new circlet and would attempt to make something suitable for an indoor, semi-dressy event on Friday.

So I did.

Picture Project Runway-gone-Medieval style madness, but I did it!  The red wool over-gown was started Friday morning and totally finished less than 12 hours later.  Nothing is glued or safety pined.  Granted, the seams are serged and I already had the base pattern from making the green linen kirtle, but I'm still pretty pleased with myself.  The only visible machine stitching on the outside of the gown are the buttonholes.

Unfortunately I have lost just enough weight since making the kirtle that it no longer supports me the way is should, so the whole thing will need to be taken in a bit sooner rather than later.  Also, the neckline on the overgown needs to come down a bit and I will eventually want to replace the buttons with something a bit more authentic (there are plain silver shank buttons on there now, not terrible but not quite up to standard either).  The green kirtle under this gown is the straight front pattern, which I find to be less flattering on my body than the curved front version.  I think I look about 4 months pregnant in it, no matter what I do to suck in my gut or stand straight.  This doesn't seem to be as noticeable in pictures of the curved front dress, but part of that may also be because that particular gown has a waist seem, which generally has a slimming effect on me at least.   Once I get the whole thing taken in, perhaps it will be a bit more flattering.

Thursday, February 16, 2012

Pouting

I had a very lovely discussion with some fellow weavers at KASF about my need to find a smallish table loom to do sampling on.  It's really a pain to warp up the big floor loom to do a small amount of weaving to test thing like set and thread suitability, especially since there is so much warp wasted on the bigger looms.  Imagine my joy when one of those weavers found a perfect loom, in wonderful condition, for sale near by for a really fantastic price!  And my little business had been doing well enough that I could have totally swung the cash.  Well...then Tuesday I was working away on some cornhole bags (bean bags for the non-initiated/tailgating redneck types, yes I am bitter) and my sewing machine decided to throw a fit.  The tension has gone totally bonkers.  Back to the repair shop it went, only to be told it's pretty well done with it's reliable and useful life.  


The good news is I now have a beautiful new babylock that should last me a good long time, even sewing cornhole bags and other thick fabrics.  The bad news is no loom and no money (anyone need a knitting needle case?)  So I am very sad and sort of pouting about the whole weaving situation, I really was hoping to get started on the Perugia project in the next week or two but oh well.  With some luck I will be able to go visit a friend who has a table loom for a couple of days and do the sampling there.


In the mean time, before the great Sewing Machine Disaster I was able to order all the linen for the DH's new suit of cloths so I can at least get started on that.  With a spanky new machine that will sew things nicely too!  Yay for that!  I've started looking at briaes patterns and images.  The pinboard is here if you are interested in what I'm finding. I'm learning towards a style like that seen at left, which is from Tacuinum Sanitatis (BNF Nouvelle acquisition latine 1673), c. 1390-1400: making millet bread (fol. 56).  Since he will have chauses over these rather than split hose, some extra length in the leg (as opposed to the brief style that you see a bit latter) will be more modest.  The super long ones with the weird floppy legs seem like too much for the poor boy to deal with.  This is a nice compromise.
The plan is to make one pair, make the chauses, see how it all works, then modify the briaes as needed.  He's not a big event-goer but he'll still want more than one set of these.  There are a couple of camping events I can get him to in a year so he needs enough manties to get through a weekend.

Sunday, February 5, 2012

Perugia brainwaves

Yesterday was KASF (Kingdom Arts and Sciences Festival, an SCA event dedicated to all things artsy) and I had the very great pleasure to share my display space with some of my most favorite people from the northern part of the state, who I hardly ever get to see.  We're all apprentices, and all interested in the same things though with a focus on different time periods and geographic regions, so it's always fun to talk and see what we've all been working on.  We're also at different places in our skill sets and research, so it's fun to share sources and help each other out.

Besides, there are only so many people in the world who would get it when you mention that you want to eat a lot beets sometime to see if that really will turn your cloths pink, and not only that but then make plans to try it out with you.

Anyway, I'd been mulling over my Perugia towel project, and one of the women had what may be a solution to the very slow and tedious process of picking up every single blue pattern row with a pick up stick!  And it might actually be period! Opphampta weaving is something she's been doing on her drawloom, but you can do this on a 4-shaft loom like mine with a set of tie-up sticks and a sword. The idea, as far as I was able to gather in looking at the book while at the event, is that you tie up the draft for the pattern section on these supplementary sticks behind the sheds using string heddles. The sticks rest on the warp while you weave the plain weave sections in whatever pattern you are doing, then when it is time to do you damask or opphamta pattern, you pick up the appropriate sticks, slide in the sword to create the shed, throw you contrasting weft, and proceed. No more picking up each row and counting out each row by itself! Yay! Still slower than plain weaving but a whole lot faster than the other way of doing this, and totally within the skill set of the people who wove the original towels. I suspect this will work better for the more geometric designs, which is what I want to do for now anyway, but it could be set up to work for the more complicated patterns too.

 I also got a copy of a whole book dedicated to the cotton industry in Italy from 1100 to 1600 lat week, which I am very excited to start reading.  So far I've only thumbed through it, but it looks like it's well researched and should be an interesting read.  Since cotton was used in these towels, it will be useful to know more about where it came from and how it was produced as I write my documentation.  I'm also hoping to find out how else cotton might have been used during that period.  From my thus far very limited understanding, it was fairly expensive stuff, but it was cultivated in parts of the Mediterranean.  And interestingly, according to Marion at The Curious Frau, who is one of the most knowledgeable people about late period German costume out there, cotton was used to make those fun German headdresses that look like a doughnut stuck on the back of your head.

After all this, I still really wish I had an 8-shaft table loom to do some sampling on.  Oh well.  If anyone would like to buy me one...or failing that if you see a good deal on a used one that is somewhere on the east coast, do let me know!

Saturday, January 28, 2012

MOL Band 142 Redux

This particular bit of tablet weaving was really annoying me, I've been getting thing together for KASF next weekend and realized that since I did the snartemo trim for the DH I have not managed to tablet weave anything useable.  Which is just sad and pathetic.  Partly I am afraid of silk, it's expensive though not hard to come by if I order it.  But so expensive!!  And who wants to use up pretty, pretty (and expensive) silk on something that comes out badly?

My Laurel had recently had some good success using bamboo instead of silk for some weaving, it's not quite the same but has a similar hand and drape, so when I was home in November I stopped at Village Spinning and Weaving and got some 10/2 bamboo in a nice reddish brown color.  At $14 for 900+ yards, that's a pretty good savings over a similar amount of silk.  I've got plenty to play around with and screw up. So last night I warped up enough to give the MOL 142 band another try.  This was supposed to be a fillet, to which I will eventually sew some nice pewter beads which look like belt fittings, much like the original once had.

Well, after weaving a few inches I can safely say my problem with the first band was most definitely the stupid cotton!  Getting a neat selvedge without weird little lops poking out just wasn't working before, and now it's not a problem.  The whole thing is much smoother and neater and overall I am a lot happier with how it's looking.  Suffice it to say, I'm going to have to get more of this stuff for playing around when I am afraid of the silk.  And I'm not a lot less hesitant to warp up some double face trim, to get started on that project and make a pair of garters!  Yay for progress!

I'll post some pictures of the new band once I have a bit more done.  It's only going to be long enough to go around my head so I don't expect it to take too long to do.

Friday, January 27, 2012

Perugia towel research

I'm finally starting to make some headway on my long-delayed Perugia towel project.  This is a Very Good Thing Indeed, as I think it will be a fun challenge and produce something useful and (hopefully) beautiful in the process.

I'm starting to compile my visual sources on a pintrest board, a new (to me anyway) tool that I find wonderfully useful for this sort of research and also totally addictive.  What a great way for visual people like me to keep links organized!  Hurray!

Anyway, I did the indigo dying for the cotton contrast bands yesterday with very good results.  The blue came out nice and bright and even, so that's ready to go.  I have 3 tubes of 40/2 linen ready to go, which should be more than enough for one napkin sized towel.  I'm just starting to wonder if the 40/2 is too small.  20/2 is definitely too big, but I can't seem to find anything in between.  Last year I was given a tube of what I think is 30/2, but I'm not sure and can't find more anywhere anyway.  Gah.  Hopefully the 40/2 will work, that's the best I'm going to get.  Having to work at 48 EPI or small is a little terrifying, especially when I get to thinking about the pickup part (the blue bands are all done with a pickup stick, by hand), but this is supposed to be a challenge after all.

If you are at all interested in these towels, here are some on-line sources that might be of use to you:

http://larsdatter.com/perugia-towels.htm - tons of links to extant towels and art work with towels in it
Perugia Towels - a blog about Perugia towels and the weaving techniques used to make them.  Lots of useful information
Bibliography of Sources - Thora Shaprtooth's bibliography of sources on Perugia-wares.  Very helpful.
Affordable reproductions from Historic Enterprises.  Sort of makes me wonder why I want to make my own sometimes...

Thursday, January 26, 2012

A&S 50: 47- Indigo dye silk and cotton - modern method


Fibers before dying

Picking up where I left off with my last attempt at dying with indigo (working with wool and linen), I decided my next attempt should focus on cotton and silk fibers.  The cotton will eventually be used as the pattern weft for a Perugia towel and the small amount of silk will probably be used for some tablet weaving experimentation.

As has already been discussed, indigo is a close chemical relative of woad, one of the earliest known dyestuffs used in Europe.  It is unique in the universe of dyestuffs in that it requires no mordant to produce bright, colorfast shades of clear blue.  This makes the dye process relatively simple, in that the fibers to be dyed require no pre-treatment, however development of the dye vat can be a very complicated process as all oxygen must be removed from the water in order for the indigo to process and adhere to the fibers.

Having attempted to use a chemical-free method of developing the vat and failed miserably, this time around I opted to use the simpler, modern method relying on color run remover.  While not a period process, this poses several distinct advantages; first the smell is limited to that given off by the indigo alone, and second the dying entire process can completed in a few hours rather than a few days, thus further limiting the unpleasant smells.  I can finish my dying and air the house out while my husband is as work, and he will be none the wiser to the day’s noxious activities!  (Did I mention the indigo stinks?)

Stinky, stinky indigo paste
The process:


Materials:


  •   A total of 8 oz of fibers (I dyed 2 oz of cotton, .5 oz of silk, and approximately 4 oz of handspun alpaca and still had usable dye in the vat)
  •   10 grams indigo, ground as finely as possible (my indigo is in chunk form so I ground it myself in a morter)
  • 1 tsp washing soda
  •    1 oz color run remover
  •   Small jar
  •   A crock pot that will never ever have food in it again
  •   Spoon


"bloom" of scum after vat has processed

I set fibers to soak in warm water.  While fibers were soaking, I ground my indigo and added it to the washing soda in a small jar.  I mixed this with a small amount of boiling water to make a paste and stirred to dissolve all the particles.  I then added water to my crock pot sufficient to cover half my fibers at a time and the color run remover and set it to “low” to warm up.  Windows were opened and the kitchen fan was turned on to start airing thing out as the indigo stink was already getting bad.

After 30 minutes, I added the indigo to the crockpot carefully, trying not to introduce any air bubbles in the process.  There was grit in the bottom of the indigo jar, so I spooned a bit of the dye vat water into jar to get this out and added it to pot.  I gave it all a gentle stir, and let the whole thing sit for 45 minutes to develop.

A thick scum of indigo had formed on top of my vat so it was difficult to tell if the dye has turned the greeny-yellow I was looking for, but with some gentle poking it looked all right.  This bloom of scum is apparently normal and cannot be avoided.  Not sure how the dye book authors get their nice clear vats for the pictures, but there you go.  The cotton and silk went in first and set for 20 minutes.  They came out beautifully, with a deep rich blue on the cotton and a vibrant blue on the silk.  I had a few white spots where I had tied my skeins too tightly, but I repositioned the knots and dip dyed those sections for about 10 minutes and the skeins are more even now.
Finished yarns, alpaca, cotton and silk

The alpaca went in for 20 minutes after the cotton and silk were finished and came out a grayish blue.  This is I think because it started out a natural tan color rather than white.  Again, the take up was a little sparse where I had tied the skeins too tightly.

Learnings:
  • I need to tie my skeins more loosely to get more even dye take up
  • You can stir the vat!  Just really really carefully
  •  Indigo stinks, did I mention that already?


Sources:

Dean, Jenny.  Wild Color.  Watson-Guptill Publications, 1999.

Bingham, Gayle.  Woad Dying.  Medieval Textiles issue 29. Sept. 2001. (http://www.elizabethancostume.net/dyes/medtex.pdf) Last visited Nov. 18, 2010

Kolander, Cheryl.  Dying with Indigo – Natural Fermentation Vat.  (http://www.aurorasilk.com/info/indigo_tutorial.shtml) Last visited Nov. 18, 2010.

Priest-Dorman, Carolyn.  Colors, Dyestuffs, and Mordants of the Viking Age: An Introduction
 (http://www.cs.vassar.edu/~capriest/vikdyes.html) Last visited Nov. 18, 2010.

Wednesday, January 25, 2012

A project for the DH

The DH does sometimes come to events.  Not often, and mostly local ones, but he does come with me.  So he needs cloths to wear that meet my own personal standard of authenticity but also don't take up so much of my time and precious fabric that I resent them not getting worn very often.  Or as often as I would like them to get worn.

Image after Norlund, from M Carlson
Anyway, he came with me to our local 12th night celebration this weekend, and something about that event and my glee at receiving my fabulous turn shoes in the mail has got him wanting new cloths to wear.  He wants a G63.  For those of you not familiar with this term, this refers to a specific men's garment dug up in Greenland that dates to the later part of the 14th century.  This is fine with me as it fits in well with my own persona and most of my own garb, and it's a garment I've been wanting to make anyway.  Plus he will look good in it.

I'm wondering though, there is some weirdness with the sleeve shaping, namely a (seemingly) random vertical seam at the elbow and triangular elbow gore filling out a space where the bottom half of the sleeve is not quite as wide as the top half.  There is also the usual gore at top of the sleeve typical of the Greenland gowns.  I'm wondering if this elbow seaming has any actual purpose or was done due to fabric constraints?  It's a pretty full sleeve so I don't think the elbow gore is there for movement, besides which it's the wrong shape, or at least appears to me.  If I have the right sized fabric, would it be wrong, from an authenticity point of view, to simplify this by eliminating the elbow piecing and making this a two-piece sleeve like all the others?

At least he's willing to wear proper chauses and braies with this thing, that makes it so much more fun me!  I've got to find him some better shoes though.  Ordering some off-the-shelf probably won't work to well for him though as his feet are quite wide and all the turnshoes I've found so far run a little narrow.  We'll figure something out I'm sure.

Saturday, January 21, 2012

A&S 50: 43 MOL band 142


The original band fragment was found attached to a plaited hair piece and would have been used in styling the hair.  The silk band shows evidence of having had metal plaques or other ornaments sewn on to it on intervals.  The band would have been worn with the artificial hair hanging down the sides of the face in looped braids, a fashion popular in the 1340s.

The structure of the band closely resembles plain tabby weave.  This effect is achieved by threading the tables through two holes diagonally opposite each other and turning the cards ¼ turn, alternately turning the cards forward and backward  The original was 26 tables wide, with two edge tables on either side threaded through all four hole S-direction.  These edge tables were turned continuously forward.  The band was woven in plied silk and measures 10 mm in width with 46 weft picks per centimeter.

My first attempt at this band was done in purl cotton using 26 tablets.  The turning pattern is quite simple however I found the thread to be quite difficult to work with.  I was never able to get an even selvedge or anything close to the dense weft pack seen in the original band.  After much wringing of hands of gnashing of teeth, and some consultation with more experienced tablet weavers, I determined that the difficulty lay in my choice of fibers.  The cotton is simply too sticky to work well with this particular weave.  I was able to weave enough of the band to get a general idea of what the weave looks like, but will need to use silk or something with a softer hand if I wish to make any useable length of this band.
Sources:

Crowfoot, Elizabeth.  Textiles and Clothing, c.1150-1450 (Medieval Finds from Excavations in London).  Boydell Press, 2001.

Crocket, Candace.  Card Weaving.  Interweave Press, 1991.

Lewins, Shelagh.  The Ancient Craft of Tablet Weaving:  Getting Started (http://www.shelaghlewins.com/tablet_weaving/TW01/TW01.htm)  Last accessed Nov. 18, 2010.

Gaslee, Sarah.  Basic Tabletweaving.  (http://www.stringpage.com/tw/basictw.html) Last accessed Nov. 18, 2010.

Friday, January 20, 2012

A&S 50: 33-Rosette Twill


Twill and its variants make up nine of the sixteen mostly commonly found textiles identified in Bender-Jorgensen’s North European Textiles Until AD 1000.  In my continuing effort to understand weave structure and improve my weaving skills in an historical context, exploring some of these twills presented an excellent challenge.  The rosette twill in particular appealed to me as both a technical challenge, and an attractive and appealing pattern.

For this project, I decided to make napkins using two colors of weft on the same warp.  Using ivory cottolin warp set at 24 ends per inch, I wove two lengths of the same pattern using tan weft and light green weft.  Unlike some of my previous twill experiments, this time I used a floating warp to ensure a neat selvedge, which was a big help.
  
Learnings:
  •  Floating warps really do make a huge difference!  My selvedges not only are free of the weird floaters I was getting on the Greenland twill, but they are much more even.  It took some getting used to and slowed me up a bit at first, but once I got used to working with them it was worth the extra effort.
  • Patterns like this are far less forgiving of mistakes in tredling than plain twill.  You can see every little mistake.  My usual strategy of warping up twice what I actually needed too to get two usable napkins proved to be a good one here, as I had quite a few tredling mistakes at the beginning.
  •  I need to do some work on color combining.  I was surprised that the tan and cream pattern had better contrast that the green and cream.  This is not at all what I would have thought would have happened.  I suspect that doing white-on-white would have a better effect that I had initially thought as well, given how nicely the cream/tan combo came out which bodes well for my Perugia project.
Sources:

Bender-Jorgensen, Lise.  North European Textiles until AD. 1000.  Aarhus University Press (December 1992)

McKenna, Nancy.  Medieval Textiles: North European Textiles (http://www.medievaltextiles.org/lbj.html) Last accessed Jan. 19, 2011

A&S 50: 14 Learn Fingerloop Braiding


Fingerloop braiding is a method of weaving narrow braids or cords using loops, or bows, of thread held on the fingers.  This method of making cords reached its height of popularity between 1200 and 1600 in Europe, but fingerlooped cords were used much earlier and continue to be used in some parts of the world today.  In the middle ages, fingerlooped cords could be found on a wide range of objects, from purses to hairnets to seal tags.  As these cords are so useful, particularly for closing pouches and the fronts of supportive gowns, I decided that it behooved me to learn to make at least a few of the simpler sorts of fingerlooped cords.

Using the naming conventions from Tak V Bowes Departed I have attempted and am now reasonably comfortable with five different fingerlooped cords, “A Lace Baston,” a two-colored cord from the Harley manuscript dating to 1475, “This Flat String,” another two colored cord from To Make Pursestrings dating to c. 1600,  “Two Strings at Once” also from Harley, “A Broad Lace of V Bowes,” from Harley, and “Round Lace of V Bowes” from Harley.  All are distinct, with the except of the Lace Baston and the Round Lace of V Bows, which are worked in exactly the same manner save that the Lace Baston used departed bowes, that is bows in which two colors have been joined together.  All of these cords use only five bowes.

More complex cords are possible and many are described in the extant braiding manuals which use more than five bowes, some of which require two people to manipulate the bowes.  I have not yet attempted any of these more complex braids but am looking forward to finding a braiding partner so that I can give some them a try!

Learnings:
  • Braiding is not that hard once you get into the rhythm of it
  •  Small dogs and fingerlooping do not mix at all well.  Nor do curious cats
  • The phone will inevitably ring in the idle of a long braiding session
  • You can make much longer cords by working your braid from the middle of the bowe.  It’s not as scary as it sounds, it just takes some time and patience to sort out the bowes when you start back up from the center to work in the opposite direction.  Your mileage may vary working on more complex braids but it works well with these five simple ones.  This could be avoided if you had a second person to tighten up the braiding for you with a sword beater or some kind as you worked


Sources:

Benns, Elizabeth et. al. Tak V Bowes Departed.  Soper Lane. London, 2006.

Crowfoot, Elizabeth.  Textiles and Clothing, c.1150-1450 (Medieval Finds from Excavations in London).  Boydell Press, 2001.

Goddard, Andy.  Fingerloop Braiding (http://www.bumply.com/Medieval/braiding01.html)

Priest-Dorman, Carolyn.  Sample Fingerlooped Braids from a Fifteenth-Century Manuscript (http://www.cs.vassar.edu/~capriest/fingerloop.html)

Goslee, Sarah, Fingerloop Braiding (http://www.stringpage.com/braid/fl/fingerloop.html)

Swales, Lois et. al.. Fingerloop Braids. (http://fingerloop.org/)

Monday, January 16, 2012

The finished Venetian Coat and 12th Night report

Here it is, in all it's glory!  Overall, I'm pretty happy with how it turned out.  For a weeks worth of work, it's not too bad.  There are some minor tweaks with the fit I would like to do, and had I had more time I probably would have done a few things differently (doing a full lining for one thing, and side splits for another) but it looks good and the client was happy was happy and comfortable, which is the main thing.

12th Night was quite a bit of fun.  I was a little worried about the drive down there, I have not been a car for that long since my surgery in August, but I was ok coming and going and am only a little sore today.  Given all the walking we did on Saturday and how cold it's been, that's not surprising at all.

There were quite a few more merchants there this year than last, which was really a nice surprise.  Eadric the Potter was set up, and I got a really beautiful 14th century ceramic cookpot for camp.  Eadric does amazing work and is very knowledgeable, if you are not familiar with what he does you should check our his website and his Etsy shop.

I also found a new guy to buy reasonably priced reproduction buckles from!  Hurray!  Thorthor's Hammer does lovely work, and as I said is quite reasonably priced, which is novel for metal workers in this area.  I got a really pretty little heart shaped annular brooch for $8.  Score!  Plus he has fibulae for Roman that don't cost an arm and a leg, so I will be able to replace the buttons on my tunica exterior.

Aside from shopping, I did enter my Eyelet Brick Stitch bag of Doom into the A&S display, along with the lampworked rosary, neither of which had made it to 30 Year or WOW last year.  It was a little hard to watch people Picking Up The Bag (!!!) but nice to see that they appreciated the work that went into.  I was awarded a silver nautilus in evening court for it too!  For those of you not in Atlantia (or in the SCA) this is an arts and sciences award given out for an extraordinary achievement in the arts.

Now I've got to get myself together to KASF, it's only 2 weeks away! Gah!  I'm not making anything new, or competing, but my display is a mess.  I need to get organized and make sure I have all my A&S 50 stuff in some kind of order.

Thursday, January 12, 2012

Coat Progress and new costume resource

The coat and camica are done!  Yay!  The client came last night for a fitting last night and the coat itself fit well and she was quite happy, but I had failed to up underarm gussets in the camica, which turned out to be desperately needed, so I put those in this morning.  That's what happens when you make a thing in 3 days with no chance for a fitting.  It's much better now, and we were able to get it placed well enough to see that the neck draping will work perfectly.  I may actually have the neck a little too wide, but that should be easily solved with a few pins.  It will work out perfectly if she ever decides to do an actual Italian gown.

Sadly, in the joy of finishing the blasted project, I failed to take a picture.  Not that it fits properly on my dress form anyway, about the only thing that would would be a costume from Downton Abby.  I will get a picture of the whole thing this weekend though.

In other later-period costuming news, Kendra at Demode posted yesterday about a fantastic resource for those of you/us interested in 16th century costume.  She found a scanned PDF of a book by Lucas de Heere with some really fantastic illustrations of contemporary costume, a couple of which I have not seen before (and I have done a lot of research into this period from my Faire days). What's really great about de Heere is that he's drawn common people, not just the aristocracy.

Saturday, January 7, 2012

Turkish Coat Progress!

The coat is coming along nicely!  Last night I did the fitting and everything fit, which was a relief.  Not that I don't trust my measuring and patterning skills, but it's always a bit scary when there is so little time to fix major problems.  The sleeve looked great, I am very glad I went with the more fitted shoulder and sleeve shape.  I think it will make a huge difference in the overall look of the finished coat, especially in the fabric, which is rather on the stiff side.

So, today I put the rest of the coat together, got the button holes made (by machine, I really think they should be button loops but I don't have time to make them that way), and tonight I will be doing the hand sewing.  I have to sew on the trim, finish sewing on the buttons, and sew the hem.  Not so bad really.

I am sort of debating about the trim.  There is not enough the gold and pearl trim to do the fronts, but I can use it for the sleeves.  I have plenty of the gold giump style braid, but it's a bit plain for the brocade.  Either way, the fabric is rich enough (the pictures don't show it off too well) that the trim will just finish off the edges and add a bit of depth to the whole thing.  I can't decide if I should just use the braid, or go ahead and use the pearl trim on the sleeves and the braid on the coat neck and down the front.  I think using both might look a little funny, especially with the richer trim on the sleeve where it won't be as noticeable.

Any ideas?

Friday, January 6, 2012

New turn shoes

My 12th Night present to myself arrived today - a pair of brand new bright red 14th century styled turn shoes! yay!  This is my first pair of proper turn shoes and I do think they are going to take a little getting used to and breaking in, not having any arch support in the shoe to speak of is quite different than modern foot wear, and the bottom is very slick.  Without the usual rubber bit on the heal of modern shoes, this might get tricky on carpet on certain linoleum floors.  I ordered them from revival.us and am very happy all around.  I think the color will look smashing with my green hose and blue garters!  Now I just need to find/make/find someone to make for me some wooden pattens and I am all set.

Not much else going on to report...I made very little notable progress on the Turkish coat yesterday.  I've decided to go with the Greenland/grand asiette style sleeve, as this makes more sense to me and will look better.  The sleeves are cut, I've got the sleeve opening cut, the facings (I'm not lining the coat, it's made from upholstery polyester and she will roast to death with a lining, I did not pick the fabric) are attached and sewn down.  Tonight I will fit the coat and figure out where the side gores need to be, tweak the waist and side seams, and mark the hem and hopefully finish this thing over the weekend.  Then I can make the camica and be done!  Hurray!  Oh...the trim.  There is trim.  And buttons.  Which I do not have yet.  Sigh.  It's always something.

Thursday, January 5, 2012

Venetian Coat Sleeves

Work is coming along on the Venetian coat.  I've got it cut out (always an important first hurdle to overcome) and the center back gore is put in.  I went with a basically rectangular construction, based on the pattern for Ottoman style coats given at the Renaissance Tailor because this seems plausible and I don't really have time to do a great deal more research.  I did however skip the weird underarm gore thing, partly because I don't have time to figure this out and also because it does not make sense that this is how the Venetian version of the coat would be cut.

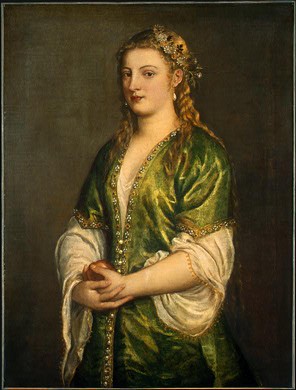
Here is my thinking...the lady in the Titian portrait is clearly NOT wearing actual Turkish clothing.  The fabric is plain satin, which as far as I know was not a big thing in the Ottoman Empire at the time, the trim is wrong, and the fit is more constructed that what you see in the few illustrations of contemporary coats I've looked at.  So, my thought is this is an Italian interpretation of what the Ottoman's wore, and thus cut more like Italian cloths. Given that, I've cut the body of the garments in two rectangles with triangular gores at the sides and center back, which squares with how similar robes are cut in Janet Arnold (sort of, it's at least plausible and makes good use of the fabric).

Which brings me to the sleeves and upper body.  The original coat the lady I am making this for made is cut just like your basic early period tunic, with honking big gores under the arms (see the picture).   This is all well and good, but produces a much looser look around the upper body than you see in the Titian painting, and as far as I know wasn't a commonly used construction method in the 16th century.  So...what to do?  A shaped armscye?  Something more like the grand asiette style sleeve I've used in my fitted gowns, but looser fitting?  Clearly some sort of set in sleeve is called for, the question is weather I want/need to use the gore in the back, and how set in it should be.


Monday, January 2, 2012

Acid dye fun and Venetian dresses

So acid dye is Not Period, but I went and saw the Muppets and got inspired by all the fun Muppet-colored dye possibilities.  Multi-colored rovings always remind me of Fraggles for some reason actually, usually not in a good way, but I think these turned out pretty well.  For my first attempts at dying roving anyway, I'm pretty happy with the results.  I think they will spin up into nice, good-Fraggle looking yarns.

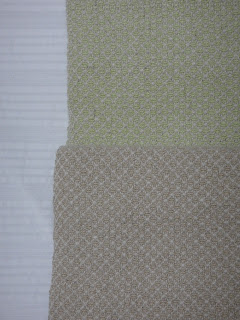
I've got a total of 8 ounces in the each colorway, so there should be enough to so something of real significance with either color.  Not a sweater, my dye pots aren't large enough for sweater quantities of roving anyway, but scarves and mittens and hats and things are certainly workable.  Next up, more indigo!  I need to do some cotton for my long-delayed Perugia towel project and some silk to compare the results.

In sewing related news...not much going on other than knitting needle cases and bags, but I am working on a Venetian Turkish coat thing for our local Baroness for 12th Night.  It's all a bit last minute, but I think it will turn out nicely.  The only thing I'm a little worried about is the camica layer.  I think (?) it's just a regular old camica, but I have not done a lot of research on 16th century Venetian clothing so I'm not really sure how this should be cut so that it's reasonably correct, looks like the picture, and will not result in any unfortunate wardrobe malfunctions (mostly the last one).

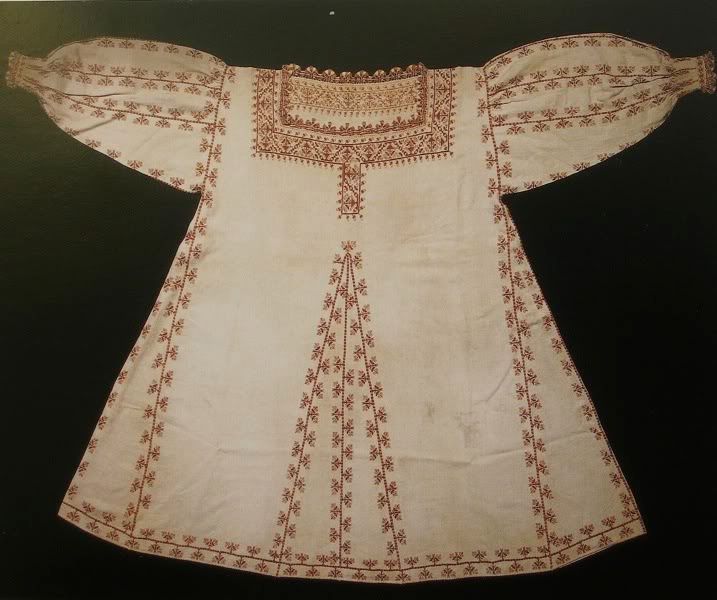
I know there is a surviving Tuscan camica from the same period that is square-necked and cut roughly the same way as your basic tunic, but with but pooffy sleeves.  This seems like it might be a good way to go.  The Titian painting does not seem to show a heavily gathered (or gathered at all) neck line on the camica, just some loose drapes as though the shoulders are pulled up further than they are meant to sit.  With the squared neck and some judicious pinning to avoid any unfortunate and untimely slippage, I think the right affect could be achieved.  

Tuesday, December 20, 2011

*ded*

Somehow or another I have managed to actually start a very small, itty bitty business!  And the Christmas rush has been driving me nuts!  That's what they don't tell you about working for yourself...it's all "you can set your hours" (not mentioning that they will be 7 days a week) or "you can work in you PJs" (because you won't have time to put on real pants).  November was a good first month, December has been even better, and I'm hoping to keep the ball rolling into the New Year now that I have some product ideas that people seem to actually want.  Yay!

Not that this has anything to do with this particular blog.  :)  Except that I am thinking about doing some hand dyed rovings, so that's sort of relevent.  Kind of.

Anyway...I am exhausted!  And totally ba-humbuging the whole holiday thing.  Tomorrow should be the last day for orders I *must* get mailed, so then I can rest a little, maybe bake some cookies and try to get into the Christmas spirit, or at least into the I-don't-want-cry-I'm-so-tired spirit.  Then maybe, just maybe, I will have time to actually make something new for 12th Night. 

I ordered some really gorgeous new wools from Fabric.com last week (? I think?) when they were on sale for $4.99 a yard.  Of course, I feel so fat and repulsive right now, the idea of making a dress out of such pretty fabric seems terribly wasteful, and I do have my blue linen houp I can wear.  Maybe with the new hat I've been planning. 

We'll see.

First, a nap.  And some eggnog, heavy on the rum! :)