Showing posts with label dyeing. Show all posts

Sunday, May 17, 2015

Silk Banners! Or, this Oda Cannot Draw a Straight Line


Yesterday I spend the afternoon with a couple of SCA friends (my former peer and her husband) working on a new silk banner.  To be strictly correct, it's currently my ONLY silk banner, they were working on replacing/augmenting their current silk banners.  Always nice to have someone who knows what they are doing when you doing something like this for the first time!

The motto translates as Shadows Pass, Light Remains.
A good reminder for me right now, and it reminds me a little
of the Litany Against Fear from Dune
We made large silk pennons which we will probably fly from our pavilions or from poles next to them.   I'm not 100% sure that silk painting in this manner is strictly period, but from what I've been able to fine the style of banner is and the idea of painting fabric to make a banner of some sort is, and this being the SCA no one seems much to care beyond that.  The silk looks lovely fluttering in the breeze and is actually very easy to paint with modern silk painting materials.

There are a number of good websites on how to do these types of banners.  It's a lot of fun and quite easy to do.  The most difficult part is stretching the silk.  We have two styles of frame to start with, one of wood and another of PVC with integrated legs.  Even with the legs, the PVC was much less expensive to construct, easier to build and move around, more adjustable, and easier to store.  The silk was cut to something close to size, attached with rubber bands and large safety pins (though you could also sew it on to the frame the way you attach fabric to an embroidery frame) and you are ready to go!

We also found it helpful to have several yard sticks (and a couple of old leese sticks, we're all weavers so these are plentiful) to support the paper we had drawn our designs on while tracing with the resist and to rest our hands on while painting.  Unfortunately I didn't take in-progress photos but again, there is a lot of good information out there.

Overall I am really happy with how this turned out.  The wool combs from my arms could stand to be a little larger, and there isn't a straight line to be found, but once flying in the wind no one will notice. There are also a couple of small drip spots and bleed overs, but again you can't see them from a distance.  We found that the darker colors covered up the light color drips/bleeds very well, and that once one color dried it created a bit of a dam for the adjacent colors.  Not as good a break as the resist, but it worked pretty well.

I'll be doing wool applique for my next banner project.  I know that both methodology and application are correct for my time period in this case, and it will create a heavier piece suitable for hanging on the wall of my tent or displaying as an actual banner with all the necessary hoists and supports.

Some resources:
Midrelm article on Banners, Standards and Pennons
How to Paint Silk Banners (PDF file, very good instructions!)
Flags and Banners in the SCA (another PDF, great overview of various shapes)
Dharma Trading Co. (for all the supplies!  Great place to get Dynaflow paints, gutta resist, and even silk to make your banner, plus lots of instructions on how to use whatever products you choose.  We used these paints - http://www.dharmatrading.com/paints/dye-na-flow-fabric-paint.html)

Thursday, January 26, 2012

A&S 50: 47- Indigo dye silk and cotton - modern method


Fibers before dying

Picking up where I left off with my last attempt at dying with indigo (working with wool and linen), I decided my next attempt should focus on cotton and silk fibers.  The cotton will eventually be used as the pattern weft for a Perugia towel and the small amount of silk will probably be used for some tablet weaving experimentation.

As has already been discussed, indigo is a close chemical relative of woad, one of the earliest known dyestuffs used in Europe.  It is unique in the universe of dyestuffs in that it requires no mordant to produce bright, colorfast shades of clear blue.  This makes the dye process relatively simple, in that the fibers to be dyed require no pre-treatment, however development of the dye vat can be a very complicated process as all oxygen must be removed from the water in order for the indigo to process and adhere to the fibers.

Having attempted to use a chemical-free method of developing the vat and failed miserably, this time around I opted to use the simpler, modern method relying on color run remover.  While not a period process, this poses several distinct advantages; first the smell is limited to that given off by the indigo alone, and second the dying entire process can completed in a few hours rather than a few days, thus further limiting the unpleasant smells.  I can finish my dying and air the house out while my husband is as work, and he will be none the wiser to the day’s noxious activities!  (Did I mention the indigo stinks?)

Stinky, stinky indigo paste
The process:


Materials:


  •   A total of 8 oz of fibers (I dyed 2 oz of cotton, .5 oz of silk, and approximately 4 oz of handspun alpaca and still had usable dye in the vat)
  •   10 grams indigo, ground as finely as possible (my indigo is in chunk form so I ground it myself in a morter)
  • 1 tsp washing soda
  •    1 oz color run remover
  •   Small jar
  •   A crock pot that will never ever have food in it again
  •   Spoon


"bloom" of scum after vat has processed

I set fibers to soak in warm water.  While fibers were soaking, I ground my indigo and added it to the washing soda in a small jar.  I mixed this with a small amount of boiling water to make a paste and stirred to dissolve all the particles.  I then added water to my crock pot sufficient to cover half my fibers at a time and the color run remover and set it to “low” to warm up.  Windows were opened and the kitchen fan was turned on to start airing thing out as the indigo stink was already getting bad.

After 30 minutes, I added the indigo to the crockpot carefully, trying not to introduce any air bubbles in the process.  There was grit in the bottom of the indigo jar, so I spooned a bit of the dye vat water into jar to get this out and added it to pot.  I gave it all a gentle stir, and let the whole thing sit for 45 minutes to develop.

A thick scum of indigo had formed on top of my vat so it was difficult to tell if the dye has turned the greeny-yellow I was looking for, but with some gentle poking it looked all right.  This bloom of scum is apparently normal and cannot be avoided.  Not sure how the dye book authors get their nice clear vats for the pictures, but there you go.  The cotton and silk went in first and set for 20 minutes.  They came out beautifully, with a deep rich blue on the cotton and a vibrant blue on the silk.  I had a few white spots where I had tied my skeins too tightly, but I repositioned the knots and dip dyed those sections for about 10 minutes and the skeins are more even now.
Finished yarns, alpaca, cotton and silk

The alpaca went in for 20 minutes after the cotton and silk were finished and came out a grayish blue.  This is I think because it started out a natural tan color rather than white.  Again, the take up was a little sparse where I had tied the skeins too tightly.

Learnings:
  • I need to tie my skeins more loosely to get more even dye take up
  • You can stir the vat!  Just really really carefully
  •  Indigo stinks, did I mention that already?


Sources:

Dean, Jenny.  Wild Color.  Watson-Guptill Publications, 1999.

Bingham, Gayle.  Woad Dying.  Medieval Textiles issue 29. Sept. 2001. (http://www.elizabethancostume.net/dyes/medtex.pdf) Last visited Nov. 18, 2010

Kolander, Cheryl.  Dying with Indigo – Natural Fermentation Vat.  (http://www.aurorasilk.com/info/indigo_tutorial.shtml) Last visited Nov. 18, 2010.

Priest-Dorman, Carolyn.  Colors, Dyestuffs, and Mordants of the Viking Age: An Introduction
 (http://www.cs.vassar.edu/~capriest/vikdyes.html) Last visited Nov. 18, 2010.

Monday, January 2, 2012

Acid dye fun and Venetian dresses

So acid dye is Not Period, but I went and saw the Muppets and got inspired by all the fun Muppet-colored dye possibilities.  Multi-colored rovings always remind me of Fraggles for some reason actually, usually not in a good way, but I think these turned out pretty well.  For my first attempts at dying roving anyway, I'm pretty happy with the results.  I think they will spin up into nice, good-Fraggle looking yarns.

I've got a total of 8 ounces in the each colorway, so there should be enough to so something of real significance with either color.  Not a sweater, my dye pots aren't large enough for sweater quantities of roving anyway, but scarves and mittens and hats and things are certainly workable.  Next up, more indigo!  I need to do some cotton for my long-delayed Perugia towel project and some silk to compare the results.

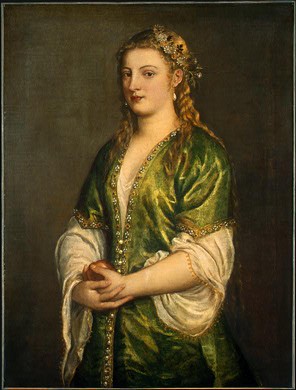
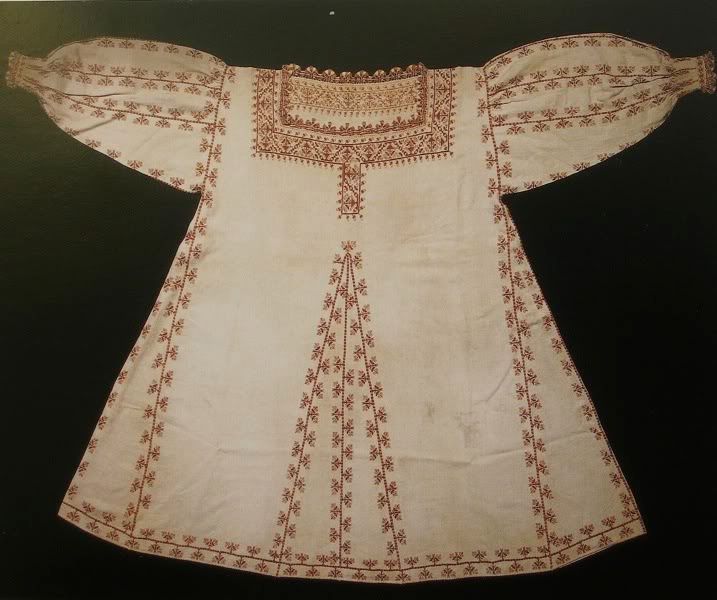
In sewing related news...not much going on other than knitting needle cases and bags, but I am working on a Venetian Turkish coat thing for our local Baroness for 12th Night.  It's all a bit last minute, but I think it will turn out nicely.  The only thing I'm a little worried about is the camica layer.  I think (?) it's just a regular old camica, but I have not done a lot of research on 16th century Venetian clothing so I'm not really sure how this should be cut so that it's reasonably correct, looks like the picture, and will not result in any unfortunate wardrobe malfunctions (mostly the last one).

I know there is a surviving Tuscan camica from the same period that is square-necked and cut roughly the same way as your basic tunic, but with but pooffy sleeves.  This seems like it might be a good way to go.  The Titian painting does not seem to show a heavily gathered (or gathered at all) neck line on the camica, just some loose drapes as though the shoulders are pulled up further than they are meant to sit.  With the squared neck and some judicious pinning to avoid any unfortunate and untimely slippage, I think the right affect could be achieved.  

Wednesday, May 18, 2011

Madder dying results, and fun with fire

Here are the results of my latest attempts to dye with madder:

The small skein in between the silk and the wool is from the original, pickle-tainted attempt, to show the differance in color.  It's actually pretty close to how the skeins came out of the dye pot, so I'm thinking the pickle jar ended up not making that big a difference in the end.  I did end up using an iron modifier on the wool, just briefly, as they skeins came out pretty bright and orangy-red to begin with.  The color is a sort of terracotta/rust red now, which is pretty but still not quite what I was going for.  I will be able to wear it as a flat cap though, with a buffer of linen cap, which is the main thing.

So, I am no closer to understanding how to get a true red from madder.  It may be that with alum, you just don't get a true red, more of an orange based red.  Maybe I need to change my mordant?  Possibly it's the water from my tap and I need to check the Ph and/or mineral content there?  Or maybe I'm doing something wrong?  I kept the temperatures low, and according to my book if it had got too high the color would have gone dull, which it certainly did not, so I'm pretty sure that wasn't my problem.  Maybe madder just gives you an orange based red and I need to accept that?

The yarn ended up fulling a bit in the dye pot as well, which is rather to be expected but a major pain to deal with.  Since there are bit of madder root floating around in there too, they got all stuck to the yarn and it's been no fun trying to wind the stuff into balls.  Maybe less stirring next time?  Though if I stir less, I'm not sure I would get such an even color on the yarn.

I was quite surprised by the color I ended up with on the silk - it's a really pretty champagne/orange, which I like but was not at all what I was expecting to get (the silk did not go in the iron modifier).  The silk will probably get used for some tablet woven garters, which will look lovely in that color.  I'm guessing to get red, or even just brighter color on silk, you need to either use a different mordant or leave it in the dye longer.  Or possibly use a different dye altogether.

And as a total random aside, here are my first six attempts are making lampwork beads.  The seventh bead got stuck on the mandrel and had to be smashed with a hammer.  The process is quite exciting, what with the large flame and all, if a little scary.  Hopefully I will get the hang of the technique well enough to make enough beads for my paternoster project.  These will probably end up on a Viking bead swag (or garland as I prefer to call them):

Monday, May 16, 2011

More Madder

My madder vat is on the stove!  Yay!  After a few of hours of slow simmering, it looks like I'm getting a decent red this time, rather than the orangey color I got the first time I tried dying with madder (the result of soaking my root in a plastic jar which had previously been home to pickles).  The silk I threw in for good measure is orange though.  Sort of a brownish orange, heading towards salmon, but still orange.  I'm not really sad about this, I suspect the silk would take the color differently but I'm surprised.  It guess that explains the difference in some of the period dye recipes for silk (duh), many of them add other dyestuffs to get a good red, or don't use madder at all.

I've got the let this first round got for awhile longer yet before I know how good a red I've got on my wool.  Depending on the orange tones, I may try a little bit of an iron modifier on the wool.  It's destined to be a flat cap and the trim band on a pair of mittens, both of which I hope to be able to wear.  Since I will have at least a linen cap on between the flat cap and my face, I can stand a little orange in the red, but the super orange I ended up with last time is really not flattering at all.  According to my dye book, I should get a nice tone with the iron and lose most of the orange.  We shall see. 

I have 12 ounces of oatmeal colored handspun CVM to toss into the exhaust bath once this first round is done.  The current plan is to try that with the mordant-and-dye-in-one-go method and see how that works.  And use the iron for sure on that, just for fun.  I have no particular plans for that fiber, it's been sitting around in my pile of spun wool waiting for something so I figured it might get used if I dyed it.

Friday, May 13, 2011

Know thy strength

I got some madder root last night from my laurel to use for a A&S entry coming up at the end of the month, and since I really need to get moving on the project, I started prepping the root this morning.  For those of you not familiar with the madder root dyeing process, the roots come in pretty big pieces which you have to crush up into small bits, so as to expose maximum surface area to your dye liquid, and then soak the little bits for a day or two before you can start dyeing.  Chopping up the roots can be pretty tough business, you have to either grind them up in a food process or use a mortar or something similar.  Some of the larger bits can be really hard to deal with.

One of the larger, tough bits broke my small food processor (it was a P.O.C. anyway, so this is not surprising).  This is what happened after some vigorous smashing with my just-for-dyestuff mortar: