Sunday, June 12, 2011

Banded kirtle

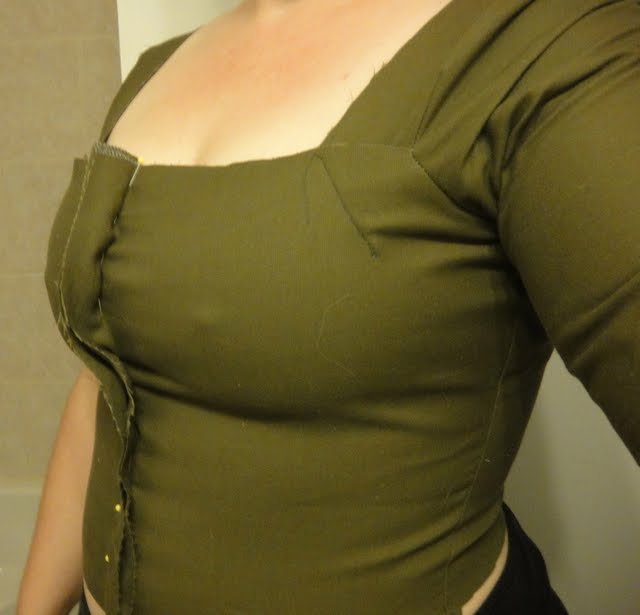
Here is the banded kirtle (or so I've decided to call it) so far.  As was pointed out, the front should dip down a little bit to more closely match at least the air filter hat picture, and probably also the Descent from the Cross gown as well, though that one is at an odd angle so it's harder to tell.  I went with a square neck for this as that will work better under the gown this will eventually go under, and it also seemed a little easier to focus on one point of wierdness at a time (in this case the banding and the sleeve thing). The next iteration of this gown will have the dipped/sweetheart neck, now that I think I have the banding figured out.

You can see on the front that the line from the facing and strap is extending right into the underarm, giving the effect of a raglan seam.  The sleeve is a normal sleeve shape, the trick to the raglan line is lining up the strap with the top facing bit and the armscye just right.  To make that work the front neckline has to be high enough but as it turns out once the girls are lifted up and well-supported the neckline will end up in the right place.

The back did not line up with the top facing quite as well - I need to shift it down to get it to line up right but by the time I realized it was not right fixing it would have been far more trouble than I can go through without extra fabric to re-cut anything if I need to.  I think if I think more about how I put the sleeve and facings and shoulder bands together I could avoid this issue next time, but again you can see where the raglan line is coming from.  It's just the shoulder strap.

Overall, I'm pretty happy with how this has come out.  I still need to do the eyelets down the front and fingerloop a lacing cord, then once I can lace the whole thing up I can level the hem and finish it up.  The strap thing was fairly easy to work out and fit on myself, though it would have been easier to do some of the tweaking in back with an extra set of hands (duh).  One nice thing about this particular design is that you can get a really wide neck and still have useful and secure shoulder straps.  Even with the sleeves in and the skirt on, nothing is shifting around or slipping off and I still have a nice wide, open neckline, which will be nice with later houppelands and early Burgundian styles.

Medieval flashers

One of the things on my list to do before surgery in Septermber (and really, I need to get this done before Pennsic) is make a cloak.  So I was duitifully looking up pictures of ladies matles last night in between eylets, and came across the following page from the Manesse Codex:

If you look closely, you can totally see through the men's tunics. Good thing he seems to have all his proper under things on.

I wonder if they were being presented in a state of semi-undress, or if they really did wear semi-sheer tunics?  Either way, I'm not letting my husband see this one, he doesn't need to get any more strange ideas for hot events.

Saturday, June 11, 2011

Supportive kirtle, attempt 1

In a fit of stubborn productivity, I managed to get my supportive kirtle fitted on myself!  I think I got the sleeve/shoulder strap thing sorted out too.  As you can see from the pictures, I need to rotate the sleeve cap back a little bit and add a little bit of width at the bicep (my poor chubby arms), but other than than I am happy with how everything is looking.  And I can move my arm!  Yay!  This is a huge step up from the last (somewhat) supportive dress I did which had numerous sleeve problems.  It's very hard to get and out of that dress.  This one should be much better.

The diagonal stitching line at the neck edge is where the strap attaches and where the facing will be at top neck edge.  So far, the plan is to attach the facing directly to the bodice.  That should work better than having it stick up from the main body of the bodice, and be easier to put together.  Plus it will serve to reinforce the edge a bit, which is all for the good. A  little more structural integrity at that top edge will help hold the girls in place, not that they are trying to escape or anything  but I'm planning to cook and do work in this gown so the sturdier the better.

My only real issue the whole thing is that I'm still not getting the raglan-ish line under the arm.  I think this might be because my neckline is lower than it should be, but the painting don't seem to be a whole lot higher than I have this in relation to the bust line.  Maybe I need to get the bust higher up for that to work?  The general idea that the underarm seam is somehow extending into the facing seam does seem to play out, if you look at the picture above, the problem is just where the neckline is, which is putting the facing seam lower down.  The back looks right anyway (I couldn't get a good picture of that with me in it).

As far as actually putting the whole thing together goes, I think I will sew the sleeve into the underarm then attach the shoulder straps and facings.  That's going to involve more handsewing in that area than I wanted to do, but it will look neater in the end.  The whole thing is now cut out, complete with trapezoidal skirt pieces and lining.  The plan is get the interior seams on the bodice machine stitched today, tweak the fit, and flat fell the seams by hand before I attach the skirt.  I'll probably just machine french seam the skirt, flat felling seems like overkill.

Friday, June 10, 2011

More kirtle fun

I think I've got the pattern for my supporting kirtle sorted out (all by myself too! yay! And no free-range boobs!) I've decided to give the funky shoulder strap thing I posted about a couple of weeks ago a try, as this is an interesting problem and I really do like the look of the facing/strap/whatever around the neck opening.

I came across this picture which threw a bit of a wrench into things though:
The detail is taken from the Braque Family Triptych, another van der Weyden, dated about 1450.  If you look closely at the shoulder area, it looks like she's working the raglan sleeve seam again, but also a shoulder seam running down the top of the sleeve of the kirlte.  Which is weird.  This funny top seam doesn't extent into the shoulder strap section as far as I can tell, so it might just be some strange piecing in the sleeve?  But there's a bit of white shift poking out, so maybe the kirtle is sleeveless and the seam is the shoulder seam and the strap is just a facing?

As far as the shoulder strap idea goes, that's working out pretty well so far.  I'm actually getting something fairly close to the raglan type line at the underarm, where the armscye scoops up to the strap.  It's not as pronounced on my pattern but if I were to raise to neckline up a bit it would be (or at least it could be if I fiddle with things a bit, I'll take some pictures later once I have things as point where it's descent). 

I'm trying to decide what the best way to attach the facing at the top of the bodice to the strap and the main body of the bodice is - so far the bodice has a smooth line across the top until it dips down for the armscye.  I think the easiest way to attach the straps so it looks neat and like the pictures would be to make up the top facing bit with the straps attached to that and sew them on to the top of the bodice as a single piece to finish the neck, then attach the sleeve.  Or, put another way, treat the band at the top of the bodice as an actual facing and not as an extension of the bodice.  It might be easier to put the sleeve in first, then sew in the facing and the shoulder band.  Huh.  Now I've confused myself. 

Tuesday, June 7, 2011

Largess Napkins

I'm not quite sure what possessed me to volunteer to do this but I've decided to weave a pair of napkins for the Pennsic largess basket this year.  I think I was partly inspired by our kingdom having gotten Caid, which is where I went to my very first ever SCA event back when I was still a wide-eyed high school kid.  So it's a little bit nostalgic, and really, how many napkins do I need? 

The napkins are being woven in cottolin, as I had some and it looks nice and is easy to take care of, in natural and a weird sort of light grass green that I'm really not fond of by itself.  It's working up very nicely though.  I'm still surprised by what colors do when you weave with them.  The draft is the rosette twill from Northern European Textiles (which can be found here).  I'll be writing up more extensive documentation on the draft when I'm done, as this is part of my A&S 50 list too, but so far it's going very well.  I managed to get the loom threaded without any mistakes, and my first attempt at using a floating selvedge is going pretty well (if a little slowly at first).

Here's the start of my actual weaving:
The slight lumpiness in the closeup seems to be resolving itself as I'm weaving, I didn't have my warp under quite enough tension when I started weaving and the result is what you see.  The bit I have woven since I took these pictures is much more even and smooth.  I think once everything comes off the loom and gets washed it will even out just fine.  I have found that I need to be much more careful when I am weaving this as the pattern and colors show mistakes very clearly, and since I'm presenting these to foreign royalty and all we can't have too many obvious errors.  As I did with the elevation towel, I made my warp long enough that I should be able to pick the better of 3 or 4 napkins once I am done though.

It turns out this weave is quite similar to the diamond patterned background used on several of the Perugia towels, so this is turning out to be good practice for my next big project.  Warping up the fine linen for that still scares me a little bit, but I think I can manage.  I just have to find some good movies to watch on the laptop while I'm threading and I'll be fine.

Monday, June 6, 2011

Finished Roman!

I wore the new Roman for half a day at Sapphire last weekend, but it got a proper first-day-out this weekend at our local Baronial Birthday event.  I still need to make a tunica interior, and I think I am going to turn the Pink-Palla-of-Doom I wore at Sapphire with a silk palla.  The smaller silk veil I wore this weekend was much more comfortable and moved better.  Plus I don't look like Hello Kitty Roman Matron.

Overall the gown did very well.  I had some problems with my mamillare (the bust band that keeps the girls from going all free-range on me, like chickens).  I found this page today, which is from a class at Pennsic a couple of years ago, and I think I've been wrapping it backwards.  This morning I decided to test out the start in front method and so far it working much better.  The girls can't get out the top of the band and nothing seems to be shifting downwards, which was the problem over the weekend.  Yay!


For the stolla, I want to get some better hardware for the straps.  The current version just has purchased trim sewn on, some of the artwork looks like there is jewelry of some kind holding the gown together at the shoulders.  One looks like large round buttons or small brooches, which would be a nice option and give me different ways of wearing the stolla since I could pin the pleats however I wanted that day.  The Pink Palla of Doom is going to become a tunica I think, which I could wear as a stolla if I wanted to go the Hello Kitty route.  Once I make a couple of tunica interiors I will have pretty decent Roman wardrobe for those hot humid events!

Friday, June 3, 2011

A&S 50 16: Learn Naalbinding: Oslo Stitch


Nalebinding (or naalbinding) is an ancient form of needlework related to and often mistaken for knitting and crochet. It is worked with a single needle and short sections of yarn which are stitched into looped to form a stretchy, dense fabric quit similar to knitting. Nalbinding was in use in Bronze Age Europe and was used by the Viking to make shoe liners, short socks and mittens.

Several variants of Nalbinding stitches are known to have been used in Viking Age Europe, the simplest of them being the Oslo stitch (so called for an eleventh century mitten worked in this stitch found in the Oslo excavations). This seems to have been a fairly common stitch and at least three extant mittens have been found worked in this manner. As this stitch is fairly simple, was commonly used, and I knew someone who could teach it me, I elected to learn this stitch first.

I had attempted to teach myself Nalbinding from a book and various text and illustration based instructions several years prior to this with very little success. My second attempt with a live instructor was more successful and after a few bumps I was able to produce a passable tube of nalbound fabric. After some problems with maintaining even tension, I was able to start on my first sock.

Viking age socks were more like shoe liners than modern socks, coming up only to the ankle. These would have provided an extra layer of warmth and padding over cloth stockings of some sort and under leather shoes. Surviving socks seem to have been constructed from the toe up, unlike my socks which I worked from the top down to simplify the starting row. I plan to work future socks in the more historically accurate toe-up manner once I am more comfortable with the techniques involved.

Sources:
Walton, Penelope. Textiles, Cordage and Raw Fiber from 16-22 Coppergate. York Archeological Trust 1989.

Hald, Margrethe. Ancient Danish Textiles from Bogs and Burials: A Comparative Study of Costume and Iron Age Textiles, trans. Jean Olsen. Archaeological-Historical Series Vol. XXI. Copenhagen: The National Museum of Denmark, 1980.

Schmitt, Larry.Lessons in Nalbinding: Mittens, Mittens, Mittens! Lawrence W. Schmitt, 1997

Schmitt, Larry.Lessons in Nalbinding: Scarves, Wimples and More. Lawrence W. Schmitt, 1999.

Priest-Dorman, Carolyn. Nalebinding Techniques in the Viking Age. (http://www.cs.vassar.edu/~capriest/nalebind.html) Last accessed June 2, 2011.

Lewins, Shelagh. Nalbinding Socks: Methods of Construction (http://www.shelaghlewins.com/reenactment/naalbinding/sock_construction.htm) Last accessed June 2, 2011.

For instruction on the actual stitch, YouTube is a great resource! Just do a search for “nalbinding” and you will find lots of helpful instructional videos, one of which will explain in a way that works for you. I found the videos available from http://www.youtube.com/user/senshisteph to be helpful with Oslo stitch but there are many others.

Wednesday, June 1, 2011

Weekend report

This weekend I went to Sapphire Joust, a notoriously hot and humid event near Richmond.  Overall, it was fun, though my hip and leg gave me a lot of trouble and I ended up packing out earlier on Sunday than I had planned too.  Oh well, could have been worse.  I did some good shopping, talked with friends, and won the Arts and Sciences competition I had knit the Monmouth cap and mittens for!  yay!  The prize was a really gorgeous spindle, which was perfect for a "Best use of Raw Wool" competition.  This was the last competition I had as Baronial Champion, and it was nice to go out with a successful one.  I've posted a link to the documentation to the right, and will be writing up the pattern for the mitten in the next week or so.  The hat pattern, as I mentioned in my last post, needs some work, so that will be coming as soon as I get it worked out to my satisfaction.

I wore the green hose all day on Saturday, with mundane clogs, and they worked pretty well.  I need to re-cut the feet and take them in a little bit through the leg and ankle to meet with my own particular standards (which are a little OCD, I will admit), but they are comfortable and look pretty good as is.  Bias cutting the foot was definitely a mistake.  this might have worked in wool, but it make for way too much stretching in the linen, and lots of strange bunching around the ball of my foot.  Luckily it all sort of bunched up in a way that was not a problem in my shoe, but I can do better than that.

The blue houppeland was a big hit and looked great, even after a car trip and less than ideal storage in my tent.  And it was comfortable.  I wore it for late-afternoon court on Saturday, sitting in the sun and was quite comfortable.  The hood made for a very nice sun-shade when I flipped the brim forward, though I apparently looked a little bit like a Sith apprentice or something.

Unfortunately I didn't get any pictures, but I will be trotting my new Roman out next weekend for our local birthday event and will hopefully get some pictures of that then.  If I am feeling ambitions I may change into the houppland for feast and for court, but we shall see.

Now I must buckle down and finish the brick stitch bag for Pennsic, and get some more undies made so that if I am able to go (more on that later, I'm going in for hip surgery so that may get in the way of camping plans) I will have enough clothes.  And get my stuff for 30 Year done (definitely not going to that as my surgery is slated for the week before, but my entries will be there without me)

Thursday, May 26, 2011

Monmouth Cap and MOL Mittens

Here they are in their glory!  I will post the documentation as soon as it gets a once over from a fresh set of eyes.  This is my entry for this weekend's raw wool challenge.  I spun the wool quite awhile ago, and just did the dying (my latest experiments with madder which I posted about recently).


I like that the hat and mittens are more functional and less fashionable, things an ordinary working person might have had.  Or a kid out for a romp in the snow.  In this case, an over-sized kid, but certainly not the little lordling I'm usually trying to dress.  The mittens are ambidextrous too, which just goes to show that Elizabeth Zimmerman's suggestion to knit mittens in sets of 3's might have been around for a good long while.  We have this one because a kid dropped it in a field after all.

Now I should just have time to get to activities night tonight and get myself packed up for the weekend in the morning without a huge rush!  Or at least not any more than the usual amount of rush.  Thankfully the doctors appointment that was scheduled for tomorrow late in the afternoon got moved to yesterday, so I am free to leave whenever I am ready and will be able to beat some of the traffic.  As long as I get there in time to set the tent up in daylight I will be doing ok.

Wednesday, May 25, 2011

Knitting frustration

A quick post to say that my project for this weekend's event (hah, nothing like the last minute you say?) is, in typical form, not going well.  The mitten portion is done and looks wonderful, the hat is giving me grief.  I was going to do a flat cap and got halfway done with the crown (those buggers take For.Ev.Er. to knit BTW) when I realized I wasn't going to have enough yarn to finish no matter what I did.  Gah.  So, I frogged the whole thing yesterday and started on a Monmouth cap.  Still a hat, still a different gauge than the patterns out there so it's not a too-easy knitting part of the project, and I should be able to get it done pretty fast and not run out of yarn this time.

It's also still boring as hell to knit, like most period European knit (except the Sion bags), and means I have to start over on my hat portion of the documentation.  Sigh.  I can do this, right?  It's not a huge A&S event, I don't need a 20 page opus or anything and there's the spinning and dying and wool processing part to talk about and that none of that has changed.  Just the knitting.

Did I mention it was boring to knit?  Just round after round of boring old stockinette.  Sure, there's some vaguely interesting construction with the brim but I've done that sort of thing before so it's rather lost it's glamor and besides which, that's hardly enough to make a vast expanse of stockinette interesting.  It would probably be soothing and mindless if I didn't have to worry about writing up the documentation as well.

Tuesday, May 24, 2011

Finished ave beads

Somehow or another I've got the hang of this lampworking thing well enough to finish the ave beads for my paternoster project!  I ended up being able to produce enough 7-9mm beads for a Seraphic rosary, or Franciscan Crown, which has seven decades (72 beads in all once you add the bit at the end).  Yay!

I'm super excited about this for a couple of reasons.  First of all, it's a really interesting form of paternoster and one of the few that can be documented to a specific time period.  Franciscan historians date it to 1422 (see http://www.shrinesf.org/rosary.htm), when a young friar had a vision of the Virgin.  Second, the focus is on the joys of the Mary rather than the more common (at least today) sorrows or wounds that you tend to see in "special" forms of the devotion (though if you do the standard 15 mysteries only 5 of those are sorrowful).  I'm all about some extra joy right now, so I find this particular form of the prayer really appealing.  Lastly, I really like St. Francis.  My grandmother, who was a huge force in my early life had a particular affinity for St. Francis and when I visited Assisi in high school I found the experience particularly moving.  I wasn't even Catholic yet, but I found it to be one of the most peaceful and prayerful places I've ever visited.  The brothers that we met there were some of the kindest, warmest people I have had the honor to met.

When I set out to make the beads for a paternoster I was really hoping I would be able to do a Franciscan Crown, but I wasn't sure if the actual glass working was going to go well.  I took the time to practice, and didn't try to do anything more ambitious that 72 simple beads that are more or less the same size (which is, I hope, ambition enough for my eventual judges), but so far it's looking really good.  Here you can see everything laid out, waiting for the gauds.  I found that if I sorted the decades into similar sizes you notice the variations in size much less.

The plan is to find some nice 12mm (or so) silver beads for the gauds, and order a cross or some other medal from The Rosary Workshop.  Hearts were quite popular and they have a couple of suitable sacred hearts that should be about the right size.  I'd like to avoid a tassel, though if I don't find a cross or something else that goes well with whatever gauds I end up with that's what I'll use.  I had planned to tablet weave the cord for the beads, as something similar is shown in one of the MOL books, but the hole in the beads is a little too small so I'll thread them on a heavy linen cord.

Thursday, May 19, 2011

More fun with fire

The lampworking thing is sort of addictive! I've been practicing, with an aim towards producing uniform, round beads so that I can eventually make a paternoster. I think I'm ready to start working with the actual glass I want to use, it seems that each color rod behaves a little differently, which makes sense since different metals and minerals are used to make the colors and each one melts and burns at a different temperature. They also seem to wind onto the mandrels a little differently. If I was good at this, I would be working all the glass at the coolest possible temperatures but I've got to figure out what that is for the glass I want to work as I am not good at this yet.

Anyway, the result of my practice is, as you see, a lovely Viking-ish bead swag! With some dangley bits of things that went terribly wrong but I could not bear to throw away.
 And some close ups:
The stacked beads in the center are the first beads my husband and I made (he made the silvery blue one and I made the red one).  I'm pretty pleased with the clear one with red spots and the amber one with a black stripe, my first attempts at embellishing.  The whole thing has been a learning process but it's fun and oddly relaxing.

Wednesday, May 18, 2011

Flemmish kercheif/coif/head thingie

I'm posty-mcposty-pants today.  Oh well.

While waiting for my yarn to dye, I decided to make a Flemmish style kerchief or cap to go with my as-yet-unsewn kirtle.  The general idea of the head covering comes from several pictures, but they pretty much all look like this one from from the Hours of Charles of Angouleme:


The Medieval Tailors Assistant has a pattern for such a cap which is tailed.  Sort of a coif with long flaps, rather like lappets, cut on the bias, which one wraps round the head and ties.  See http://www.gelfling.dds.nl/tailed%20cap.html for the one remaining website (and some broken links to sites with construction details, le sigh) about this method of making this head covering.  This makes no sense to me as it's highly wasteful of fabric, and for nothing more than a do-rag.  Besides which, it sort of looks like you can accomplish the same thing with a rectangular cut veil.

So, I found http://www.heatherspages.net/flemish-kerchief.html which shows an alternate way of arranging a Flemish style kerchief and http://lynnehurstinvites.com/edyth/notes/veil.html which gave me another set of instructions and some dimensions for the thing.  I set to cutting and hemming (oh how I hates the hemming) and then pinning and flipping and low and behold it worked!  Here you see the results:

I played around with how I arranged the kerchief a bit and discovered that if I fold back the brim, twist the ends and bring them up to the top of my head, it ends up looking just like the picture!  As seen here:

I think I need to make the whole thing just a little wider for this to work perfectly, maybe only an inch or so on either side of the brim, but it looks right and makes a lot more sense to me than the tailed cap approach.  Plus, you can wear this in several ways, which seems more economical and practical. 


Madder dying results, and fun with fire

Here are the results of my latest attempts to dye with madder:

The small skein in between the silk and the wool is from the original, pickle-tainted attempt, to show the differance in color.  It's actually pretty close to how the skeins came out of the dye pot, so I'm thinking the pickle jar ended up not making that big a difference in the end.  I did end up using an iron modifier on the wool, just briefly, as they skeins came out pretty bright and orangy-red to begin with.  The color is a sort of terracotta/rust red now, which is pretty but still not quite what I was going for.  I will be able to wear it as a flat cap though, with a buffer of linen cap, which is the main thing.

So, I am no closer to understanding how to get a true red from madder.  It may be that with alum, you just don't get a true red, more of an orange based red.  Maybe I need to change my mordant?  Possibly it's the water from my tap and I need to check the Ph and/or mineral content there?  Or maybe I'm doing something wrong?  I kept the temperatures low, and according to my book if it had got too high the color would have gone dull, which it certainly did not, so I'm pretty sure that wasn't my problem.  Maybe madder just gives you an orange based red and I need to accept that?

The yarn ended up fulling a bit in the dye pot as well, which is rather to be expected but a major pain to deal with.  Since there are bit of madder root floating around in there too, they got all stuck to the yarn and it's been no fun trying to wind the stuff into balls.  Maybe less stirring next time?  Though if I stir less, I'm not sure I would get such an even color on the yarn.

I was quite surprised by the color I ended up with on the silk - it's a really pretty champagne/orange, which I like but was not at all what I was expecting to get (the silk did not go in the iron modifier).  The silk will probably get used for some tablet woven garters, which will look lovely in that color.  I'm guessing to get red, or even just brighter color on silk, you need to either use a different mordant or leave it in the dye longer.  Or possibly use a different dye altogether.

And as a total random aside, here are my first six attempts are making lampwork beads.  The seventh bead got stuck on the mandrel and had to be smashed with a hammer.  The process is quite exciting, what with the large flame and all, if a little scary.  Hopefully I will get the hang of the technique well enough to make enough beads for my paternoster project.  These will probably end up on a Viking bead swag (or garland as I prefer to call them):

Monday, May 16, 2011

More Madder

My madder vat is on the stove!  Yay!  After a few of hours of slow simmering, it looks like I'm getting a decent red this time, rather than the orangey color I got the first time I tried dying with madder (the result of soaking my root in a plastic jar which had previously been home to pickles).  The silk I threw in for good measure is orange though.  Sort of a brownish orange, heading towards salmon, but still orange.  I'm not really sad about this, I suspect the silk would take the color differently but I'm surprised.  It guess that explains the difference in some of the period dye recipes for silk (duh), many of them add other dyestuffs to get a good red, or don't use madder at all.

I've got the let this first round got for awhile longer yet before I know how good a red I've got on my wool.  Depending on the orange tones, I may try a little bit of an iron modifier on the wool.  It's destined to be a flat cap and the trim band on a pair of mittens, both of which I hope to be able to wear.  Since I will have at least a linen cap on between the flat cap and my face, I can stand a little orange in the red, but the super orange I ended up with last time is really not flattering at all.  According to my dye book, I should get a nice tone with the iron and lose most of the orange.  We shall see. 

I have 12 ounces of oatmeal colored handspun CVM to toss into the exhaust bath once this first round is done.  The current plan is to try that with the mordant-and-dye-in-one-go method and see how that works.  And use the iron for sure on that, just for fun.  I have no particular plans for that fiber, it's been sitting around in my pile of spun wool waiting for something so I figured it might get used if I dyed it.

Saturday, May 14, 2011

Hose, attempt one

Here's my fist attempt at hose, using my fabulous new leg to drape and fit (sort of) the pattern.  I used the 16th century pattern from Textiles and Clothing (the MOL book) as that particular set of hose had no seams under the foot.  I have, as a result of a car accident almost 2 years ago, developed some less than fun problems with my feet and having seams running under the arch of my foot seems like it might be a bad plan.  Probably less so with wool hose, but as I want to make linen hose for now (I live in Virginia, it gets humid and I die) seams under my arch are right out.

Anyway, here are the results.  I'm not 100% happy with the fit of the foot but overall they came out pretty well.  Certainly they are wearable and fit as well the ready-made pair I bought at 12th Night.


I made one mistake/change in drafting the pattern that I need to go back and correct before I cut out the next pair (which will be yellow!) - I cut the sole and side gussets in one piece and cut the whole bottom of the foot on the bias.  There is another pair of extant hose where the foot is constructed in this way, but the pair from London has the gussets and sole cut separately and on the straight grain.  I think this will work better on my foot.  Also, the heel seam needs to extend UNDER my heel a bit, which I did not do to avoid a seem under my foot, but I think the hose will sit better on the leg if the seam goes all the way around the curve of the heel the way the original hose to.  I also want to tighten up the fit around the lower leg and ankle just a bit.  

I'm also wondering if they made these footed - i.e. for right and left feet, or if they were ambidextrous.  The way the seams were sewn on the original would allow you to wear it either side out, so I suppose you could fit it more closely and effectively have a left and right foot.  I didn't want (and still don't) to have footed socks, as that's just one more thing to think about before my coffee, but does argue in favor of hand sewing and careful finishing.  I think if I snug the whole thing up I will eliminate most of the bagging thats resulting from making the foot right/left neutral but this is something I'm really curious about now.

Overall I'm pretty happy with these as a first attempt.  Having never made cloth hose before, it went pretty well and I'm pleased with when I ended up with.  They aren't perfect but I learned a lot and feel a lot more confident going into the next pair.

Friday, May 13, 2011

Know thy strength

I got some madder root last night from my laurel to use for a A&S entry coming up at the end of the month, and since I really need to get moving on the project, I started prepping the root this morning.  For those of you not familiar with the madder root dyeing process, the roots come in pretty big pieces which you have to crush up into small bits, so as to expose maximum surface area to your dye liquid, and then soak the little bits for a day or two before you can start dyeing.  Chopping up the roots can be pretty tough business, you have to either grind them up in a food process or use a mortar or something similar.  Some of the larger bits can be really hard to deal with.

One of the larger, tough bits broke my small food processor (it was a P.O.C. anyway, so this is not surprising).  This is what happened after some vigorous smashing with my just-for-dyestuff mortar:

Wednesday, May 11, 2011

A Third Leg

After much gnashing of teeth and rending of hair, and some discussion with various people (all whom have the audacity to be non-local and thus of no immediate help) I think I have, thanks to a suggestion from Edith over at The Compleatly Dressed Anachronist stumbled across a solution to my hose fitting problem!  Meet my Duct Tape Leg Double!


This was actually quite easy to make, even on myself.  I think it would be easier to do with some help, but it's totally doable on your own.  For those of you wanting to make hose on your own, here's what I did:

Supplies:
Cling wrap
1 Roll duct tape
1 16oz bag stuffing (minimum)
Scissors

1. Wrapped you leg in plastic wrap.  Get the good stuff, the cheep kind won't cling well and you will end up taping to your leg.  Ouch!  Wrap all the way up to your mid-thigh, you want the leg form to go above the knee, higher that your finished hose will go (better too high than not high enough).  Secure the cling wrap with a small bit of tape.
2. Cut some strips of duct tape about 8 inches long with scissors you do not care about (the tape will gum up your scissors pretty bad so don't use your good ones)
3. Start taping at the bottom of your foot, keeping your ankle in a bent position as though standing.  I found this was easiest to do if I sat down and kept my foot on the ground, checking my wrapping as I went by standing up after I placed every couple of pieces of tape.  The tape should be as smooth as you can make it and snug, but don't wrap too tightly or you will cut off the circulation to your foot.
4.  Keep wrapping with short bits of tape up your leg, keeping it in a standing position, until you have one layer of tape from your foot to wherever you want your form to stop (thigh high is probably good).  Don't make it tight at the top or it won't be an accurate fit.
5.  Build up a second layer of tape over the first, with the tape strips going in the opposite direction.
6. Cut the form off your leg CAREFULLY and remove from your foot.  I cut down the inside of my leg to my foot rather than down the back, as I was doing this alone and could not reach the back of my leg and cut safely.  Do whatever works, just don't cut yourself and try to keep the cutting line straight.  This is the hardest part of the whole process.
7. Tape the cut line back together but only up to the top of the ankle.  Stuff the foot and ankle firmly with whatever you are using to stuff.  I used plastic grocery bags for the foot and poly fiber fill for the rest.  Get a good firm stuff on the foot and ankle to support to the rest of the form.
8.  Tape the rest of the leg and finish stuffing.

9. Cut on oval of cardboard out to fit the top opening of your leg form.  Insert this to cover the stuffing, and tape it in place, covering it with tape.


10.  Go back and add one more layer of tape over the whole form, paying particular attention to weak spots like the ankle and behind the knee.  You can tweak the measurements a bit at this stage, building up or pulling in spots are not quite the right size.
11.  Admire your work and make beautiful hose!

A couple of quick notes:
- I stuffed the foot with plastic bags, which seemed to give me a firmer pack.  This is a good thing.  More weight might also be good, so if you can add something to weight the foot so the whole thing stands on it's own, put that in the foot stuffing.
- If I do this again I will try that expanding foam insulation stuff they have at the hardware store
- A dowel or some other rigid support might be useful to support the ankle.  Mine is a little wobbly, which is not a huge issue as I don't anticipate this thing lasting that long but if you want to use it for many pairs of hose the extra rigidity might help.

Sunday, May 8, 2011

Another mystery

I'm getting ready for my next sewing project (other than the blasted hose, which hardly rise to the level of a project IMO, except in the whole finding-help-with-pattern aspect of the thing), which will be a kirtle.  So far the plan is to do this in linen, as linen is less expensive than wool, will be comfy at Pennsic, and I have some I am willing to commit to a gown at my current size. 

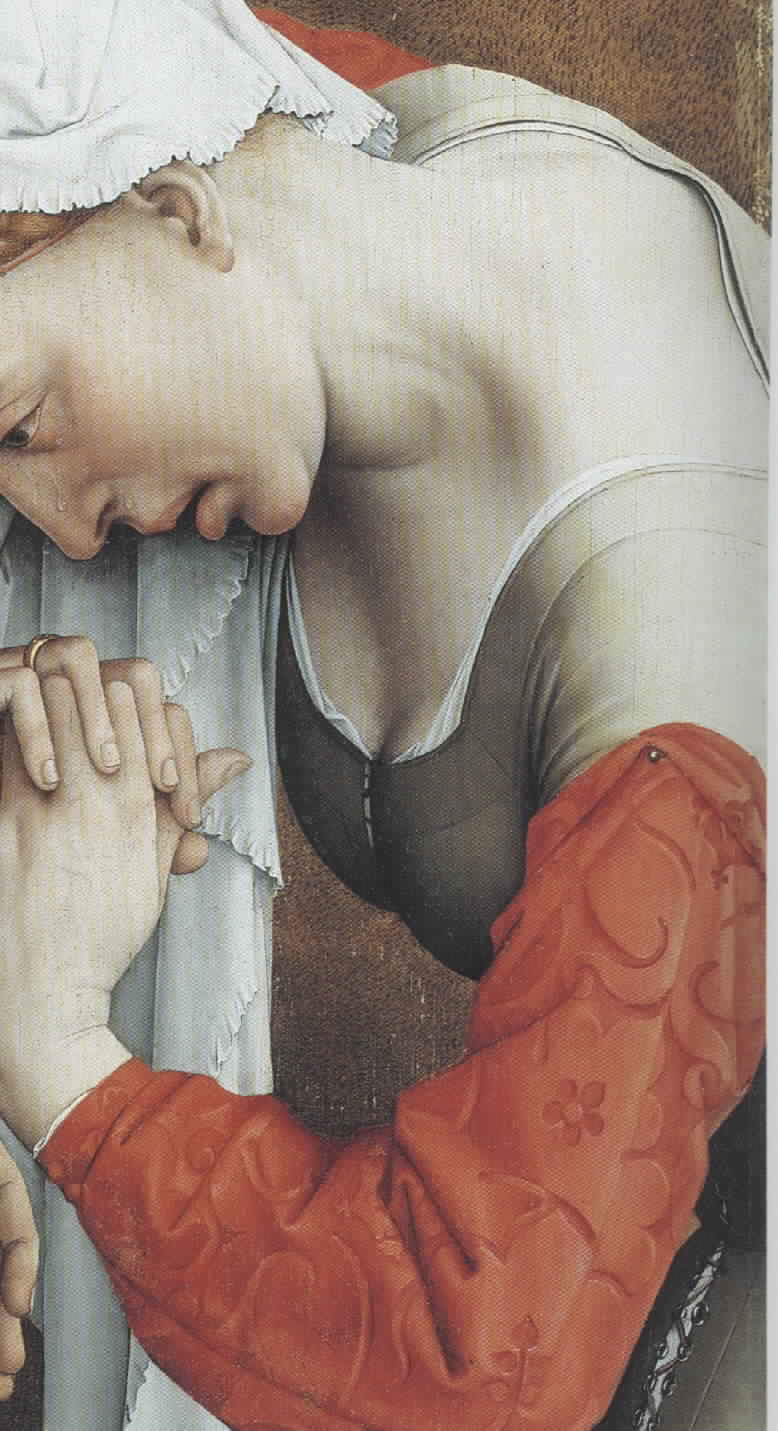
Anyway, I've pretty well decided to go with the waist-seam method of doing this, with trapezoidal skirt panels similar to those shown in the MOL book, as that will be much easier to fit on my self with minimal-to-no outside help.  Which brings me to the questions.  The bodice.  I've been looking at paintings to get the best idea I can of where all the seam lines should be and have run across something strange (to me anyway).  In nearly all of the artwork there is a facing or something around the neck that I don't tend to see included on the reproductions of these gowns.  You can see it quite clearly here, in a detail from Rogier van der Weyden's Descent from the Cross:


It also looks like there is a small raglan-type seam at the arm.  I can't be quite sure if it's just in the facing piece, or if that's actually actually how the sleeve is shaped.  It (the raglan-looking seam I mean) would actually make sense if the facing bit was a narrow shoulder strap extending from the back, or cut separately and attached to both front and back, rather like what you see on some later period bodices.  In a larger view of the picture, you can see the same angled seam front and back.  One thing there clearly is NOT is a seam at the top of the shoulder.  Again, this isn't the only place I've seen this sort of seaming in paintings, it seems rather more typical than exceptional, though I've found examples showing a regular shoulder seam as well.  (the other thing I really like about this picture is that is appears she's using both eyelets AND lacing rings, with the transition between the two at the waist)

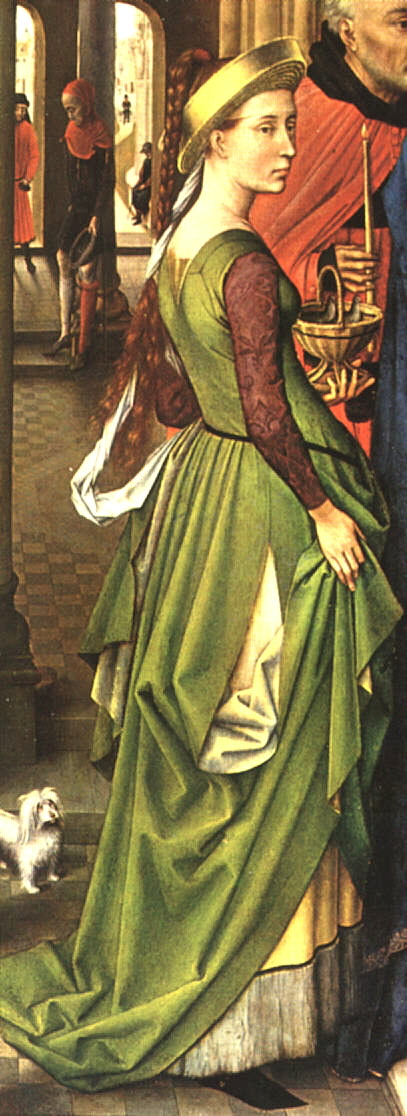
Here's a good back view of this sort of gown, another van der Wyden, this one a detail from "The Presentation at the Temple."  Here you can see that the angled seem goes down all the way into the armscye at least:


So, what does all this mean?  Is it a sort of raglan sleeve?  Or just a separate strap bit?  Is the seam around the neck a facing or just a line of stitching or something else?  If the strap is separate, I can see where the extra bit around the neck opening would be helpful (it would be helpful regardless really).  Should I try this?  Or just do the easy seam-over-shoulder bodice?

Thursday, May 5, 2011

Cloth hose dilema

I need to make, among other things, several pairs of cloth hose for myself.  I have one pair which I purchased that fit pretty well, but the foot is not 100% accurate.  I don't know if I care about this or not, the design seems pretty easy to deal with and more of the extant examples I've looked at have some really odd, fiddly things going on in the heel or ankle.  I'm sure there's a reason for this, and that once I got a pattern sorted it would all make sense, but this brings me to the problem...

Patterning.  Specifically, patterning something that really needs to be done while on the body.  From what I've been able to find so far, to get hose to fit well, you really have to fit them carefully on the foot and leg for which they are being made.  Since they will be on my leg, this is going to be tricky.  Coordinating with someone who has the skills to do this for me is going to be very tricky.

So, do I give up on well-fitted hose and go with a commercial pattern,doing what I can on my own and accepting a certain amount of bagginess?  Or copy the pair I have and accept a known amount of bagginess?  Copying the instep piece is going to be a little tricky without taking the whole thing apart but not any worse than starting from scratch.  It really would be nice to have a good pattern, I need several pairs and the pattern will serve me well for a long time once I get it sorted out.

Wednesday, May 4, 2011

What's doing

I freely admit that I'm a project collector. One of the email lists I'm on has been discussing this, and it would seem I'm not alone, but I never really bothered to really think about this before. I counted last night and had no less four in-progress projects within arms reach of where I was sitting and another four or five within easy reach in the same room (not counting anything spinning related). My poor husband. Our living room has been totally taken over. Oh well. At least most of them are pretty small things.

For the things that have deadlines and aren't distractions or just hemming sorts of things (veils and bits of Roman garb), here's what I'm currently working on:

For A&S 30 Triathlon:
  • Finishing the eyelet brick stitch bag (making some good progress here actually)
  • Perugia towel (research and supply collecting phase)
  • Lampwork Rosary (as above, need to schedule a work-day)
For Sapphire raw-wool challenge:
  • MOL mitten (can be seen here)
  • Flat cap (the plan for this event, which is creeping up on a little faster than I would like, is to madder dye some wool I spun from a fleece to make the hat and the little contrast band on the mitten.  Otherwise it's a supper-dull project.   I'm planning on going to Maryland Sheep and Wool this weekend, so I should be able to get some madder root there, or get some from my Laurel (who I'm going with) and do the dying next week, then I can knit and be done with that)
Other:
  • Weave napkin for auction/raffle fundraiser (really lacking motivation here for several silly reasons)
  • Get A&S 50 documentation up to date
  • Make clothes for Pennsic (mostly underwear, but I need at least one supportive gown.  I need fabric for this)
  • Finish knitting protective bags for feast gear
  • a totally modern alpaca sweater
  • Finish spinning gotland wool for weaving warp
  • Finish sorting and washing Hog Island fleece
Now that I've listed all this out, I feel bad posting about it.  I should get to work!  How can I be board with this much to do?   My level of productivity over the next few months will be largely governed by whether or not my surgeon decides to proceed with fixing my hip.  If he does, lots of the big stuff that involves standing for any period of time will have to get done soon or put off till after I've recovered from surgery.  Sadly it's my right leg, so I'm not sure how much spinning and weaving I will be able to get done during the early stages of recovery.  At least I will have embroidery and hand-sewing to keep my busy, and maybe I can finally get some of the more complex tablet weaving I've been wanting to try figured out, if I can sort out a way to warp.

A&S 50 7: Tablet Weave Two Colored Striped Band from London Dig MOL Braid 449


The original band was woven in two colors of plied silk, pink and pale yellow (possibly originally white) and had bronze bar mounts attached to it.  Twelve tablets were used, making a fairly narrow band of 8.5 millimeters.  Each tablet was threaded with two colors of silk threaded in groups of three, SSSZZZSSSZZZ and turned continuously in one direction to create a striped pattern.  The band shows one reversal of the turning direction, probably to un-twist the remaining warps.
            The cards as threaded in two colors as shown below:

A


B


C


D


S
S
S
Z
Z
Z
S
S
S
Z
Z
Z

1
2
3
4
5
6
7
8
9
10
11
12

The cards turn continually forward.  The original band shows one reversal of direction.  When enough twist has built up in the warp to prevent smooth turning of the cards, reverse direction to untwist the warp and continue turning backwards.

I had selected this band as my first attempt at tablet weaving as it seemed like a fairly simple threading and turning pattern.  For this first attempt, I used size 3 crochet cotton from DMC in two colors, a light blue and grey.  Threading the warp was quite simple using the continuous warping method described by Crocket and Lewins.  Actual weaving proceeded smoothly, with some allowance given for the learning process.  The start of the band is a great deal looser and wider than the end, which can be attributed to my inexperience.  By the finish of the band I figured out how to beat the weft down to get a smooth surface and maintain an even band width.

Overall, I am quite pleased with how this band works up and am looking forward to using the design again, perhaps for a belt or set of garters in silk, using the original pink and yellow.


Sources:
Crowfoot, Elizabeth.  Textiles and Clothing, c.1150-1450 (Medieval Finds from Excavations in London).  Boydell Press, 2001.

Carolyn Priest-Dorman.  Three Recipes for Fourteenth- and Fifteenth-Century Tablet Weaving.  (http://www.cs.vassar.edu/~capriest/3recipes.html) Last accessed Aug. 31 2010.

Crocket, Candace.  Card Weaving.  Interweave Press, 1991.


Lewins, Shelagh.  The Ancient Craft of Tablet Weaving:  Getting Started (http://www.shelaghlewins.com/tablet_weaving/TW01/TW01.htm)  Last accessed Nov. 18, 2010.