I will be off-line, or at least not able to post much, for a bit as I am having my hip fixed this afternoon. It's a very good thing, and means I will be able to go to the mall *and* the grocery store like a normal youngish person again without paying for it for 3 days after, and also maybe walk the dogs and go to camping events. An uphill climb in my mobility rather than what I've been dealing with for the last two years sounds really wonderful.
Anyway, my plan, once I get off the drugs, is to get caught up on my A&S 50 documentation so hopefully I will be able to start posting that late next week. In the mean time, here is a preview of the Franciscan Crown rosary I made using beads I made myself (at least I made the green glass beads). If I can finish the documentation next week this will be one third of my entry for 50 year next weekend!
Thursday, August 25, 2011
Friday, August 19, 2011
Really finally finished bag!
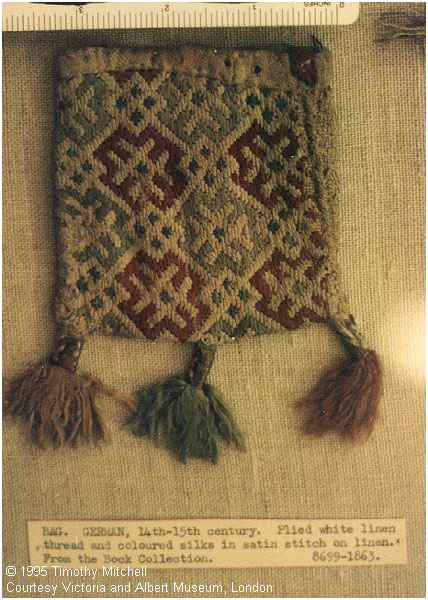
It's done!! (picture me running/hobbling in circles flailing madly like Kermit and you will get a pretty good idea of my joy at typing that) The purse strings are fingerlooped, the tassels are tassels, and the linings is all attached and finished off. I'm really quite happy with how this turned out. The finished relic bag represents about 135 hours of work in total, but overall I think it was worth the effort.
I may still make a separate hanging string, the first bag I made has one, and that seems to be a common arrangement of strings where strings or any sort have survived. Plus it would make it easier to hang off my belt if I decided to actually wear it as a pouch. The only other change I may at some point make is to add the turks head knots to the tassels. I've been trying to teach myself how to make them and can do ok with twine or yarn, but the small silk I used for the tassels is a bit too much. If I can find something a little stiffer to work with that might help. I can always add them later once I get the hang of it.
Bag finishing - in progress!
It's actually getting done, and I'm actually going to make it by the 30 year dead line! Hurray! I've got the lining put together and attached, the side seams stitched, and I'm 2/3rds of the way done with the braided seam finish. The original bag looks like it had a tablet woven edge down the sides, but I'm not that confident with my tablet weaving, so I've opted to the edge finishing I know I can do neatly. The top will get a narrow band of red silk folded over the raw edges, like I talked about in my last post. That band will have worked eyelets to hold the purse strings. Three tassels will finish off the bottom.
You can barely see from the pictures (or in person really) but the bag is faced with a mustard color silk. My original plan had been to use a bright blue to show behind the eyelet holes, but when I looking at it the blue made the whole piece look a little dark and the eyelets didn't pop. The mustard was much better. The Hubs, who insists he is no good at these things, was a huge help. He's actually really good at the whole color theory thing, even the medieval color theory, no matter what he says.
Here you can see a detail of the braided edging. I'm really happy with how the red looks, it's a nice contrast and brings out the small touches of red I already had worked into the design. I'm also very pleased with the pattern matching down the side seams, another feature you don't often see in the extant bags but to modern eyes not matching the pattern can be very off-putting. It's funny sometimes, the things we worry so much about that they just didn't concern themselves with.
Because I know someone will want to know, this type of edge finish is really quite simple to do. It's slow, and you have to be careful to work neatly, but it looks really sharp. Apparently it was used on things other than these bags too, like Viking hoods and such, though I don't have the documentation for that myself. There are a few differant ways to do it, but I follow these instructions. My only additional tips are to try to make your loops as long as they need to be so you don't have to join new ones half way through, and to wind them onto bobbins. The bobbins keep the extra thread neat, and give you some extra weight to keep the tension on the braid even, which is a huge help. You also need to be careful as you work not to pull things tightly or you will distort the edge of your piece.
Edited to add: I've been looking at the online images of the original bag to sort of drawstring placement and I think the top band is actually embroidered, not a sewn on ribbon or tablet weaving after all. If you zoom in on some of the black and white photos, you can see pretty clear plain brick stitch where the holes for the purse strings are, and sections of the ground cloth showing through in places where the embroidery has worn away. Unfortunately I placed my work on the fabric such that I could not do this, so I've gone with the band method seen in the V&S bag, but it is adds another set of options for finishing off the top. The side of bag is presenting a more interesting set of questions. It's hard to tell what's going on in the pictures but it kind of looks more like little buttons or knots running down the side of the bog than tablet weaving or a braided edge. You can sort of see what I mean in the picture to the left, it's more clear on the zoom-able version on RICH website. I'd love to get my hands (or at least my eyes) on the actual bag to see how this is all done, but that will have to wait. In the mean time, I shall proceed as planned. I'm kind of leaning towards leaving off the middle tassel at this point, but we'll see.
You can barely see from the pictures (or in person really) but the bag is faced with a mustard color silk. My original plan had been to use a bright blue to show behind the eyelet holes, but when I looking at it the blue made the whole piece look a little dark and the eyelets didn't pop. The mustard was much better. The Hubs, who insists he is no good at these things, was a huge help. He's actually really good at the whole color theory thing, even the medieval color theory, no matter what he says.
Here you can see a detail of the braided edging. I'm really happy with how the red looks, it's a nice contrast and brings out the small touches of red I already had worked into the design. I'm also very pleased with the pattern matching down the side seams, another feature you don't often see in the extant bags but to modern eyes not matching the pattern can be very off-putting. It's funny sometimes, the things we worry so much about that they just didn't concern themselves with.
Because I know someone will want to know, this type of edge finish is really quite simple to do. It's slow, and you have to be careful to work neatly, but it looks really sharp. Apparently it was used on things other than these bags too, like Viking hoods and such, though I don't have the documentation for that myself. There are a few differant ways to do it, but I follow these instructions. My only additional tips are to try to make your loops as long as they need to be so you don't have to join new ones half way through, and to wind them onto bobbins. The bobbins keep the extra thread neat, and give you some extra weight to keep the tension on the braid even, which is a huge help. You also need to be careful as you work not to pull things tightly or you will distort the edge of your piece.
Edited to add: I've been looking at the online images of the original bag to sort of drawstring placement and I think the top band is actually embroidered, not a sewn on ribbon or tablet weaving after all. If you zoom in on some of the black and white photos, you can see pretty clear plain brick stitch where the holes for the purse strings are, and sections of the ground cloth showing through in places where the embroidery has worn away. Unfortunately I placed my work on the fabric such that I could not do this, so I've gone with the band method seen in the V&S bag, but it is adds another set of options for finishing off the top. The side of bag is presenting a more interesting set of questions. It's hard to tell what's going on in the pictures but it kind of looks more like little buttons or knots running down the side of the bog than tablet weaving or a braided edge. You can sort of see what I mean in the picture to the left, it's more clear on the zoom-able version on RICH website. I'd love to get my hands (or at least my eyes) on the actual bag to see how this is all done, but that will have to wait. In the mean time, I shall proceed as planned. I'm kind of leaning towards leaving off the middle tassel at this point, but we'll see.
Wednesday, August 17, 2011
Bag finishing
I've been mulling over how to finish my lattice bag for the last few days. The embroidery itself took such a long time, I really don't want to kill the whole piece with poor finishing. Some of the extant bags done in this particular style have the drawstrings threaded right through the embroidery, which is how I did the first bag I made, but the original lattice bag has some sort of band at the top that the strings go through. It's hard to tell from the pictures on line what this band is made from, so I'm trying to decide what will work best, look good, and still be true to the original.
I had come across the bag to the left when I researching the first bag and I think I have my answer! Yay! It's rather roughly finished, but the top has a binding of ribbon or fabric that folds over the top edge and is whipped stitched down on the front of the bag. It seems to have worked eyelets (boo) through which the strings would be threaded. From the picture, it looks like the band was put on in one continuous loop after the bag was assembled, leaving only one seam in the band piece, but it's hard to tell for certain. This particular bag is folded along the side edge rather than the bottom edge, so the construction is a little strange to begin with.
In digging through my fabric stash I found a big of dark red silk that sort of matches the silk I used for the red eyelets and the silk I have for the drawstrings and tassels (which don't exactly match each other but you can hardly tell). It's not a perfect match, the silk fabric is a little more of a rust than a blue-red, which is what I used for the embroidery, but I don't think I'm going to find anything better in the shops locally. The other red I have is way too bright, so the slightly rusty shade is probably going to be the best match. I thought I had some burgundy china silk someplace but I can't find it anywhere. Don't you hate that? I've got one place left to look, then I can start on the finishing tomorrow afternoon! Having a plan is good!
I had come across the bag to the left when I researching the first bag and I think I have my answer! Yay! It's rather roughly finished, but the top has a binding of ribbon or fabric that folds over the top edge and is whipped stitched down on the front of the bag. It seems to have worked eyelets (boo) through which the strings would be threaded. From the picture, it looks like the band was put on in one continuous loop after the bag was assembled, leaving only one seam in the band piece, but it's hard to tell for certain. This particular bag is folded along the side edge rather than the bottom edge, so the construction is a little strange to begin with.
In digging through my fabric stash I found a big of dark red silk that sort of matches the silk I used for the red eyelets and the silk I have for the drawstrings and tassels (which don't exactly match each other but you can hardly tell). It's not a perfect match, the silk fabric is a little more of a rust than a blue-red, which is what I used for the embroidery, but I don't think I'm going to find anything better in the shops locally. The other red I have is way too bright, so the slightly rusty shade is probably going to be the best match. I thought I had some burgundy china silk someplace but I can't find it anywhere. Don't you hate that? I've got one place left to look, then I can start on the finishing tomorrow afternoon! Having a plan is good!
Sunday, August 14, 2011
Something completely different
I've been quite busy and productive this weekend, though not with anything textile or fiber related. Yesterday the husband was at a martial arts clinic (I didn't go because of the injury which will be getting fixed in my upcoming surgery) so I stayed home and got caught up on some totally modern jewelry making and did laundry. Today though, I canned jam! I haven't made jam since grade school so this was fun and exciting and I feel like a clever and accomplished and terribly thrifty homemaker. Even though since I had to actually buy the fruit, possibly it wasn't all that thrifty in the end.
So far, I've make 3 pints of pickles using cucumbers from the garden, 7 half pint jars of mixed fruit jam from a recipe I cobbled together from a list of things Himself decided he wanted in his jam, 5 pints of plum jam, and a couple of jars of lemon sage mustard. Tomorrow I'm going to do some pint jars of strawberries with the 4 pounds of berries I got on sale at the market. Normally I wouldn't bother canning with berries from the regular grocery store, but they must have got a shipment of really fresh ones or something because these strawberries are really good. I think we will have plenty of jam to last until next year, and a few jars to give away as gifts as well.
All this canning business has got me thinking about some of the period mustard recipes I've been playing around with. Most of them are better if you age them awhile, so they would benefit from being pasteurized and sealed in a sterile jar. I think I may try fiddling with some of the recipes so I can can a few of them and see how that works out. It's not exactly period, but it's safer than period food storage methods and would be easier to transport to events. Plus I wouldn't need to keep all the little jars and things in my fridge, I could just put them in the pantry.
So far, I've make 3 pints of pickles using cucumbers from the garden, 7 half pint jars of mixed fruit jam from a recipe I cobbled together from a list of things Himself decided he wanted in his jam, 5 pints of plum jam, and a couple of jars of lemon sage mustard. Tomorrow I'm going to do some pint jars of strawberries with the 4 pounds of berries I got on sale at the market. Normally I wouldn't bother canning with berries from the regular grocery store, but they must have got a shipment of really fresh ones or something because these strawberries are really good. I think we will have plenty of jam to last until next year, and a few jars to give away as gifts as well.
All this canning business has got me thinking about some of the period mustard recipes I've been playing around with. Most of them are better if you age them awhile, so they would benefit from being pasteurized and sealed in a sterile jar. I think I may try fiddling with some of the recipes so I can can a few of them and see how that works out. It's not exactly period, but it's safer than period food storage methods and would be easier to transport to events. Plus I wouldn't need to keep all the little jars and things in my fridge, I could just put them in the pantry.
Friday, August 12, 2011
Staffordshire Hoard in D.C.!
I just found this article about an exhibition of a selection of more than a hundred pieces from the Staffordshire Hoard which will be on display in D.C. at the National Geographic Museum from October 29, 2011 to March 4, 2012! Yay! That's only 3 hours from home, and conveniently after the major recovery period from my surgery later this month! I should be able to walk through the museum with no problem!
If you are in to Anglo-Saxon stuff in general, and metal working in particular (go shiny bits!) this should be a really amazing exhibit, and not to be missed!
Wednesday, August 10, 2011
Finished bag
The lattice bag is done! Hurray! Thanks to over 120 hours of work starting in October of last year (I stopped keeping track for awhile after 96 hours, my best guess at this point is that it took about 125 hours), the major work is finished. I still need to line and assemble to bag, and sort out how I will handle the cord band at the top, but that should not take more than another 8 or 10 hours of work. I hope.
Anyway, the finished bag is about 5.5 inches wide and 11.5 inches tall. It'll be folded in half, so when all is said and done the bag itself will be roughly square. It will be finished with a band at the top and tassels at the bottom so the final effect will be slightly more rectangular. There is a partial write-up on the bag availiable here as a PDF. Once the whole thing is done, it will get it's own documentation. Hopefully for Atlantia 30 Year, but as I will be having surgery a week before and thus not going myself I'm not stressing myself out about that.
I've already started a new brick stitch project based on a German box cover. This one is going to be a book cushion for the book which I won as a prize for the Greenland hood. I actually started at the very end of April, got as far as picking threads and a little embroidery, and then did nothing until yesterday. What you see below is about 10 to 12 hours worth of work, possibly as much as 15. It's much slower going when you have nothing at all on the cloth and have to count out over bare threads with no reference points. Whoever tries to tell you that counted thread work is easy has clearly never really tried it.
As far as the details of the project...again it's based on a 14th century box top and will eventually be a book cushion. The piece is quite large, so I'm working it in cotton rather than silk, over 28 count linen. So far I'm very happy with how it's turning out. The pattern is much simpler to work than the lattice bag, being just basic brick stitch, so my only challenge is counting out a larger pattern repeat than I'm used to dealing with. The first half-row of diamonds was quite a pain, but the the subsequent rows have been getting easier so I have hope. Usually once you get one pattern laid down you don't have to look back at the chart so much, you can just refer to the work itself to see what's next and that makes things move along faster. I am debating weather I want to try putting this in a frame or not, the excess cloth is really sort of a pain to deal with. It's a large enough piece that the frame itself might get in my way too though, so I'm not sure.
Anyway, the finished bag is about 5.5 inches wide and 11.5 inches tall. It'll be folded in half, so when all is said and done the bag itself will be roughly square. It will be finished with a band at the top and tassels at the bottom so the final effect will be slightly more rectangular. There is a partial write-up on the bag availiable here as a PDF. Once the whole thing is done, it will get it's own documentation. Hopefully for Atlantia 30 Year, but as I will be having surgery a week before and thus not going myself I'm not stressing myself out about that.
I've already started a new brick stitch project based on a German box cover. This one is going to be a book cushion for the book which I won as a prize for the Greenland hood. I actually started at the very end of April, got as far as picking threads and a little embroidery, and then did nothing until yesterday. What you see below is about 10 to 12 hours worth of work, possibly as much as 15. It's much slower going when you have nothing at all on the cloth and have to count out over bare threads with no reference points. Whoever tries to tell you that counted thread work is easy has clearly never really tried it.
As far as the details of the project...again it's based on a 14th century box top and will eventually be a book cushion. The piece is quite large, so I'm working it in cotton rather than silk, over 28 count linen. So far I'm very happy with how it's turning out. The pattern is much simpler to work than the lattice bag, being just basic brick stitch, so my only challenge is counting out a larger pattern repeat than I'm used to dealing with. The first half-row of diamonds was quite a pain, but the the subsequent rows have been getting easier so I have hope. Usually once you get one pattern laid down you don't have to look back at the chart so much, you can just refer to the work itself to see what's next and that makes things move along faster. I am debating weather I want to try putting this in a frame or not, the excess cloth is really sort of a pain to deal with. It's a large enough piece that the frame itself might get in my way too though, so I'm not sure.
Tuesday, August 9, 2011
Lattice bag progress
I spent most of yesterday watching Season 1 of Doctor Who and working on purple eyelets, and what you see here is the result. I'd say I got about 6 solid hours of work in on the bag, give or take. Taking pictures actually helps, I can see how far I've come in a day (or an hour) which makes the work less tedious. Filling in the corner also helped with the motivation, at least I can see now what the final bag will look like.
At the risk of sounding like a commercial, the OttLite is really helping. Before, the grey squares were much slower going than the yellow ones. They are still a little slower, but not by much. The only place where I notice much of a drop off in speed is along the edges and in the corners, where it's harder to see some of the half stitches along the edges. Had I thought about this, those squares should have been done in the yellow but oh well. Picking up some speed is all for the good and I'm really happy with how this is looking it's all for the good. With any luck, my next post will include a picture of the finished embroidery! Hurray!
Monday, August 8, 2011
Poor mans Ott Light
I've been totally stalled on my eyelet brick stitch project, partly because other things keep getting in the way, but mainly because the light in my living room is pretty bad and it's hard to see the grey/silver lines I'm trying to work the eyelets in between. I do ok in bright daylight, but there's only a couple of hours of good light a day so progress is limited my those hours being otherwise unoccupied. Yesterday the hubs and I were at Michaels and he found Ott Light bulbs! Who knew? They also had inexpessive clip-on swing arm task lamps, so with my happy 40% coupon for about $35 I have a brand new, perfect for my work space, Ott light! Yay! It's a perfect solution, most of the lamps they make, aside from being hideously expensive, are ugly as sin and would not work well in the space we have (basically none). With this, I can move the lamp or the little table it clipped to to whichever side of the sofa I'm sitting on and I'm good. It's even reduced glare on the tv so we're all happier. Working on the embroidery this morning, I seem to be making better progress with less annoyance and eye strain so I think this will help a lot. So that plan for today is to plug away on the lattice bag. I've managed to make pretty good progress so far, chipping away at it bit by bit. I figure at this point I have another 15 hours or solid work to go before the actual embroidery is done, then I have to do the finishing. The original plan was to tablet weave the edging, but I'm leaning towards the braided edging I did on the first bad, as I already know how to do that and I know it will look well. The only major issue I need to resolve is how to do finish the top edge. The original bag seems to have a narrowish band of either tablet weaving or cloth at the top edge, through which the purse strings are threaded. It could be more brick stitch, but the texture looks more like tablet weaving or something else to me. So, do I weave a band and attach it? Use fabric? Or lace through the bag itself? I think a band of red would look really pretty and bring out the red eyelets nicely, and I have a bit of red velvet that would work if I decide to use fabric. Plus there is plenty of silk for the purse strings and trimming to weave a bit of an edging if I decide to go that route.
Either way, I be very glad when this project is done. I'm heartily sick of stitching eylets.
Friday, August 5, 2011
Two new books!
My darling husband bought me two new costuming books which came in the mail over the last couple of days. Yay! I've had time to look them over and am overall very pleased. Here are my thoughts in case any one is contemplating purchasing one or both of these books.
| Fashion in the Middle Ages by Margaret Scott is a slender volume but packed with lots of great illustrations and content. The book is a companion to an exhibit on late medieval fashion as presented in illuminated manuscripts currently on display at the Getty in Los Angeles. The author and curators do a great job explaining how manuscript illuminations can be used as sources for costumes and where they fail as reliable information, even comparing the illuminations to similar extant garments in a couple of cases. She also talks about the typical visual cues and conventions used in the artwork and what they would have indicated to the viewers. Overall, this is a great book. There were quite a few illustrations I had not seen before and good details shots and explanations. It's a great source of inspiration for the price, especially if you are interested in the high middle ages. |
| I had very high hopes for Illuminating Fashion. This is a much larger book with literally TONS of wonderful illustrations, and like the Getty book is also a companion to a museum exhibit (this one at the Morgan Library in New York). The book has a narrower focus, looking at France and the Netherlands from 1325 through 1515, once again using illuminated manuscripts as the main source. The illustrations are great and there are enough of them in enough detail to justify the price, BUT the analysis is really rather poor. It's pretty clear that the book was written by an art historian and not a costume historian. The list of extant garments is incomplete, and the author makes some very strange and totally unsupported statements about construction that make this is a really bad source for a new costumer (things like the looser fitting sleeves of the 1330's being cut of a piece with the body of the gown, rather than cut separately and attached). She also identifies an obviously fur-lined hood a frilled veil in one illustration. Having so many wonderful illuminations with a narrow geographical focus laid out chronologically is really helpful and makes it much easier to see the rapid changes in fashion that were occurring during these years, so the book is a worthy addition if this is your area of interest, just be wary of the textual analysis. |
Wednesday, August 3, 2011
Finished gowns
The commission gowns I did as a fundraiser for my local SCA group as finally done! These took longer than I would have liked, my vacation got in the way a bit as did a major cold/flu/plague and some life interruptions on the clients end as well, but it's finally done! I still owe her a shift and pair of hose, but those can get done after Pennsic. With any luck I'll get the shift done while she is at Pennsic, and get the hose at least cut out so I can fit them when she gets back.
The kirtle is an oatmeal colored linen, with long sleeves that button to the elbow and spiral lacing up the front. Right now the lace is just a piece of ribbon. Eventually it will be a nice fingerlooped cord, the client has a friend who does this so I don't need to supply that. The eyelets are all hand-bound and the bodice seams are hand finished.
The over gown buttons down the front and has angel wing or trump sleeves which fold back a bit at the wrist to expose the kirtle sleeves. I ended up with some extra fabric in the sleeve head so rather than re-cutting the sleeves I made some small pleats in the back of the sleeves. I haven't seen this done on women's fitted gowns, but I have seen it on men's and it actually made the sleeve hand rather nicely so I'm ok with the small bit of pleating. It was a better solution that loosing length in the sleeves. The seams are machine finished on the inside, and everything is hand finished on the outside.
The kirtle is an oatmeal colored linen, with long sleeves that button to the elbow and spiral lacing up the front. Right now the lace is just a piece of ribbon. Eventually it will be a nice fingerlooped cord, the client has a friend who does this so I don't need to supply that. The eyelets are all hand-bound and the bodice seams are hand finished.
The over gown buttons down the front and has angel wing or trump sleeves which fold back a bit at the wrist to expose the kirtle sleeves. I ended up with some extra fabric in the sleeve head so rather than re-cutting the sleeves I made some small pleats in the back of the sleeves. I haven't seen this done on women's fitted gowns, but I have seen it on men's and it actually made the sleeve hand rather nicely so I'm ok with the small bit of pleating. It was a better solution that loosing length in the sleeves. The seams are machine finished on the inside, and everything is hand finished on the outside.
Thursday, July 28, 2011
Award and Worth
I've been tagged by Jessie over at Some Things I Have Made for the One Lovely Blog Award! She had just found my blog and tagged me, which is very sweet and came on sort of the perfect day (it's been a rough couple of weeks).
So, I am supposed to give five facts about myself and tag someone else, so here goes:
On a totally random aside, I came across The House of Worth on Flickr, which if you are at all interested in 19th century clothing, Worth, or just pretty cloths in general you simply must check out. There are some truly drool-worthy gowns and very good quality images in the collection.
So, I am supposed to give five facts about myself and tag someone else, so here goes:
- My undergraduate degree is in early modern British history, with a minor in costuming. Pretty much Ren Faire.
- I have two dogs and an evil cat. The beagle is a step-dog, smelly and dumb as a box of rocks. The Chihuahua is scary smart and eats literally everything. Socks, shoes, mulch, wasabi, whatever, she eats it. The cat is just mean and we all live in fear. She also licks plastic bags, which is the most annoying things ever.
- I love baking. Love it. Sadly, the hubs is not so into the fresh baked goodness and sees no point in home-baked bread. I can't get my head around that one at all, but it puts a major crimp in my baking activities. I can only eat so much bread on my own.
- Before I moved to Virginia and went to law school, I worked in software testing in the San Francisco area for about seven years. Breaking stuff for a living was sort of fun, having the engineers fear me was the bomb.
- I am dyslexic. This has made many things I have chosen to do in life more challenging, like law school, and probably blogging, but I love to read and write so I've done what I can to adapt. Just don't even ask me to sound out a word, that drives me nuts.
On a totally random aside, I came across The House of Worth on Flickr, which if you are at all interested in 19th century clothing, Worth, or just pretty cloths in general you simply must check out. There are some truly drool-worthy gowns and very good quality images in the collection.
Monday, July 25, 2011
Wrap front gowns?
I've been battling a nasty summer cold (no fun in a heat wave in Virginia) and haven't been overly productive since I got back from my trip to California. I have been reading though. While out at my parents house I found 4(!!) boxes of books from my undergrad days, mostly on Medieval and early modern history. I picked out enough to fill two large flat rate boxes and shipped them home so they would be waiting for me when I got back.
One of the books I shipped is on the history of private life in the middle ages. It's quite interesting, if you are into academic reading and social history (which I am). But what got me really excited was the picture on the cover. I can't find a citation for the cover image anywhere for some reason. What you see here is a small version of the cover. Amazon has a larger, though lower quality scan of the cover here Any ideas where this image comes from? What's interesting to me is the two ladies in the back who appear to be wearing wrap front gowns. The image to the right, a 15th century miniature by Jean Bourdichon seems to show a artisan's wife in a similar style dress (of course her arm is covering the bit of her gown that I really want to see, but she's also holding a distaff I'm ok with that).
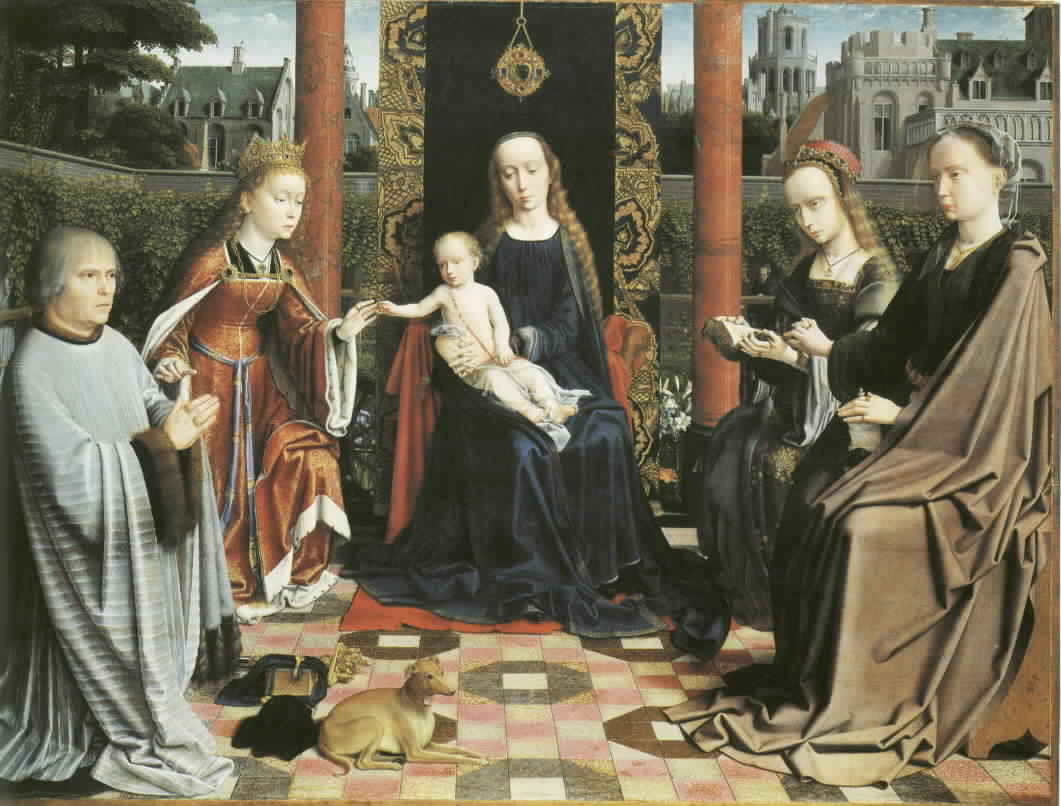
We also have this image by my old friend Gerard David, which shows Mary Magdelan (in the cloak) wearing what might be a wrap front gown:
Unfortunately the clearest image I've found so far of this type of dress is the book cover I can't find any attribution for, but I'm intrigued. The ladies in the book cover look like attendants, the artisans wife is clearly at work, so perhaps this is some kind of working overgown? If I can find some more information about this style of dress, it would be a fun project. I don't think I've seen anyone wearing a wrapped gown like this.
We also have this image by my old friend Gerard David, which shows Mary Magdelan (in the cloak) wearing what might be a wrap front gown:
Unfortunately the clearest image I've found so far of this type of dress is the book cover I can't find any attribution for, but I'm intrigued. The ladies in the book cover look like attendants, the artisans wife is clearly at work, so perhaps this is some kind of working overgown? If I can find some more information about this style of dress, it would be a fun project. I don't think I've seen anyone wearing a wrapped gown like this.
Thursday, July 14, 2011
Vacation Report
I'm back from vacation in Southern California! I don't recommend air travel, Disneyland, or the Getty on a gimpy leg necessitating being pushed around like a luggage cart but it was still a good trip. My fabric haul was mostly quilt related, so not really applicable to this blog, but I did get to visit the Getty Villa, which has a wonderful collection of Greek and Roman art, great for my collection of source material on Roman clothing! Yay! Of course, they also have lots of images on line but there's something about seeing the pieces in person and in life-size that makes all the difference. Plus you can take pictures close up of whatever details you want and from odd angles.
I haven't uploaded my pictures yet, so these are all from the Getty's website, but will give you some idea of what's in the collection and what I found particularily inspiring:
A Portrait of a Woman as a Cybele is quite large and striking. I like how she has her palla draped leaving one arm bare, and the crown/diadem on her head (though that might be what sets her apart as a cybele). Something about her pose in the gallery was quite relaxing and natural. She just seemed comfortable, sitting there with her little critters.
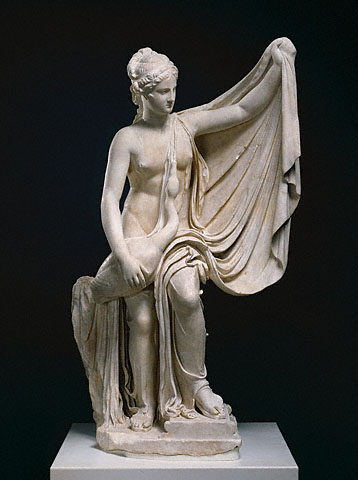
Leda and the Swan not cloths, but her hair is pretty and for some reason I just love this piece. It's not huge in person, but strikingly beautiful and amazingly well preserved. Probably my most favorite sculpture in the villa.
Faustina the Elder another way to wear a palla, this time much more modestly. In person, it looked like the palla was tucked into the belt of her tunica somehow, which made me feel vindicated as I have done that myself to control the inside end of palla. I also like the hair piled up on top of her head.
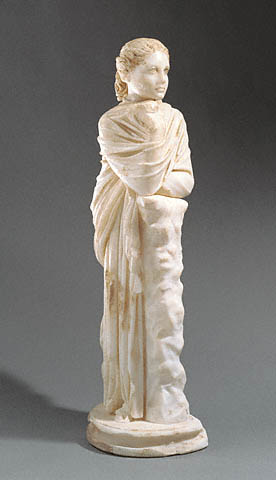
Muse what you can't see from the museum's picture is that she's got her hair in a ponytail! The gallery this statue was in had several other muse's in it and at least one other was also working the ponytail look, which made me very happy. They both looked to have hair that hung to just below the shoulders, maybe the middle of the shoulder blades at the longest. Very cool on several levels, though again since it's a muse and no a portrait it's hard to say if a normal person would ever wear her hair that way.
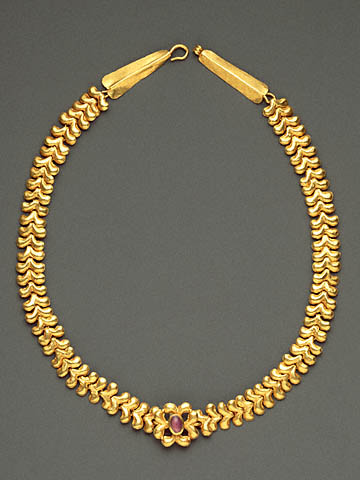
Roman Necklace this was probably my most favorite piece of jewelry in the collection, it looks like something you could get today in a better jewelry store. They actually had a reproduction of it in the museum store ($250, which isn't really bad at all). They have a pretty good collection of jewelry and such, which you can look at here. Lots of rings, but there are some of lovely necklaces and burial diadems as well.
I haven't uploaded my pictures yet, so these are all from the Getty's website, but will give you some idea of what's in the collection and what I found particularily inspiring:
A Portrait of a Woman as a Cybele is quite large and striking. I like how she has her palla draped leaving one arm bare, and the crown/diadem on her head (though that might be what sets her apart as a cybele). Something about her pose in the gallery was quite relaxing and natural. She just seemed comfortable, sitting there with her little critters.
Leda and the Swan not cloths, but her hair is pretty and for some reason I just love this piece. It's not huge in person, but strikingly beautiful and amazingly well preserved. Probably my most favorite sculpture in the villa.
Faustina the Elder another way to wear a palla, this time much more modestly. In person, it looked like the palla was tucked into the belt of her tunica somehow, which made me feel vindicated as I have done that myself to control the inside end of palla. I also like the hair piled up on top of her head.
Muse what you can't see from the museum's picture is that she's got her hair in a ponytail! The gallery this statue was in had several other muse's in it and at least one other was also working the ponytail look, which made me very happy. They both looked to have hair that hung to just below the shoulders, maybe the middle of the shoulder blades at the longest. Very cool on several levels, though again since it's a muse and no a portrait it's hard to say if a normal person would ever wear her hair that way.
Roman Necklace this was probably my most favorite piece of jewelry in the collection, it looks like something you could get today in a better jewelry store. They actually had a reproduction of it in the museum store ($250, which isn't really bad at all). They have a pretty good collection of jewelry and such, which you can look at here. Lots of rings, but there are some of lovely necklaces and burial diadems as well.
Monday, July 4, 2011
Waffle Towels
I managed to finished the waffle towels just in time to get them washed (to bring up the waffle weave texture and pre-shrink them) and photographed before I had to get everything packed and ready to go for the surprise visit to California for my mom's birthday. The actual surprise will be at lunch time today, then we're going on a boat to watch the fireworks from the water. One of the nice things about being born on the 4th of July is everyone makes a big fuss about your birthday!
Anyway, here are the towels. I used cottolin from Webs, working at 24 ends per inch. This was my first experiment working with an actual pattern (which I modified a little bit of course!) and working with stripes of color. I did change the stripes, adding more colors. The original pattern would have just had the outside red stripe and one less cell of waffle in between. I wanted to add more colors to go with her kitchen so I added the yellow and brown. Once I get everything on the loom I realized it would have looked better with brown in between each stripe, not just in the middle, and that the whole striped section should have been placed another couple of cells in from the edge, but oh well. Next time. The other interesting (?) feature of the towels is the hem. The pattern called for a one inch band of tabby weave at each end of each towel to make the hem. Which is all well and good and sounds just fine, until I realized that waffle weave draws in more on the loom than tabby does, and also shrinks up a huge amount more than tabby does. This is what gives it the fun waffle texture. So the band of tabby ends up making a weird wavy shape and sort of deforming the whole shape of the towel, which is pretty obvious in the pictures but not as bad when you see them in person. Very annoying. Next time I do this pattern I think I will leave off the tabby hem. Or possibly double up the weft somehow so it draws in a bit rather than fanning out.
In other news, both of the supportive gowns I was working on for myself are totally done. Yay! I still need to get pictures, but that will have to wait till I am back home and I can get someone to photograph me in them. I'm not going to be able to go to Pennsic after all so there won't be any event action shots for quite awhile (probably post-surgery). I'm very happy will how they turned out and my ability to fit the things on myself.
I also fixed my green hose, it turns out the major issue was having cut the foot portion on the bias. One of the extant hose that I had based the pattern on was done this way but it turned out not to work well with the combination of my foot and fabric choice. Turning the pattern piece back to the straight of the grain and taking the toe in a bit help tremendously. Now I know I can be a lot more aggressive in my fitting of the hose and it will still be fine. In fact it will fit better if I fit it more snugly to begin with.
The fundraiser project is going well (pictures, again, will be coming after I get home next week). I'm doing more fitted gowns. By all reports the client is very happy. The supportive undergown is nearly done, I just have to finish the hem and sew in the eyelets. There will be buttons and button holes down the sleeves, but the client is casting the buttons herself so that is going to have to wait till she has done the buttons. I've brought that with me so I can hopefully get the eyelets done while I'm visiting with my parents this week. The overgown is cut out (except for the sleeves) and should go together pretty quickly. That will be a button-front gown with modest trumpet sleeves, again with hand-cast buttons. I've still got to do hose and a shift, which should go pretty quickly, then it's all done! I'm hoping I can get her to wear a veil at least for pictures, even though that's not really her thing. It will complete the whole thing so nicely.
It looks like my next project will also be a commission, this time Italian. I'm in research mode, trying to decide how long I think the various parts will take and how best to construct things so the client will (a) be comfortable (b) be supported in the gown and (c) be able to get dressed on her own, all the while looking like she stepped out of a portrait. It looks like the gowns she likes close either down the side or in back, which makes putting on the supportive layer yourself next door to impossible. So I'm thinking and plotting and coming up with options.
Friday, June 24, 2011
Lacing points
A quick post to ask for some collective advice on lacing points or chapes...I need some for the end of my nice fingerlooped cords I've done for my new kirltes and don't have any. I'm not sure where to get the thin craft metal to make them myself (I live in a craft store back-water, it's tragic) and the only place the I've found that sells them online domestically is Historic Enterprises and they were out of stock the other day when I checked (plus I'm not sure those are good ones? They don't have pre-drilled sewing holes so that's a problem).
Anyway, I'm guessing I should be able to find some at Pennsic, but in the mean time, what to do so I can lace myself up? Any thoughts or ideas? Here's what I have so far:
Does anyone know of any other online resources for getting these things? I need some pretty small ones for the blue banded gown, the eyelets are small. I did come across some European sites with nice selections but they didn't give diameter measurements, and the prices were kind of high so I'm not sure that's the best solution.
Anyway, I'm guessing I should be able to find some at Pennsic, but in the mean time, what to do so I can lace myself up? Any thoughts or ideas? Here's what I have so far:
- Heat shrink tubing - actually had a little left over in my corset supply stash and it worked ok, except that one pulled off already. I think this is fine as long as your eyelet to point ratio is not to snug. It also won't shrink to a very sharp point which is sort of an issue for that one inevitable smaller-than-planned eyelet.
- Thread wrap (any maybe nail polish) - this worked with just thread on a soutach lace I have, so far it seems like the best option, though I wonder if it would be sturdy enough on a fingerlooped cord
- Lots of glue - might not hold together well over several lacings
- Tape - won't hold up in the wash
- Something else?
Does anyone know of any other online resources for getting these things? I need some pretty small ones for the blue banded gown, the eyelets are small. I did come across some European sites with nice selections but they didn't give diameter measurements, and the prices were kind of high so I'm not sure that's the best solution.
Wednesday, June 22, 2011
Some updates
What I week...I got some sort of Summer Plague and have been on antibiotics and generally miserable for the last week. No fun at all. I did manage to make it up to the William and Mary library last week as planned to get my alumni library card sorted out (yay for university library check out privileges!) and pick up some of the books I need for my 30 Year research before getting laid out by the Plague. It's been slow going getting my notes taken on the books, but I'm finally starting to feel better so I should be able to get caught up over the next few days.
The blue banded kirtle is done done done and looks pretty good. I even finished a new shift to wear with it. I'll need at least one more shift to be ready for Pennsic, with the new one I only have two with long sleeves and that won't get me too far. I decided to go ahead and modify the pattern to make a seamless straight-front kirtle as well, which is almost done. Modifying the pattern wasn't as easy as I thought it would be, it turned out to pretty fiddly to fit myself but I think now I have the general idea figured out. Fitting the gown itself was much easier than dealing with the pattern. The whole sewing of the dress has been slow going, probably because I've been sick, but all I have left to do is the sleeves, hem, hand-finishing of the seams and the eyelets.
I did all my pattern work for both dresses in cotton muslin, as that's what I had on hand, and ended up having to take the actual linen dress in a whole lot. Like over an inch. I've been taking patterns off muslins for a long time so I'm sure I didn't make that big a mistake in copying off the pattern and adding seam allowances. The only explanation I can come up with is that linen stretches a lot more than the muslin does. Or at least this linen does. Oh well, I suppose taking in the pattern would be a mistake, if I ever make a gown out of less stretchy fabric.
Once I get the straight front gown done, I have two more gowns to do as part of a fundraiser for our local barony (along with some underthings to go with them) before I can get back to my Pennsic sewing. In the mean time, I've got to warp up some dishtowels for my mom's birthday present. I'm going to do a waffle weave, not period as far as I know but I think she will like them.
I've managed to get a few other small things done, fixing my green kermit hose and making the fingerlooped cords for my kirtles (and learning two new patterns too). The cloak is cut out, and I've decided to finish at least the front and neck edges with a narrow silk facing like those seen in the MOL book, which I have cut out and ready to sew on. That should stabilize the lettuce edge and curved bit around the neck. The bottom hem I will just turn up and stitch.
So, lots to do! Now to get better, these afternoon naps are really not helping with getting stuff done.
The blue banded kirtle is done done done and looks pretty good. I even finished a new shift to wear with it. I'll need at least one more shift to be ready for Pennsic, with the new one I only have two with long sleeves and that won't get me too far. I decided to go ahead and modify the pattern to make a seamless straight-front kirtle as well, which is almost done. Modifying the pattern wasn't as easy as I thought it would be, it turned out to pretty fiddly to fit myself but I think now I have the general idea figured out. Fitting the gown itself was much easier than dealing with the pattern. The whole sewing of the dress has been slow going, probably because I've been sick, but all I have left to do is the sleeves, hem, hand-finishing of the seams and the eyelets.
I did all my pattern work for both dresses in cotton muslin, as that's what I had on hand, and ended up having to take the actual linen dress in a whole lot. Like over an inch. I've been taking patterns off muslins for a long time so I'm sure I didn't make that big a mistake in copying off the pattern and adding seam allowances. The only explanation I can come up with is that linen stretches a lot more than the muslin does. Or at least this linen does. Oh well, I suppose taking in the pattern would be a mistake, if I ever make a gown out of less stretchy fabric.
Once I get the straight front gown done, I have two more gowns to do as part of a fundraiser for our local barony (along with some underthings to go with them) before I can get back to my Pennsic sewing. In the mean time, I've got to warp up some dishtowels for my mom's birthday present. I'm going to do a waffle weave, not period as far as I know but I think she will like them.
I've managed to get a few other small things done, fixing my green kermit hose and making the fingerlooped cords for my kirtles (and learning two new patterns too). The cloak is cut out, and I've decided to finish at least the front and neck edges with a narrow silk facing like those seen in the MOL book, which I have cut out and ready to sew on. That should stabilize the lettuce edge and curved bit around the neck. The bottom hem I will just turn up and stitch.
So, lots to do! Now to get better, these afternoon naps are really not helping with getting stuff done.
Thursday, June 16, 2011
Research tips
When I was working on my undergraduate history degree my thesis adviser gave me lots of good advice. In addition to "Alcohol lubricates the brain" the other tidbit that has stuck with me and proved to be invaluable is "serendipity is your most valuable research tool." She was right then, I found many of my most helpful source material shelved next to the book I was actually looking for, and it's still true now in the internet age. A case in point...
Back in collage when I was active in the SCA the first time around (in Berkeley) I came across a picture of a tomb brass in a book of a lady in a funny loose gown with buttons all down the front, a silly hat, and a little dog. This gown fascinated me and seemed terribly comfortable for camping, so I worked with one of the local Laurels to come up with a plausible period method of drafting the pattern and made the dress. Soon after that I stopped playing and put the dress away. When I became active again, I pulled the dress out, but was unwilling to wear such an odd style without having the documentation for it to hand. I just couldn't remember where I had seen the picture, who it was of, or any details about it, nor could I find it in any of my own books. None of the research geeks in my new group had any ideas either when I tried to describe it, so I stuffed the dress away and moved on.
I was surfing around last night looking for images of cloaks and mantles, specifically 14th and 15th century cloaks and mantles, and I came across this site on 14th century ladies fashion, mostly from tomb monuments and brasses. Scrolling down the page, what do I happen upon but Lady Maylns, from Chinnor Church in Oxfordshir! The very same tomb brass that inspired my weird gown! Yay! So now I can wear my funny loose over gown with all the buttons again, and have yet another excuse to make a frilled veil.
Score another one for serendipity.
Back in collage when I was active in the SCA the first time around (in Berkeley) I came across a picture of a tomb brass in a book of a lady in a funny loose gown with buttons all down the front, a silly hat, and a little dog. This gown fascinated me and seemed terribly comfortable for camping, so I worked with one of the local Laurels to come up with a plausible period method of drafting the pattern and made the dress. Soon after that I stopped playing and put the dress away. When I became active again, I pulled the dress out, but was unwilling to wear such an odd style without having the documentation for it to hand. I just couldn't remember where I had seen the picture, who it was of, or any details about it, nor could I find it in any of my own books. None of the research geeks in my new group had any ideas either when I tried to describe it, so I stuffed the dress away and moved on.
I was surfing around last night looking for images of cloaks and mantles, specifically 14th and 15th century cloaks and mantles, and I came across this site on 14th century ladies fashion, mostly from tomb monuments and brasses. Scrolling down the page, what do I happen upon but Lady Maylns, from Chinnor Church in Oxfordshir! The very same tomb brass that inspired my weird gown! Yay! So now I can wear my funny loose over gown with all the buttons again, and have yet another excuse to make a frilled veil.
Score another one for serendipity.
Wednesday, June 15, 2011
More mantels
The kirtle being pretty much done (I have a few eyelets to finish yet, oh how I hates the eyelets), I've started looking at mantles. I've got my half circle mantle cut out, and decided to do a little bit of shaping through the shoulders, just to make the thing sit better and stay on. The pictures of women in mantles don't show a lot of bunching or folding in the back that you get if you don't shape the neck and shoulder (like what happens on a priest's cope), so I think it's a plausible thing to do.
First, we have Gerard David's Marriage at Cana. This picture makes me happy for a couple of reasons - there is a mantle on the bride, yes, AND Raymond's Quiet Press has a lovely reproduction of her cloak clasp, so that's a bonus. But the lady in the front with the funny white hood (yay for a white hood! The white hood is fun too) has a paternoster in her belt, and the seated woman facing her has a Perugia style towel used a lap napkin and a nifty circlet on her head - all things I'm working on in one way or another. Plus there's some fun silly hat action going. But back to the mantle. It's clearly lines in white, but it sort of looks like the white lining is coming around the red fabric of the body and binding the edge a bit, which suggests the binding idea might be on the right track.
The funeral brass of Joan Skerne shows a similar style mantle with a similar style closure (and another spiff hat), but there's not enough detail on the brass to tell how the edge of the mantle was finished. There really isn't enough detail any of the brasses I've been able to find to tell how the edge might have been finished, except to rule out major embroidery. So I tent to think women wore simpler mantles. It certaily makes scence to me that the sort of things that have survived, namely church vestments and the odd ceremonial rode, would be rather on the exceptional side and not the kind of thing one would wear every day, even if one was wealthy. The way the mantle hangs on Joan suggests to me that it is at least somewhat shaped through the shoulders though - there is certainly neck shaping. The cone neck you would end up with without shaping the neck would really get in the way of the hats and veils fashionable at the time.
We then have another guy from the Manesse Codex, who is a man but is wearing a cloak with a contrast lining and what appears to be some sort of contrast binding or trim a the edge. It's a little to hard to tell if this is artistic license, done so you can see the folds of the cloth, or actually a bit of detail thrown in for good measure. The fellow in the fur lined cloak also seems to have a bit of a white edging on his, which might just be the fur lining but could be some kind of binding/edging. The detail isn't great in these manuscripts though so sometimes it's hard to tell what the artist is or is not getting at. I've got to do a bit more digging around but from the what I can remember of the other painting I have seen, there's nothing much that's conclusive one way or the other. I thought I saw something that looked pretty clearly like a line of trim or cord on outside of the mantle, just inside from the edge of the front opening, but I can't find the painting just now (figures).
Anyway, I'm in picture collecting made thing to decide how to treat the hems. I don't want to do heavy embroidery as that seems to be a more ecclesiastical thing, and I also don't really want to do a full lining as the wool is quit heavy and the lining would just make the whole thing unbearable. I'm leaning towards a wide interior facing of some sort, or maybe just a narrow edge binding in silk or really smooth linen. So far, the narrow binding seems like a more plausible finish than the facing, though the facing would give me a buffer between the back of my neck and the wool of the cloak, not that wool bothers me much.
Doing something to the edge is definitely necessary, both to protect the wool from wear and to stabilize it. It may be thick and well-fulled but it still wants to stretch itself all out of shape and a bit of something less mooshy will help the front edge keep it's shape and hang neatly without going all lettucy on me. I just want to make sure it's as authentic a finish as it can be, somewhere in the back of my head I harbor not-so-secret thoughts about doing more serious reenacting one of these days (the kind with actual authenticity standards) and I don't want to have to re-do my whole kit if I can avoid it. Plus, authenticity is fun!
Sunday, June 12, 2011
Banded kirtle
Here is the banded kirtle (or so I've decided to call it) so far. As was pointed out, the front should dip down a little bit to more closely match at least the air filter hat picture, and probably also the Descent from the Cross gown as well, though that one is at an odd angle so it's harder to tell. I went with a square neck for this as that will work better under the gown this will eventually go under, and it also seemed a little easier to focus on one point of wierdness at a time (in this case the banding and the sleeve thing). The next iteration of this gown will have the dipped/sweetheart neck, now that I think I have the banding figured out.
You can see on the front that the line from the facing and strap is extending right into the underarm, giving the effect of a raglan seam. The sleeve is a normal sleeve shape, the trick to the raglan line is lining up the strap with the top facing bit and the armscye just right. To make that work the front neckline has to be high enough but as it turns out once the girls are lifted up and well-supported the neckline will end up in the right place.The back did not line up with the top facing quite as well - I need to shift it down to get it to line up right but by the time I realized it was not right fixing it would have been far more trouble than I can go through without extra fabric to re-cut anything if I need to. I think if I think more about how I put the sleeve and facings and shoulder bands together I could avoid this issue next time, but again you can see where the raglan line is coming from. It's just the shoulder strap.
Overall, I'm pretty happy with how this has come out. I still need to do the eyelets down the front and fingerloop a lacing cord, then once I can lace the whole thing up I can level the hem and finish it up. The strap thing was fairly easy to work out and fit on myself, though it would have been easier to do some of the tweaking in back with an extra set of hands (duh). One nice thing about this particular design is that you can get a really wide neck and still have useful and secure shoulder straps. Even with the sleeves in and the skirt on, nothing is shifting around or slipping off and I still have a nice wide, open neckline, which will be nice with later houppelands and early Burgundian styles.
Subscribe to:
Posts (Atom)