I cannot decide what to sew. There isn't much going on around here until after Pennsic, but there are quite a few events coming up in the fall that I am going to need new cloths for. Partly because I just need more cloths, and partly because I am (slowly) shrinking. Finally. Which is good, except that I can't very well work on supportive layers or really fitted things if I am changing shape, however slowly. After just 15 pounds none of my supportive gowns are supporting and they are starting to look a little funny in the belly area too.
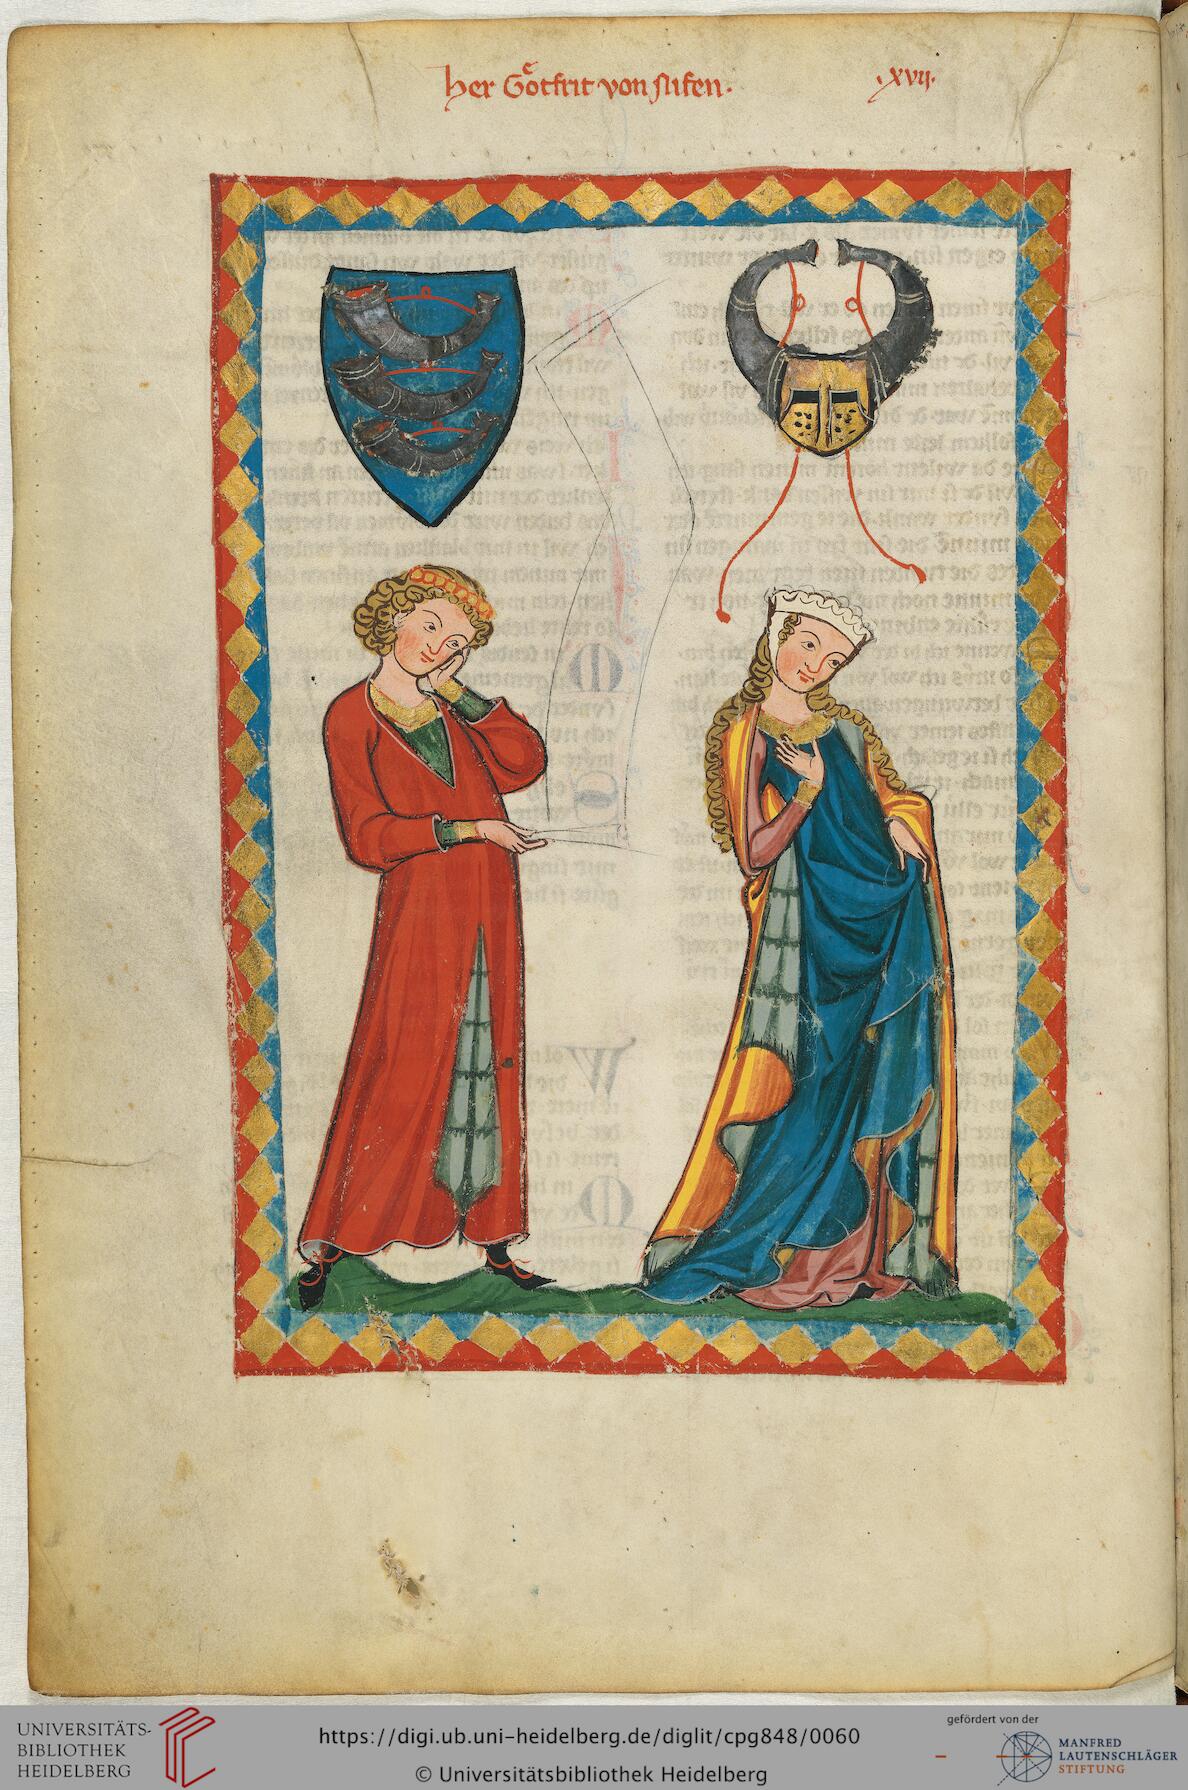
So, I want to sew something. I have all of this lovely wool to work with (in the hot, humid Virginia summer of course!), but I don't know what I should work on. I need to make a cyclas and gown from the Manesse Codex, and as those are not really fitted it would probably be a good place to start. Plus there is the fun hat. I have some lovely burgundy wool I want to use for the cyclas layer, and I'm not really sure what I'm going to do about the undergown. It really should be wool, and I have cream and some gold wool that would work, but this is for an event in early November. It could be cold, or it could be warm. I'm thinking a linen undergown might be a better way to go for comfort, plus I would be able to get more use out of the outfit. Of course I don't have any linen for that part.
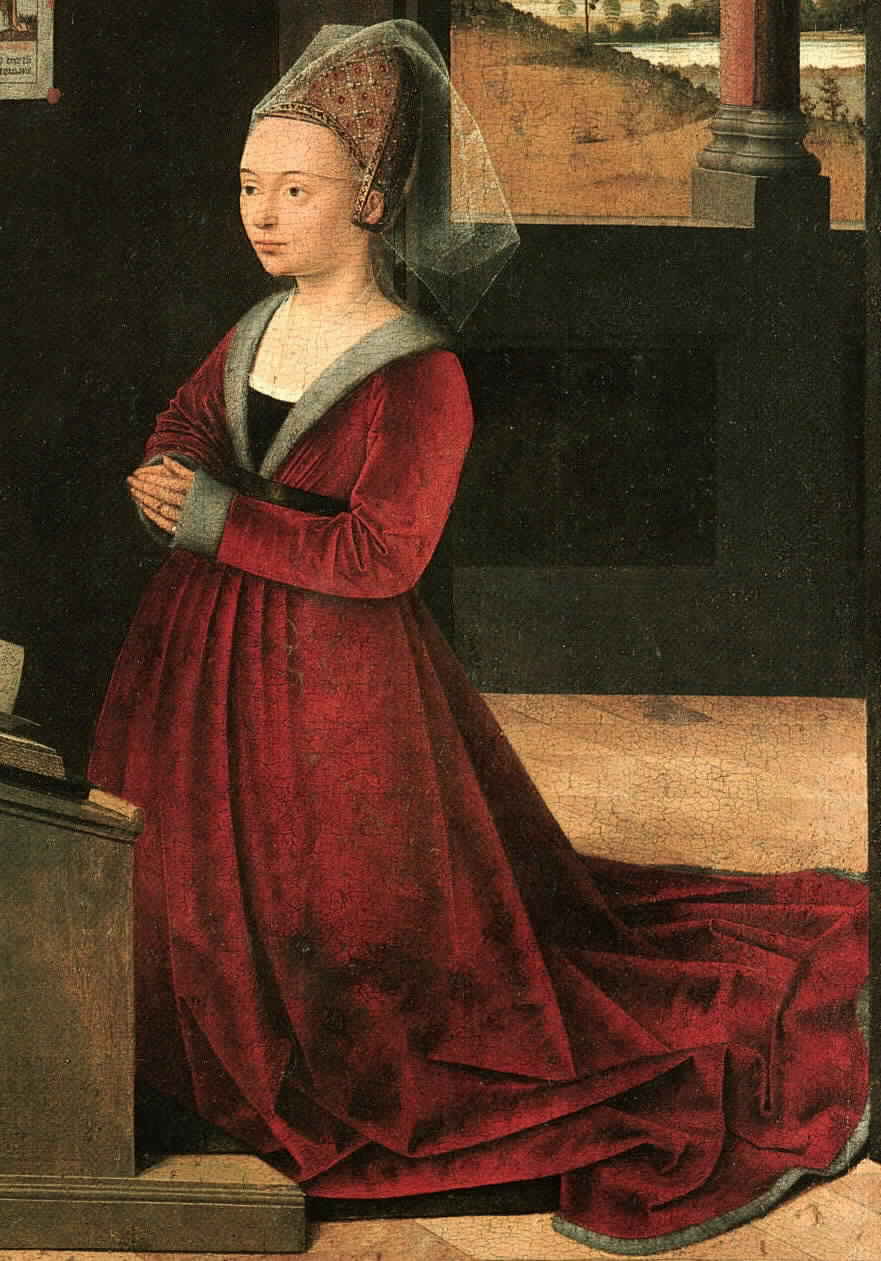
I also have been wanting to make a transitional houppeland like the one in the Petrus Cristus painting at right. As far as the outer layer is concerned, it's not that fitted so I would probably be safe making it now for fall events. I have some dark pink wool in a herringbone pattern that will look quite lovely for this style of dress, in a more middle class/every-day sort of way. I may have to pull it in a bit at some point through the shoulders, but if I use a modified G-63 pattern this should be fairly easy to do. I have some lovely black wool to do the collar and cuffs, and will probably use heavy linen as a hem guard. Lining the whole dress is out of the question for the weather here, even in winter I would roast.
There is also the Mary of Hungry dress I've been researching. I can certainly start on the smocking, and should have enough light weight linen to do that, but the supportive layer and overgown are both too fitted to bother with now.
So what to do first? Cyclas? Start the smock as an ongoing embroidery project? Houppeland/proto Burgundian? I really need to do something as a break from the weaving. The loom is almost warped for the Perugia towel (I can't focus on it for much more than an hour at a stretch) and I know the pick-up portion for the weaving is going to be slow going plus I really need something portable other than my current brick stitch project.
Friday, June 22, 2012
Wednesday, June 20, 2012
More on Mary
| Unknown painter - Portrait of Kunigunde of Austria, 1485 |
Of course now I wonder if the provenance of the gown is correct. Given that it's a royal gown I would tend to think the history of it is at least somewhat correct and that Mary wore it, but why she would choose to wear something out of date by several decades is an open issue. Marion suggested she may have been wearing one of Mary of Burgundy's gown, or one belonging to her sister in law, for the coronation festivities that occurred in the 1520s. This makes sense and bears a bit more research. I did find a website devoted to Hungarian art, so that should be a bit of a help. There are a few images there that show gowns quite similar to this one. Hopefully I will be able to find some reliable information on coordinating head-wear while I'm poking around.
So now I have a lot to think about, and may have to actually write up documentation on this project. If I find anything interesting I will be sure to post about it. I'm really wishing I spoke about 5 languages this week though, between this project and the Lengberg "bras" (more on that later) I'm running into a lot of translation issues.
Monday, June 18, 2012
Mary of Hungary
I'm in the process of planning my garb for 12th night this year, which is set at the court of Henry VIII early in his reign before he went all nutso and cranky. Straight Tudor has very little appeal to me, and I had run across the Mary of Hungary gown awhile back so this seems like a good excuse to make it. Plus there is smocking! Yay smocking!
Anyway, the dress is supposedly dated to 1520, however the only other artistic representation of this style of gown I've been able to find so far is dated 1490. It does sort of look like a cross between a late 15th century Burgundian gown and an early 16th century gown, so I'm wondering what the correct dating is.
I'm also not sure what the correct supportive undergarment would be for this. My initial thought, given the 1520 dating, is a pair of bodies maybe with an attached petticoat, work under the smocked chemise. Someone else suggested a 15th century style kirtle, and yet another person has suggested that the chemise is actually the body layer and the kirtle would then go over it. Given the limited source material I have on this style, I'm not sure. Wearing a chemise with silver embroidery on it next to the skin seems a little strange to me, as you can't really wash the embroidery. Plus the stove tile that is my only other reference at this point appears to show the chemise without anything over it.
Has anyone seen any other references to this gown that might solve the dating/underwear questions? So far I have the following-
Original article on Cynthia Virtue's site, with the stove tile image
Image gallery on Flight of Fancy
Project Diary/notes from Flight of Fancy - she mentioned two books as additional sources which I do not have access to
Hungarian National Museum description
Frazzeld Frau write-up
Pintrest board by Marion McNealy - the portraits here suggest an earlier dating (1475-90). Marion has also told me that the museum is now dating the fabric to 1475, which given the images we have so far makes more sense.
Anyway, the dress is supposedly dated to 1520, however the only other artistic representation of this style of gown I've been able to find so far is dated 1490. It does sort of look like a cross between a late 15th century Burgundian gown and an early 16th century gown, so I'm wondering what the correct dating is.
I'm also not sure what the correct supportive undergarment would be for this. My initial thought, given the 1520 dating, is a pair of bodies maybe with an attached petticoat, work under the smocked chemise. Someone else suggested a 15th century style kirtle, and yet another person has suggested that the chemise is actually the body layer and the kirtle would then go over it. Given the limited source material I have on this style, I'm not sure. Wearing a chemise with silver embroidery on it next to the skin seems a little strange to me, as you can't really wash the embroidery. Plus the stove tile that is my only other reference at this point appears to show the chemise without anything over it.
Has anyone seen any other references to this gown that might solve the dating/underwear questions? So far I have the following-
Original article on Cynthia Virtue's site, with the stove tile image
Image gallery on Flight of Fancy
Project Diary/notes from Flight of Fancy - she mentioned two books as additional sources which I do not have access to
Hungarian National Museum description
Frazzeld Frau write-up
Pintrest board by Marion McNealy - the portraits here suggest an earlier dating (1475-90). Marion has also told me that the museum is now dating the fabric to 1475, which given the images we have so far makes more sense.
Weaving update
After much hemming and hawing and gnashing of teeth, I've finally started actual work on weaving my Perugia towel. Or at least trying to warp the bloody thing. It's not going well. I decided to use 40/4 linen, which is pretty close to what was used on the original, and have ended up with a total of 1278 warp ends. I ended up having to scrounge up more heddels for my loom to accommodate all of these threads and rearrange the ones I already had to work with the pattern draft.
Once I got almost halfway done threading, I realized that the pattern draft I was using (from the CA on Perugia towels) has a mistake. It will not allow you to treadle tabby, which you need to do for the actual Perugia part of the towel (the blue brocaded bands). So I re-drafted the draw-down and started re-threading the loom only to discover that I now had my heddles arranged such that I did not have enough on the 3rd and 4th shaft of the loom. I've now solved that problem, only to snap one of my warps in the process.
Fixing a snapped warp is not that hard, it just sucks to have to do it this soon. I mean, I don't even have the whole thing threaded yet. I'm hoping and praying that I actually have the warp arranged on the loom correctly, since I an so short of heddles for this project I need to have exactly half the threads on each side of the center mark on the shafts, or I'm going to run out of heddles. They make clip-in repair heddles, which are sort of expensive but I may have to break down and order some just in case.
To make things just that much more annoying, I discovered that I made a mistake on the brick stitch book cushion, right in the middle no less, and had to rip out about 4 hours worth of work. So I spent the better part of a day last week ripping out and re-doing what I had already done.
Some weeks are like that I guess.
Once I got almost halfway done threading, I realized that the pattern draft I was using (from the CA on Perugia towels) has a mistake. It will not allow you to treadle tabby, which you need to do for the actual Perugia part of the towel (the blue brocaded bands). So I re-drafted the draw-down and started re-threading the loom only to discover that I now had my heddles arranged such that I did not have enough on the 3rd and 4th shaft of the loom. I've now solved that problem, only to snap one of my warps in the process.
Fixing a snapped warp is not that hard, it just sucks to have to do it this soon. I mean, I don't even have the whole thing threaded yet. I'm hoping and praying that I actually have the warp arranged on the loom correctly, since I an so short of heddles for this project I need to have exactly half the threads on each side of the center mark on the shafts, or I'm going to run out of heddles. They make clip-in repair heddles, which are sort of expensive but I may have to break down and order some just in case.
To make things just that much more annoying, I discovered that I made a mistake on the brick stitch book cushion, right in the middle no less, and had to rip out about 4 hours worth of work. So I spent the better part of a day last week ripping out and re-doing what I had already done.
Some weeks are like that I guess.
Monday, June 4, 2012
Elizabethan Embroidery
| Primrose worked in detached buttonhole |
| Pomegranate worked in trellis stitch |
Sunday, June 3, 2012
Finished Apron
Sadly, I didn't get any pictures of me wering the apron, but you can still see how it turned out. The whole thing is hand-sewn with linen thread through I did use modern poly sewing thread to do the pleating (mostly because I didn't waste my good linen on basting). I'm looking forward to doing another one with a slightly more interesting smocking design.
Thursday, May 17, 2012
Doublefaced tablet weaving, a start
I've finally started my first try at doublefaced tablet weaving! The pattern was adapted from a larger design found in Collingwood and is only 18 cards wide, largely because that's just about how many wood tablet I had when I started this and it seemed like an easily manageable number of cards to deal with. I'm working with size 8 pearl cotton, again because I had that on hand and it's inexpensive. Throwing out large amounts of silk when the band goes wrong just makes me cringe, so I've been doing a great deal of my experimenting with cotton. It's not really period, but it works ok and still produces something I am comfortable using at least at SCA events.
So far I'm finding this technique to be much easier than anticipated. Manipulating the cards is not terribly difficult, and I'm starting to see where I am at with the pattern just by looking at the band. The DH pointed out that it's really a bit map, and for whatever reason looking at the whole thing in terms of pixels sort of works for me. Because each color shift is 2 turns, it's easy to see what you just did and figure out from there what's next. It's certainly easier than some of the textured bands I've been working on, where I can't tell what I just did most of the time.
The one problem with this particular band is the colors. It turns out that higher contrast yarns are needed for this, otherwise you end up with very subtle patterns (as you can see below). On skeins it looked like the pink and light green would would out, but the design isn't popping much at all. Funny enough, the small striped section looks fine, it's only when you get into the doublefaced part that the colors blend together. This band is destined to become a set of garters, so it won't make much of a difference. If I were going to use it as trim or a belt I would be more unhappy.
So far I'm finding this technique to be much easier than anticipated. Manipulating the cards is not terribly difficult, and I'm starting to see where I am at with the pattern just by looking at the band. The DH pointed out that it's really a bit map, and for whatever reason looking at the whole thing in terms of pixels sort of works for me. Because each color shift is 2 turns, it's easy to see what you just did and figure out from there what's next. It's certainly easier than some of the textured bands I've been working on, where I can't tell what I just did most of the time.
The one problem with this particular band is the colors. It turns out that higher contrast yarns are needed for this, otherwise you end up with very subtle patterns (as you can see below). On skeins it looked like the pink and light green would would out, but the design isn't popping much at all. Funny enough, the small striped section looks fine, it's only when you get into the doublefaced part that the colors blend together. This band is destined to become a set of garters, so it won't make much of a difference. If I were going to use it as trim or a belt I would be more unhappy.
Monday, May 14, 2012
More smocking
Following up on my last post, where I attempted smocking for the first time in preparation for a smocking apron a la The Lutrell Psalter, I managed to do a second swatch with shallower pleats this weekend. This time I used a piece of cloth 10 inches long and pleated using the pick-up-the-dot method, rather than making cartridge pleats. Both methods are described very well on the Pleatwork Embroidery website.
My dots were spaced 1/4 of an inch apart, resulting in 1/4 inch deep pleats on the first sample, and 1/8 inch deep pleats on the second. My final bit of smocked fabric ended up being about 4 inches wide on the second sample, which means that my final apron will need to be only 36 inches wide at the hem, much better than the nearly 60 inches I would need using the cartridge pleats. I also like the look of the smaller pleats better, even though they are a little harder to wrangle into place. The large pleats give a more lush look to the piece, particularly in the honeycomb section, but since I want to smock with more than just honeycomb (which is much stretchier than the other stitches), the top bit of the apron will end up a little tighter than the bottom section of smocking, an effect that will I think look well and control the fullness of the finished apron nicely without adding an absurd amount of bulk to the finished apron. I may end up doing two aprons, in which case one will probably be plain honeycomb worked with deeper pleats.
I found that the pleats were easier to control if I ran my pleat/gathering lines closer together on the narrower pleats (no more than 1/4 inch apart), whereas I was able to do half as many lines of gathering on the deeper pleats. I also found that by picking up the dots, I ended up with the dots on the surface of the pleats which created a nice straight line I could use as a guide for my first few lines of stitching. This helped keep the second sample much neater looking than the first, and I had no need to draw in guide lines on the surface of the cloth. I will need to make sure that whatever I use to mark the dots will wash out. I used pencil on the sample, which tends not to come off the fine linen easily. Somewhere I have some other fabric markers that should work better.
My dots were spaced 1/4 of an inch apart, resulting in 1/4 inch deep pleats on the first sample, and 1/8 inch deep pleats on the second. My final bit of smocked fabric ended up being about 4 inches wide on the second sample, which means that my final apron will need to be only 36 inches wide at the hem, much better than the nearly 60 inches I would need using the cartridge pleats. I also like the look of the smaller pleats better, even though they are a little harder to wrangle into place. The large pleats give a more lush look to the piece, particularly in the honeycomb section, but since I want to smock with more than just honeycomb (which is much stretchier than the other stitches), the top bit of the apron will end up a little tighter than the bottom section of smocking, an effect that will I think look well and control the fullness of the finished apron nicely without adding an absurd amount of bulk to the finished apron. I may end up doing two aprons, in which case one will probably be plain honeycomb worked with deeper pleats.
I found that the pleats were easier to control if I ran my pleat/gathering lines closer together on the narrower pleats (no more than 1/4 inch apart), whereas I was able to do half as many lines of gathering on the deeper pleats. I also found that by picking up the dots, I ended up with the dots on the surface of the pleats which created a nice straight line I could use as a guide for my first few lines of stitching. This helped keep the second sample much neater looking than the first, and I had no need to draw in guide lines on the surface of the cloth. I will need to make sure that whatever I use to mark the dots will wash out. I used pencil on the sample, which tends not to come off the fine linen easily. Somewhere I have some other fabric markers that should work better.
Saturday, May 12, 2012
Smocking, attempt 1
Today I hosted a sewing circle for my local SCA group and used the time to work on my first ever smocking sample, in preparation for making a smocked apron similar to those seen in the Lutrell Psalter. I've created a pin board on Pintrest to gather resources for this project, but you can see from the image to the left a long narrow apron with some kind of pleating at the top. This particular style of apron seems to have been popular from the mid-14th century all the way through the 16th and to have eventually caught on with the wealthy. You can see it in a number of portraits and German wood-cuts being worn by women of all social classes.
I was initially inspired to make one of these aprons after seeing the beautiful examples at Medieval Silkwork. Isis and Machteld always do lovely work and once again managed to inspire me to try something new. Here is my first-even attempt at smocking, done so I can figure out how much fabric I will need for the final apron.
You can see from the pictures that my first line of stitching got a bit wonky. For some reason I had a very hard time stitching in a straight line. I think if I chalk out some guide lines on top of my pleats I will be able to keep things looking a bit neater. Some of the pleats themselves are not perfectly even either, which probably didn't help. I cartridge pleated the pleats, and I think if I switch to the pick-up-the-dot method of pleating they may end up being a bit more even and easier to control (and also a little smaller, which I think will be a good thing). I ended up pleating 29 inches of 3.5oz linen into 7 inches of smocking, which will end up making a very full apron. I suspect I can eliminate a little fullness by making shallower pleats (I used 1/4 inch graphing paper to make a pleat template). Since I want the apron to be fairly narrow, this will leave me with a 60 inch wide piece of fabric pleated into 14 inches. I'll be doing another sample tonight or tomorrow with smaller pleats to see if I can improve that pleating ratio a bit.
My only other concern with this project is the thread used for the smocking itself. I used two strands of cotton embroidery floss on the sample, which worked well but could possibly be a little thicker. I am assuming that silk or linen thread would have been used in period. Linen thread will work better as it simplifies washing the finished apron (assuming I need to bleach or oxy-clean the apron, silk will not hold up), but the silk would make fuller stitches and cover better. Finding suitable linen thread is challenging in this area to say the least. I have some 20/2 weaving thread that might work, so I'll try that with my second sample.
I was initially inspired to make one of these aprons after seeing the beautiful examples at Medieval Silkwork. Isis and Machteld always do lovely work and once again managed to inspire me to try something new. Here is my first-even attempt at smocking, done so I can figure out how much fabric I will need for the final apron.
|
|
You can see from the pictures that my first line of stitching got a bit wonky. For some reason I had a very hard time stitching in a straight line. I think if I chalk out some guide lines on top of my pleats I will be able to keep things looking a bit neater. Some of the pleats themselves are not perfectly even either, which probably didn't help. I cartridge pleated the pleats, and I think if I switch to the pick-up-the-dot method of pleating they may end up being a bit more even and easier to control (and also a little smaller, which I think will be a good thing). I ended up pleating 29 inches of 3.5oz linen into 7 inches of smocking, which will end up making a very full apron. I suspect I can eliminate a little fullness by making shallower pleats (I used 1/4 inch graphing paper to make a pleat template). Since I want the apron to be fairly narrow, this will leave me with a 60 inch wide piece of fabric pleated into 14 inches. I'll be doing another sample tonight or tomorrow with smaller pleats to see if I can improve that pleating ratio a bit.
My only other concern with this project is the thread used for the smocking itself. I used two strands of cotton embroidery floss on the sample, which worked well but could possibly be a little thicker. I am assuming that silk or linen thread would have been used in period. Linen thread will work better as it simplifies washing the finished apron (assuming I need to bleach or oxy-clean the apron, silk will not hold up), but the silk would make fuller stitches and cover better. Finding suitable linen thread is challenging in this area to say the least. I have some 20/2 weaving thread that might work, so I'll try that with my second sample.
New studio!
I've finally got my sewing studio moved from one end of the house to the other and so far I am really liking the new arrangement. I have a lot more room to sew in, and the ironing board is right next to the machine and the computer and scanner are in the same corner so it at least feels like I'm working more efficiently. This is really important for my work projects, less so for the historical ones as I don't use the machine as much. The space wasn't quite large enough to put the loom into as well, but so far that's working out ok too. The loom room has been cleaned out of various bits of office stuff and rearranged so I can sit and weave and look out the window. The natural light in that particular room should be helpful when doing pick-ups and warping.
The cat likes the new room too. She's been trying out various places to hang out in there. So far, her favorite is on my chair, but when I am so rude as to require use of the chair myself she's taken to hanging out on my desk, behind the sewing machine. She even tries to bat at things while I'm working which is not good at all but very entertaining. I need to go pick up a window perch for her I think.
Friday, May 11, 2012
More tabletweaving!
Finishing the headband/fillet seems to have gotten me motivated to do more tabletweaving. This is a good thing, as I need to work on getting better at it it and have several A&S50 projects related to tabletweaving. Plus both the DH and I need some garters.After I finished the fillet (see my previous post) I warped up some basic pearl cotton and gave the stripped London band (MOL 449) another shot. I had used this particular band as a pattern for the first tablet weaving I ever did. It started out a little wonky but by the end it looked pretty good, but the end result was a totally useless strip of band. The new version was done in green and gold and will become garters for the DH.
Overall I am very pleased with how this turned out. There are a couple of small problems with the selvedges, and I still don't like the look of my direction changes, but the band is even in width, nice and firm and actually long enough to make two garters without wierd tassels at the end. Hopefully I can find some nice buckles and belt tips that will fit it.
For my next trick, I'm going to start on doubleface. I have some simple patterns that aren't too wide, which should give me another set of garters and be a good learning tool. I'm going to try in cotton first and then move on to the bamboo. I really need to make a cloth belt for my Viking kit, so hopefully this will move me a step in that direction.
Wednesday, May 9, 2012
MOL 142 Redux
I posted awhile back about my first attempt at tabletweaving MOL band 142. It had not gone well, not because the weaving itself was terribly difficult but because I had chosen to use pearl cotton to make the band. The cotton looked pretty bad and made it difficult to get an even selvedge.
I tried again, this time with bamboo thread, and the results were far far better! The bamboo behaves a lot like silk but is considerably less expensive so for timid and cheep tablet weavers like myself it's a good alternative when basically practicing new techniques. If it all goes well you still end up with a lovely band that you can wear or use just like a silk band, but if it does not go so well you are not throwing out a large amount of expensive yarns.
My plan with this particular project was to make a fillet, which is what the original band was used for (this is the one with bits of fake hair attached to it). The original showed evidence of having had plaques of some kind sewn to it, so I found some flat beads that could be used in place of the plaques and sewed them to the band. I'm quite pleased with the end result. Trying it on with my hair down and no veil it looked a little hippie-dippy, and far more Pocahontas-like than I would like, but with my hair done properly and a veil I think it will look quite nice.
Overall I would say this project is a success! It's really only my second tablet weaving project (the first being the indigo linen garters), which makes me feel a lot better about some of the small problems and imperfections in the band. One thing I did learn doing this for a second time is that leaving the band alone for too long results in some visible problems with the weaving. Perhaps this will get better with time, but looking at the band you can tell where I put the project aside for awhile and picked it up again later. Longer work sessions, placed closer together, resulted in smoother weaving and cleaner selvedges.
My plan with this particular project was to make a fillet, which is what the original band was used for (this is the one with bits of fake hair attached to it). The original showed evidence of having had plaques of some kind sewn to it, so I found some flat beads that could be used in place of the plaques and sewed them to the band. I'm quite pleased with the end result. Trying it on with my hair down and no veil it looked a little hippie-dippy, and far more Pocahontas-like than I would like, but with my hair done properly and a veil I think it will look quite nice.
Overall I would say this project is a success! It's really only my second tablet weaving project (the first being the indigo linen garters), which makes me feel a lot better about some of the small problems and imperfections in the band. One thing I did learn doing this for a second time is that leaving the band alone for too long results in some visible problems with the weaving. Perhaps this will get better with time, but looking at the band you can tell where I put the project aside for awhile and picked it up again later. Longer work sessions, placed closer together, resulted in smoother weaving and cleaner selvedges.
Tuesday, April 24, 2012
Viking Weekend, a Summary
I spent the weekend at a Viking living history event, which was a lot of fun. Having actual authenticity standards in how we do things and not all being lords and ladies is sort of nice for a change. We were part of an historical encampment at a highland games in North Carolina. In no particular order, here is what I accomplished/learned over the weekend. Longer write-ups and pictures of many of these things are on the way.
1. Churning butter is rude. It just is. There's no avoiding the crude jokes with this one.
2. Half of my fiber processing tools are also rude. This, along with the butter, makes for an interesting weekend
3. Combing wool is much easier than I thought it would be but just as dangerous. Oddly, the dangerous part wasn't were I thought it would be (i.e. I didn't stab myself until I was rooting around in the basket with the wool combs looking for something else, not when I was using the combs)
4. Whipcording is easy! And fun!
5. Spear fighting is also fun (when did my life turn into Game of Thrones?)
6. It is possible to do a long draw with a drop spindle, or at least something pretty close to a long draw, with nicely combed fibers. Who knew?
7. Oh how I do love using a distaff, and oh how I do need to sand the hell out of the stick I was using as a distaff!
8. Bog shoes (the ones that look like gillies) hold a surprising amount of water in them.
2. Half of my fiber processing tools are also rude. This, along with the butter, makes for an interesting weekend
3. Combing wool is much easier than I thought it would be but just as dangerous. Oddly, the dangerous part wasn't were I thought it would be (i.e. I didn't stab myself until I was rooting around in the basket with the wool combs looking for something else, not when I was using the combs)
4. Whipcording is easy! And fun!
5. Spear fighting is also fun (when did my life turn into Game of Thrones?)
6. It is possible to do a long draw with a drop spindle, or at least something pretty close to a long draw, with nicely combed fibers. Who knew?
7. Oh how I do love using a distaff, and oh how I do need to sand the hell out of the stick I was using as a distaff!
8. Bog shoes (the ones that look like gillies) hold a surprising amount of water in them.
Sunday, April 15, 2012
Soignies Relic Bag for Queen's Largess
For some reason I have not posted about this project as it was in progress. It was one of those small things that I picked up to use up some thread in the stash of cotton, an odd bit of even weave, and keep me motivated while I work on Book Cushion of Doom. I can't be the only person who does this - keeps a small project going in the midst of a huge, interminable project just so they can see some evidence of progress and get that thrill of completion to keep them going on the bigger thing?
Anyway, since I need yet another brick stitched thing like I need a hole in my head, I decided that whatever this little bit of embroidery turned out to be would go towards the largess basket for Pennsic this year. I had been looking at the Soignies bag, so beautifully redacted by Isis at Medieval Silkwork. It's a nice, small bag in a simple lozenge pattern which as it turns out was very easy to work and went along comparatively quickly. I think the trick with "easy" brick stitch, or counted work in general, is the size and complexity of the pattern. The larger the repeat, or the more obfuscated the pattern, the harder the pattern will be. In hindsight this seems to be perfectly obvious but somehow it didn't occur to me that this would be the case when I picked a strangely repeating keyhole design for my first project and a massively huge lozenge with keyholes for the cushion. Don't even get me started on the eyelettes. That wasn't difficult so much as time consuming.
I ended up working the bag on 24 count linen with 3 strands of cotton, as this is what I had handy. Also, I suspect that if someone receives this as a gift they might be more inclined to use it if it's made from cotton rather than silk, which for some reason people who don't embroider perceive as more delicate. I found that I liked the proportion of the bag better with an attached band for the draw cords, so I added that, even though it's not found on the original, using the same linen used for the lining. As finished, it should be the perfect size for carrying around a bit of cash, ID, a couple of credit cards and a blue card at an event. Perfect for shopping!
This weekend was Spring Coronation and the A&S competition was centered around largess so, since this was finished and ready to go, I entered it. I won! But better than that, when I went to pick up my comment book and documentation, the new queen made a point of pulling me aside and telling me how much she liked it and how grateful she was for it. That was better than any prize. I'll never really know if whoever she gives it to likes it, but I know she does and that's just as good.
Anyway, since I need yet another brick stitched thing like I need a hole in my head, I decided that whatever this little bit of embroidery turned out to be would go towards the largess basket for Pennsic this year. I had been looking at the Soignies bag, so beautifully redacted by Isis at Medieval Silkwork. It's a nice, small bag in a simple lozenge pattern which as it turns out was very easy to work and went along comparatively quickly. I think the trick with "easy" brick stitch, or counted work in general, is the size and complexity of the pattern. The larger the repeat, or the more obfuscated the pattern, the harder the pattern will be. In hindsight this seems to be perfectly obvious but somehow it didn't occur to me that this would be the case when I picked a strangely repeating keyhole design for my first project and a massively huge lozenge with keyholes for the cushion. Don't even get me started on the eyelettes. That wasn't difficult so much as time consuming.
I ended up working the bag on 24 count linen with 3 strands of cotton, as this is what I had handy. Also, I suspect that if someone receives this as a gift they might be more inclined to use it if it's made from cotton rather than silk, which for some reason people who don't embroider perceive as more delicate. I found that I liked the proportion of the bag better with an attached band for the draw cords, so I added that, even though it's not found on the original, using the same linen used for the lining. As finished, it should be the perfect size for carrying around a bit of cash, ID, a couple of credit cards and a blue card at an event. Perfect for shopping!
Wednesday, April 11, 2012
Life and Hose From a Flat Pattern
Wow...what a crazy last few weeks (has it been a whole month?) it's been! We decided to swap offices, which turned into a pretty major renovation on the garage/office (or groffice) which was become my sewing studio. It was badly converted by the previous owner and the dogs and my former cat did some pretty major damage to the old carpet that had been glued (!!??!) with ever so much glue down. So once all the stuff got moved out into various other parts of the house, including the dinning area and my loom room, the DH pulled out the stinky carpet and I went to work with stripper and a scraper.
Ugh.
Then I painted the walls, painted the floor (in the end, faster than putting down tiles or some sort and there are no cracks for any further doggie accidents, plus we can tile or linoleum over it) and moved in last weekend after a five day trip to Southern California to visit my grandmother for her 90th birthday, only no one had bothered to let me know she had been sick for all of March and was in a convalescent home until the week prior to the trip. She's 90, so things starting to go is not that surprising but still it would be nice to know that she was *that* sick.
But I digress.
While out in CA, I visited one of my favorite wool shops, Village Spinning and Weaving, which is where I got my spinning wheel, and they placed a wholesale order for my knitting needle cases! Hurray! My very first wholesale account! So in the midst of all this work space moving I've been trying to fill a wholesale order, stay current on the commission I have for later this month, and get the projects I have to do for events this month done. All I have to say about that is thank God my anxiety meds are working. This is all very good stuff, but it's more than I have had on my plate at once time since the accident.
Anyhow, one of the commissions I have right now is for a pair of men's hose appropriate for a Norman persona. The client is a member of my Viking living history group and lives in North Carolina, so the authenticity standard is high and the availability of his leg for fittings is low. I will see him next weekend, so that plan is have a mock up ready for him, and hopefully cut out and at least start assembling the hose (mostly by hand) at the reenactment event we will be at. My usual method of draping a hose pattern clearly isn't going to work here, so I had to figure out how to flat pattern hose. Luckily I found a hose drafting tutorial at the Medeival Tailor! Hurray! The only problem with it is that the foot shape isn't quite what I wanted for an early period set of hose, she's got a simplified version of the London hose with a flat, inset sole peice, which as it turns out is documentable, but the more typical shape for early period seems to the stirrup style you see in the original London hose, the Greenland finds, and even a pair of Roman hose. There is a seam under the foot in this style of hose, which can be a little weird for modern feet to adjust to, but done in wool the seam would compact and not be a problem.
I decided to use my husband's linen hose and a set of wool hose for myself as a test to get the foot shaping right and what do you know but this is even easier than draping! It helps that the pattern shaping is fundamentally simpler than the gore type hose I was making before, but I think you can see from the photo that it fits quite nicely. This pair was made up after one fitting, after which the only modifications I had to make were to take in the toe area and adjust the curve of the heel. I could have probably avoid the toe adjustment if I had taken more measurements of the foot, but I wanted to work with the measurements I had of my client. Getting the heel curve right I suspect just takes some practice and a little adjustment, not a big deal.
I will have to write up how I did this, as TMT's directions are really only useful until you get to the bottom of the leg, once you get into the foot shaping things go a little funny if you want the seam under the foot sort of hose. To give you some idea, I was able to get the pattern drafted, fit and a pair of hose constructed in less than 3 hours, as compared to the 6 it took when draping just to get a pattern. I still need to hand finish the seams but that's a huge time-saver.
Ugh.
Then I painted the walls, painted the floor (in the end, faster than putting down tiles or some sort and there are no cracks for any further doggie accidents, plus we can tile or linoleum over it) and moved in last weekend after a five day trip to Southern California to visit my grandmother for her 90th birthday, only no one had bothered to let me know she had been sick for all of March and was in a convalescent home until the week prior to the trip. She's 90, so things starting to go is not that surprising but still it would be nice to know that she was *that* sick.
But I digress.
While out in CA, I visited one of my favorite wool shops, Village Spinning and Weaving, which is where I got my spinning wheel, and they placed a wholesale order for my knitting needle cases! Hurray! My very first wholesale account! So in the midst of all this work space moving I've been trying to fill a wholesale order, stay current on the commission I have for later this month, and get the projects I have to do for events this month done. All I have to say about that is thank God my anxiety meds are working. This is all very good stuff, but it's more than I have had on my plate at once time since the accident.
Anyhow, one of the commissions I have right now is for a pair of men's hose appropriate for a Norman persona. The client is a member of my Viking living history group and lives in North Carolina, so the authenticity standard is high and the availability of his leg for fittings is low. I will see him next weekend, so that plan is have a mock up ready for him, and hopefully cut out and at least start assembling the hose (mostly by hand) at the reenactment event we will be at. My usual method of draping a hose pattern clearly isn't going to work here, so I had to figure out how to flat pattern hose. Luckily I found a hose drafting tutorial at the Medeival Tailor! Hurray! The only problem with it is that the foot shape isn't quite what I wanted for an early period set of hose, she's got a simplified version of the London hose with a flat, inset sole peice, which as it turns out is documentable, but the more typical shape for early period seems to the stirrup style you see in the original London hose, the Greenland finds, and even a pair of Roman hose. There is a seam under the foot in this style of hose, which can be a little weird for modern feet to adjust to, but done in wool the seam would compact and not be a problem.I decided to use my husband's linen hose and a set of wool hose for myself as a test to get the foot shaping right and what do you know but this is even easier than draping! It helps that the pattern shaping is fundamentally simpler than the gore type hose I was making before, but I think you can see from the photo that it fits quite nicely. This pair was made up after one fitting, after which the only modifications I had to make were to take in the toe area and adjust the curve of the heel. I could have probably avoid the toe adjustment if I had taken more measurements of the foot, but I wanted to work with the measurements I had of my client. Getting the heel curve right I suspect just takes some practice and a little adjustment, not a big deal.
I will have to write up how I did this, as TMT's directions are really only useful until you get to the bottom of the leg, once you get into the foot shaping things go a little funny if you want the seam under the foot sort of hose. To give you some idea, I was able to get the pattern drafted, fit and a pair of hose constructed in less than 3 hours, as compared to the 6 it took when draping just to get a pattern. I still need to hand finish the seams but that's a huge time-saver.
Tuesday, March 13, 2012
Disguising the modern
Modern things can really kill the atmosphere in a camp or around a fighting field. We've all seen someone (probably even me) in a beautifully made, wonderfully period outfit, ruin the whole thing by pulling our a cell phone or putting on a pair of sunglasses, or pairing it with glaring white sneakers. Some of these things can't be avoided for one reason or another, but we can certainly make an attempt to cover them up as much as possible.
To whit, I present my latest woodworking project, the wax tablet kindle. We got the idea for this at our local 12th Night, when my laurel's husband and I saw one of the other local laurel's running around with an iPad. I'd seen several people with tablet computers at the last library, taking notes and whatnot, and suggested that it would be really cool if we could somehow disguise these really obviously modern, but ever so useful things as wax tablets. Really, that is what they are standing in for after all. Fast forward a little to a couple of weeks ago when we saw this very idea adapted to iPhone cases at the last event we were at.
It turns out these are really quite easy to make, if you have even the most basic of wood working skills. This particular case was cut using a scroll saw to cut out a kindle shaped hole from a piece of 1/2 inch wood which I then glued to 1/4 inch backing, but you could just as easily build up the sides like a small box. Using the scroll saw method, unless you are really good with a table saw and stripping down lengths of wood (which I am not) you are a bit limited in case size by the widths of thin lumber you can get. I was only able to get 1/4 inch and 1/2 inch wood up to 6 inches wide, perfect for the kindle fire but only just barely. For those of you interested in such things, I made this case out of poplar, stained it with a light coat of English chestnut stain and then used paste wax to finish it.
For the next one (cuz why not?) I want to make a sewn leather hinge that wraps around and closes with a buckle. I think this will work better, even it making it is a bit more fiddly. The DH wants one for his phone too, which is promising. At least he is on board with the minimizing the modern plan!
Thursday, March 8, 2012
Grain lines and gussets
I've finally started working on the G-63 for the DH, after a great deal of deliberation. So far so good. I got everything cut out yesterday and put the body of the gown together, only to discover after going back to Woven into the Earth that I had put the grain lines on the body of the gown in the wrong places. If you look at the diagram to the right (a marked up version of Marc Carlson's pattern illustration) the reddish lines indicate where the straight grain or selvedge edges should be. Arranged this way, the original has two straight edges down the front and two biased edges down the back, all other seams being the convention straight-to-bias. I got as far as getting two straight grain edges down the front, but ended up my bias-to-bais seams under the arm. I'm chalking this up to a modern sense of the symmetrical, we tend to want to hide the odd seam out someplace we would view as unobtrusive, even if that does not make structural sense, as in this case. The whole thing would hang better arranged as the original was. At least the gores are not terribly wide so the problem isn't very obvious, and I have learned something for next time.
In the process of putting this together I also realized it's basically a scaled down version of the Zhorelecky houppeland I posted about awhile back. The similarity in drape is quite remarkable, and probably not something I would have picked up on right away if I had not just been talking about the houppeland this weekend and if I did not have it pulled out and handy for comparison. The business with grain lines is really what gives both garments the beautiful rippled edges at the hem line, not a huge volume of fabric.
The other (and major) weirdness of the G-63 is the sleeve. It's very similar to the way the sleeve on the Charles du Blois cotte, at least in so far as there is a vertical seam cutting in two at the elbow. The funky little gusset at the elbow was giving me fits, I understand why they used gussets at the armscye, but why the elbow? Maybe whoever made this just ran out of fabric and this is the only way they could cut the sleeves? It wouldn't be unheard of, and it's not like we have a whole heap of sleeves from which to make well-grounded conclusions about tailoring at the time. Well, I ran across this really great article article explaining the elbow hinge on the Charles du Blois cotte, and had a long conversation with Mathilde, and decided to do the sleeves with all it's gussets intact before I attempted to draft anything out.
Oh boy am I glad I did, and am I glad I went back to the book to check on the grain lines! For a baggy sleeve, that little gusset makes a huge difference in how the whole thing hangs and how it will ultimately fit. Because the armscye is so deep, the little tricks used to allow the arm to move in a very tight sleeve are actually needed to keep the whole garment hanging correctly, hence the hinged sleeve construction. That little extra bit of bias stretch gives just enough movement in the elbow that, along with the added curve from the gusset, the whole sleeve stays in place when you move around even with a great big 25 inch (the same size at the original, the DH fits those measurements almost perfectly) arm opening. So yay! It's a very clever bit of shaping, the same sort of thing we do around bust lines today really, only applied to sleeves. One wonders where all this sleeve fitting brilliance got lost, the way this sleeve is constructed is much more three-dimensional than a modern sleeve pattern, and this much better fitting and more functional.
In the process of putting this together I also realized it's basically a scaled down version of the Zhorelecky houppeland I posted about awhile back. The similarity in drape is quite remarkable, and probably not something I would have picked up on right away if I had not just been talking about the houppeland this weekend and if I did not have it pulled out and handy for comparison. The business with grain lines is really what gives both garments the beautiful rippled edges at the hem line, not a huge volume of fabric.
The other (and major) weirdness of the G-63 is the sleeve. It's very similar to the way the sleeve on the Charles du Blois cotte, at least in so far as there is a vertical seam cutting in two at the elbow. The funky little gusset at the elbow was giving me fits, I understand why they used gussets at the armscye, but why the elbow? Maybe whoever made this just ran out of fabric and this is the only way they could cut the sleeves? It wouldn't be unheard of, and it's not like we have a whole heap of sleeves from which to make well-grounded conclusions about tailoring at the time. Well, I ran across this really great article article explaining the elbow hinge on the Charles du Blois cotte, and had a long conversation with Mathilde, and decided to do the sleeves with all it's gussets intact before I attempted to draft anything out.
Oh boy am I glad I did, and am I glad I went back to the book to check on the grain lines! For a baggy sleeve, that little gusset makes a huge difference in how the whole thing hangs and how it will ultimately fit. Because the armscye is so deep, the little tricks used to allow the arm to move in a very tight sleeve are actually needed to keep the whole garment hanging correctly, hence the hinged sleeve construction. That little extra bit of bias stretch gives just enough movement in the elbow that, along with the added curve from the gusset, the whole sleeve stays in place when you move around even with a great big 25 inch (the same size at the original, the DH fits those measurements almost perfectly) arm opening. So yay! It's a very clever bit of shaping, the same sort of thing we do around bust lines today really, only applied to sleeves. One wonders where all this sleeve fitting brilliance got lost, the way this sleeve is constructed is much more three-dimensional than a modern sleeve pattern, and this much better fitting and more functional.
Thursday, March 1, 2012
Sleeve sources
The sleeves for the 12 Hour dress are really simple - big rectangles with an s-curve cut into the top. They probably should be a little narrower than they are, as cut there are 2 pleats just back of the top shoulder, which does not seem to be a typical style for women's sleeves of the period (1410 or thereabouts). Whatever, it's not unheard of and it hangs well, which is really the main thing.
As far as sources, here are two. There are more, but these are the on-line ones that I used:
April from the Les Tres Riches Heures du duc de Berry :
There is another very similar sleeve, but with dagged edges, in Bibl. de l’Arsenal, ms. 664. fol 47. which I cannot find a picture of to link to. There is a picture of it here on page 7.
As far as sources, here are two. There are more, but these are the on-line ones that I used:
April from the Les Tres Riches Heures du duc de Berry :
There is another very similar sleeve, but with dagged edges, in Bibl. de l’Arsenal, ms. 664. fol 47. which I cannot find a picture of to link to. There is a picture of it here on page 7.
The 12 Hour Gown
Last Thursday I decided to drive up to the DC area for a an event in Fairfax with my laurel's husband. After going through my pile'o'garb, I decided I didn't have anything to wear that would go with my new circlet and would attempt to make something suitable for an indoor, semi-dressy event on Friday.
So I did.
Picture Project Runway-gone-Medieval style madness, but I did it! The red wool over-gown was started Friday morning and totally finished less than 12 hours later. Nothing is glued or safety pined. Granted, the seams are serged and I already had the base pattern from making the green linen kirtle, but I'm still pretty pleased with myself. The only visible machine stitching on the outside of the gown are the buttonholes.
Unfortunately I have lost just enough weight since making the kirtle that it no longer supports me the way is should, so the whole thing will need to be taken in a bit sooner rather than later. Also, the neckline on the overgown needs to come down a bit and I will eventually want to replace the buttons with something a bit more authentic (there are plain silver shank buttons on there now, not terrible but not quite up to standard either). The green kirtle under this gown is the straight front pattern, which I find to be less flattering on my body than the curved front version. I think I look about 4 months pregnant in it, no matter what I do to suck in my gut or stand straight. This doesn't seem to be as noticeable in pictures of the curved front dress, but part of that may also be because that particular gown has a waist seem, which generally has a slimming effect on me at least. Once I get the whole thing taken in, perhaps it will be a bit more flattering.
So I did.
Picture Project Runway-gone-Medieval style madness, but I did it! The red wool over-gown was started Friday morning and totally finished less than 12 hours later. Nothing is glued or safety pined. Granted, the seams are serged and I already had the base pattern from making the green linen kirtle, but I'm still pretty pleased with myself. The only visible machine stitching on the outside of the gown are the buttonholes.
Unfortunately I have lost just enough weight since making the kirtle that it no longer supports me the way is should, so the whole thing will need to be taken in a bit sooner rather than later. Also, the neckline on the overgown needs to come down a bit and I will eventually want to replace the buttons with something a bit more authentic (there are plain silver shank buttons on there now, not terrible but not quite up to standard either). The green kirtle under this gown is the straight front pattern, which I find to be less flattering on my body than the curved front version. I think I look about 4 months pregnant in it, no matter what I do to suck in my gut or stand straight. This doesn't seem to be as noticeable in pictures of the curved front dress, but part of that may also be because that particular gown has a waist seem, which generally has a slimming effect on me at least. Once I get the whole thing taken in, perhaps it will be a bit more flattering.
Thursday, February 16, 2012
Pouting
I had a very lovely discussion with some fellow weavers at KASF about my need to find a smallish table loom to do sampling on. It's really a pain to warp up the big floor loom to do a small amount of weaving to test thing like set and thread suitability, especially since there is so much warp wasted on the bigger looms. Imagine my joy when one of those weavers found a perfect loom, in wonderful condition, for sale near by for a really fantastic price! And my little business had been doing well enough that I could have totally swung the cash. Well...then Tuesday I was working away on some cornhole bags (bean bags for the non-initiated/tailgating redneck types, yes I am bitter) and my sewing machine decided to throw a fit. The tension has gone totally bonkers. Back to the repair shop it went, only to be told it's pretty well done with it's reliable and useful life.
The good news is I now have a beautiful new babylock that should last me a good long time, even sewing cornhole bags and other thick fabrics. The bad news is no loom and no money (anyone need a knitting needle case?) So I am very sad and sort of pouting about the whole weaving situation, I really was hoping to get started on the Perugia project in the next week or two but oh well. With some luck I will be able to go visit a friend who has a table loom for a couple of days and do the sampling there.
In the mean time, before the great Sewing Machine Disaster I was able to order all the linen for the DH's new suit of cloths so I can at least get started on that. With a spanky new machine that will sew things nicely too! Yay for that! I've started looking at briaes patterns and images. The pinboard is here if you are interested in what I'm finding. I'm learning towards a style like that seen at left, which is from Tacuinum Sanitatis (BNF Nouvelle acquisition latine 1673), c. 1390-1400: making millet bread (fol. 56). Since he will have chauses over these rather than split hose, some extra length in the leg (as opposed to the brief style that you see a bit latter) will be more modest. The super long ones with the weird floppy legs seem like too much for the poor boy to deal with. This is a nice compromise.
The plan is to make one pair, make the chauses, see how it all works, then modify the briaes as needed. He's not a big event-goer but he'll still want more than one set of these. There are a couple of camping events I can get him to in a year so he needs enough manties to get through a weekend.
The good news is I now have a beautiful new babylock that should last me a good long time, even sewing cornhole bags and other thick fabrics. The bad news is no loom and no money (anyone need a knitting needle case?) So I am very sad and sort of pouting about the whole weaving situation, I really was hoping to get started on the Perugia project in the next week or two but oh well. With some luck I will be able to go visit a friend who has a table loom for a couple of days and do the sampling there.
In the mean time, before the great Sewing Machine Disaster I was able to order all the linen for the DH's new suit of cloths so I can at least get started on that. With a spanky new machine that will sew things nicely too! Yay for that! I've started looking at briaes patterns and images. The pinboard is here if you are interested in what I'm finding. I'm learning towards a style like that seen at left, which is from Tacuinum Sanitatis (BNF Nouvelle acquisition latine 1673), c. 1390-1400: making millet bread (fol. 56). Since he will have chauses over these rather than split hose, some extra length in the leg (as opposed to the brief style that you see a bit latter) will be more modest. The super long ones with the weird floppy legs seem like too much for the poor boy to deal with. This is a nice compromise.
The plan is to make one pair, make the chauses, see how it all works, then modify the briaes as needed. He's not a big event-goer but he'll still want more than one set of these. There are a couple of camping events I can get him to in a year so he needs enough manties to get through a weekend.
Subscribe to:
Posts (Atom)