Showing posts with label AandS50. Show all posts

Wednesday, May 9, 2012

MOL 142 Redux

I posted awhile back about my first attempt at tabletweaving MOL band 142.  It had not gone well, not because the weaving itself was terribly difficult but because I had chosen to use pearl cotton to make the band. The cotton looked pretty bad and made it difficult to get an even selvedge.

I tried again, this time with bamboo thread, and the results were far far better!  The bamboo behaves a lot like silk but is considerably less expensive so for timid and cheep tablet weavers like myself it's a good alternative when basically practicing new techniques.  If it all goes well you still end up with a lovely band that you can wear or use just like a silk band, but if it does not go so well you are not throwing out a large amount of expensive yarns.

My plan with this particular project was to make a fillet, which is what the original band was used for (this is the one with bits of fake hair attached to it).  The original showed evidence of having had plaques of some kind sewn to it, so I found some flat beads that could be used in place of the plaques and sewed them to the band.  I'm quite pleased with the end result.  Trying it on with my hair down and no veil it looked a little hippie-dippy, and far more Pocahontas-like than I would like, but with my hair done properly and a veil I think it will look quite nice.

Overall I would say this project is a success!  It's really only my second tablet weaving project (the first being the indigo linen garters), which makes me feel a lot better about some of the small problems and imperfections in the band.  One thing I did learn doing this for a second time is that leaving the band alone for too long results in some visible problems with the weaving.  Perhaps this will get better with time, but looking at the band you can tell where I put the project aside for awhile and picked it up again later.  Longer work sessions, placed closer together, resulted in smoother weaving and cleaner selvedges.

Thursday, January 26, 2012

A&S 50: 47- Indigo dye silk and cotton - modern method


Fibers before dying

Picking up where I left off with my last attempt at dying with indigo (working with wool and linen), I decided my next attempt should focus on cotton and silk fibers.  The cotton will eventually be used as the pattern weft for a Perugia towel and the small amount of silk will probably be used for some tablet weaving experimentation.

As has already been discussed, indigo is a close chemical relative of woad, one of the earliest known dyestuffs used in Europe.  It is unique in the universe of dyestuffs in that it requires no mordant to produce bright, colorfast shades of clear blue.  This makes the dye process relatively simple, in that the fibers to be dyed require no pre-treatment, however development of the dye vat can be a very complicated process as all oxygen must be removed from the water in order for the indigo to process and adhere to the fibers.

Having attempted to use a chemical-free method of developing the vat and failed miserably, this time around I opted to use the simpler, modern method relying on color run remover.  While not a period process, this poses several distinct advantages; first the smell is limited to that given off by the indigo alone, and second the dying entire process can completed in a few hours rather than a few days, thus further limiting the unpleasant smells.  I can finish my dying and air the house out while my husband is as work, and he will be none the wiser to the day’s noxious activities!  (Did I mention the indigo stinks?)

Stinky, stinky indigo paste
The process:


Materials:


  •   A total of 8 oz of fibers (I dyed 2 oz of cotton, .5 oz of silk, and approximately 4 oz of handspun alpaca and still had usable dye in the vat)
  •   10 grams indigo, ground as finely as possible (my indigo is in chunk form so I ground it myself in a morter)
  • 1 tsp washing soda
  •    1 oz color run remover
  •   Small jar
  •   A crock pot that will never ever have food in it again
  •   Spoon


"bloom" of scum after vat has processed

I set fibers to soak in warm water.  While fibers were soaking, I ground my indigo and added it to the washing soda in a small jar.  I mixed this with a small amount of boiling water to make a paste and stirred to dissolve all the particles.  I then added water to my crock pot sufficient to cover half my fibers at a time and the color run remover and set it to “low” to warm up.  Windows were opened and the kitchen fan was turned on to start airing thing out as the indigo stink was already getting bad.

After 30 minutes, I added the indigo to the crockpot carefully, trying not to introduce any air bubbles in the process.  There was grit in the bottom of the indigo jar, so I spooned a bit of the dye vat water into jar to get this out and added it to pot.  I gave it all a gentle stir, and let the whole thing sit for 45 minutes to develop.

A thick scum of indigo had formed on top of my vat so it was difficult to tell if the dye has turned the greeny-yellow I was looking for, but with some gentle poking it looked all right.  This bloom of scum is apparently normal and cannot be avoided.  Not sure how the dye book authors get their nice clear vats for the pictures, but there you go.  The cotton and silk went in first and set for 20 minutes.  They came out beautifully, with a deep rich blue on the cotton and a vibrant blue on the silk.  I had a few white spots where I had tied my skeins too tightly, but I repositioned the knots and dip dyed those sections for about 10 minutes and the skeins are more even now.
Finished yarns, alpaca, cotton and silk

The alpaca went in for 20 minutes after the cotton and silk were finished and came out a grayish blue.  This is I think because it started out a natural tan color rather than white.  Again, the take up was a little sparse where I had tied the skeins too tightly.

Learnings:
  • I need to tie my skeins more loosely to get more even dye take up
  • You can stir the vat!  Just really really carefully
  •  Indigo stinks, did I mention that already?


Sources:

Dean, Jenny.  Wild Color.  Watson-Guptill Publications, 1999.

Bingham, Gayle.  Woad Dying.  Medieval Textiles issue 29. Sept. 2001. (http://www.elizabethancostume.net/dyes/medtex.pdf) Last visited Nov. 18, 2010

Kolander, Cheryl.  Dying with Indigo – Natural Fermentation Vat.  (http://www.aurorasilk.com/info/indigo_tutorial.shtml) Last visited Nov. 18, 2010.

Priest-Dorman, Carolyn.  Colors, Dyestuffs, and Mordants of the Viking Age: An Introduction
 (http://www.cs.vassar.edu/~capriest/vikdyes.html) Last visited Nov. 18, 2010.

Saturday, January 21, 2012

A&S 50: 43 MOL band 142


The original band fragment was found attached to a plaited hair piece and would have been used in styling the hair.  The silk band shows evidence of having had metal plaques or other ornaments sewn on to it on intervals.  The band would have been worn with the artificial hair hanging down the sides of the face in looped braids, a fashion popular in the 1340s.

The structure of the band closely resembles plain tabby weave.  This effect is achieved by threading the tables through two holes diagonally opposite each other and turning the cards ¼ turn, alternately turning the cards forward and backward  The original was 26 tables wide, with two edge tables on either side threaded through all four hole S-direction.  These edge tables were turned continuously forward.  The band was woven in plied silk and measures 10 mm in width with 46 weft picks per centimeter.

My first attempt at this band was done in purl cotton using 26 tablets.  The turning pattern is quite simple however I found the thread to be quite difficult to work with.  I was never able to get an even selvedge or anything close to the dense weft pack seen in the original band.  After much wringing of hands of gnashing of teeth, and some consultation with more experienced tablet weavers, I determined that the difficulty lay in my choice of fibers.  The cotton is simply too sticky to work well with this particular weave.  I was able to weave enough of the band to get a general idea of what the weave looks like, but will need to use silk or something with a softer hand if I wish to make any useable length of this band.
Sources:

Crowfoot, Elizabeth.  Textiles and Clothing, c.1150-1450 (Medieval Finds from Excavations in London).  Boydell Press, 2001.

Crocket, Candace.  Card Weaving.  Interweave Press, 1991.

Lewins, Shelagh.  The Ancient Craft of Tablet Weaving:  Getting Started (http://www.shelaghlewins.com/tablet_weaving/TW01/TW01.htm)  Last accessed Nov. 18, 2010.

Gaslee, Sarah.  Basic Tabletweaving.  (http://www.stringpage.com/tw/basictw.html) Last accessed Nov. 18, 2010.

Friday, January 20, 2012

A&S 50: 33-Rosette Twill


Twill and its variants make up nine of the sixteen mostly commonly found textiles identified in Bender-Jorgensen’s North European Textiles Until AD 1000.  In my continuing effort to understand weave structure and improve my weaving skills in an historical context, exploring some of these twills presented an excellent challenge.  The rosette twill in particular appealed to me as both a technical challenge, and an attractive and appealing pattern.

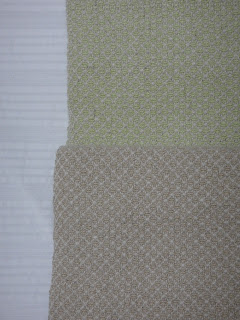
For this project, I decided to make napkins using two colors of weft on the same warp.  Using ivory cottolin warp set at 24 ends per inch, I wove two lengths of the same pattern using tan weft and light green weft.  Unlike some of my previous twill experiments, this time I used a floating warp to ensure a neat selvedge, which was a big help.
  
Learnings:
  •  Floating warps really do make a huge difference!  My selvedges not only are free of the weird floaters I was getting on the Greenland twill, but they are much more even.  It took some getting used to and slowed me up a bit at first, but once I got used to working with them it was worth the extra effort.
  • Patterns like this are far less forgiving of mistakes in tredling than plain twill.  You can see every little mistake.  My usual strategy of warping up twice what I actually needed too to get two usable napkins proved to be a good one here, as I had quite a few tredling mistakes at the beginning.
  •  I need to do some work on color combining.  I was surprised that the tan and cream pattern had better contrast that the green and cream.  This is not at all what I would have thought would have happened.  I suspect that doing white-on-white would have a better effect that I had initially thought as well, given how nicely the cream/tan combo came out which bodes well for my Perugia project.
Sources:

Bender-Jorgensen, Lise.  North European Textiles until AD. 1000.  Aarhus University Press (December 1992)

McKenna, Nancy.  Medieval Textiles: North European Textiles (http://www.medievaltextiles.org/lbj.html) Last accessed Jan. 19, 2011

A&S 50: 14 Learn Fingerloop Braiding


Fingerloop braiding is a method of weaving narrow braids or cords using loops, or bows, of thread held on the fingers.  This method of making cords reached its height of popularity between 1200 and 1600 in Europe, but fingerlooped cords were used much earlier and continue to be used in some parts of the world today.  In the middle ages, fingerlooped cords could be found on a wide range of objects, from purses to hairnets to seal tags.  As these cords are so useful, particularly for closing pouches and the fronts of supportive gowns, I decided that it behooved me to learn to make at least a few of the simpler sorts of fingerlooped cords.

Using the naming conventions from Tak V Bowes Departed I have attempted and am now reasonably comfortable with five different fingerlooped cords, “A Lace Baston,” a two-colored cord from the Harley manuscript dating to 1475, “This Flat String,” another two colored cord from To Make Pursestrings dating to c. 1600,  “Two Strings at Once” also from Harley, “A Broad Lace of V Bowes,” from Harley, and “Round Lace of V Bowes” from Harley.  All are distinct, with the except of the Lace Baston and the Round Lace of V Bows, which are worked in exactly the same manner save that the Lace Baston used departed bowes, that is bows in which two colors have been joined together.  All of these cords use only five bowes.

More complex cords are possible and many are described in the extant braiding manuals which use more than five bowes, some of which require two people to manipulate the bowes.  I have not yet attempted any of these more complex braids but am looking forward to finding a braiding partner so that I can give some them a try!

Learnings:
  • Braiding is not that hard once you get into the rhythm of it
  •  Small dogs and fingerlooping do not mix at all well.  Nor do curious cats
  • The phone will inevitably ring in the idle of a long braiding session
  • You can make much longer cords by working your braid from the middle of the bowe.  It’s not as scary as it sounds, it just takes some time and patience to sort out the bowes when you start back up from the center to work in the opposite direction.  Your mileage may vary working on more complex braids but it works well with these five simple ones.  This could be avoided if you had a second person to tighten up the braiding for you with a sword beater or some kind as you worked


Sources:

Benns, Elizabeth et. al. Tak V Bowes Departed.  Soper Lane. London, 2006.

Crowfoot, Elizabeth.  Textiles and Clothing, c.1150-1450 (Medieval Finds from Excavations in London).  Boydell Press, 2001.

Goddard, Andy.  Fingerloop Braiding (http://www.bumply.com/Medieval/braiding01.html)

Priest-Dorman, Carolyn.  Sample Fingerlooped Braids from a Fifteenth-Century Manuscript (http://www.cs.vassar.edu/~capriest/fingerloop.html)

Goslee, Sarah, Fingerloop Braiding (http://www.stringpage.com/braid/fl/fingerloop.html)

Swales, Lois et. al.. Fingerloop Braids. (http://fingerloop.org/)

Sunday, September 18, 2011

A&S 50: Nine: Learn to Weave – Basic Tabby Structure, Rigid Heddle Loom


Tabby, also called plain weave, is the most basic of weave structures and a great place to start for new weavers.  For my first weaving project, I decided I use to use the small 24 inch rigid heddle loom I already had, and work with tabby (partly because rigid heddles work best for tabby and partly because I had almost no prior weaving experience).

The basic structure is very simple.  The weft threads travel over every other warp thread, alternating each row to create the weave.  This can be achieved with finger manipulation or needle weaving, but the rigid heddle makes manipulating the warp threads much quicker and simpler, allowing the weaving to raise or lower the threads all in one motion.  The primary disadvantage to this style of loom (aside from having only one heddle or shaft) is that the heddle is free-floating and doubles as the beater, making it difficult to maintain an even beat and keep the selvedges straight.

The cloth was tabby woven using a rigid heddle loom at 10 DPI at the full loom width of 24 inches. After weaving, the cloth was fulled in a washing machine. Pre-fulling, the weave was quite open and relatively even, though some areas were packed more tightly than others (this was my first major weaving project and the first time I had worked with a wool warp, so there was a bit of a learning curve in this process). After fulling, the weave evened out a great deal and packed down considerably. By the end of the fulling and dyeing process, the warp and weft were barely visible and a compact, water repellent fabric had been produced, as can be seen in the finished piece. This is significantly thicker and denser than the cloth used in the extant Dublin caps, but will serve as a useful warm layer at cold and wet events.

The cloth used to make my Dublin-style Viking hood had been intended for another project, but due to excess shrinkage in the fulling and dyeing process was not suitable for my intended use (a later period hood). After making a pair of mittens out of part of the length of fabric, I had a piece left which was just large enough to make this cap if I placed the fold along the back of my head rather than across the top (kismet!). As conservation of resources seems within the spirit of the time period, this alteration of the basic pattern seems to be plausible if not entirely supported by the archeology in Dublin and Jorvik.

Of the twelve caps and three remnants of caps studied in Heckett, nine of the caps and two of remnants are wool. All of the examples are tabby woven, with an even weave structure. All but one are classified as having an open weave. The wool caps are woven at a range of 12 to 23 warps per centimeter, with wefts ranging from 9 to 20 per centimeter. The cloth for all of the caps is lightweight and quite fine, and some of the silk is very delicate. At least some of the hoods seem to have been purpose-woven on narrow warps. All of the wool caps analyzed in Heckett have selvedges along two sides, while the silk caps all appear to have been cut to size from wider pieces of cloth. Most have not been analyzed for dye, but of those that have two were undyed, two showed traced of iron mordant.

Sources:
Heckett, Elizabeth Wincott. Viking Age Headcoverings from Dublin. Royal Irish Academy, 2003.

Walton, Penelope Textiles, Cordage and Raw Fibre from 16-22 Coppergate,Council for British Archaeology, London, England 1989.

Viking Silk Cap, Yorkshire Museum (http://www.historyofyork.org.uk/themes/life-in-viking-york/viking-silk-cap).

Crowfoot, Elisabeth. Textiles and Clothing c.1150-c.1450. Medieval Finds from Excavations in London, 4. London: Her Majesty's Stationery Office, 1992.

Sunday, September 11, 2011

A&S 50 Eight: Learn Tubular Tablet Weaving

For my second-ever tablet weaving project I decided to be ambitious (as usual) and challenge myself a bit by weaving tubular cords for small book bag. Such cords can be seen on a brick stitch pouch housed in the V&S and studied extensively by Master Richard Wymarc and several have been found used as seal tags and as strings for rosary beads (see Crowfoot and Myers).

The basic technique is quite simple - a few cards are threaded, usually all Z or all S, and all the weaving in carried out by always working from right to left (or left to right), carrying the weft thread under (or over) the work to create a tube. The band will spiral, or not, depending on which direction the weft is passed through the shed and whether you pass the weft over or under the band. Learning which combinations will produce the desired effect takes some experimentation, but a handy reference can be found in Cindy’s Myers article on the purse strings, at http://www.silkewerk.com/tabletweaving/tubular.html.

My purse strings suffer from some unwanted spiraling, which due to my lack of technical understanding at the time, I was not readily able to control. I now realize that the areas free of spiral alternating with spiral were likely due to changes in the direction the cards turned. Had I turned the cards consistently in one direction, or changed the way I passed the weft when I changed my turning direction, I would have had a more consistent cord. I am looking forward to experimenting more with this technique as the cords produced are quite attractive and could be useful for many purposes. Unlike fingerlooped cords, there is no restriction on the length of cord that may be worked so this would be an excellent way to produce miles and miles of lacing cords.

Sources:
Crowfoot, Elizabeth. Textiles and Clothing, c.1150-1450 (Medieval Finds from Excavations in London). Boydell Press, 2001.

Myers, Cindy. Tubular Tablet-Weaving; Identifying and reconstructing the hanging cord from a 14th century embroidered purse. (http://www.silkewerk.com/tabletweaving/tubular.html) Last accessed Sept. 11, 2011. Originally published in Spring 2008 issue of TWIST.

Bag 8313-1863. 14th cen. Victoria and Albert Museum, London. http://collections.vam.ac.uk/item/O115592/bag/

Friday, June 3, 2011

A&S 50 16: Learn Naalbinding: Oslo Stitch


Nalebinding (or naalbinding) is an ancient form of needlework related to and often mistaken for knitting and crochet. It is worked with a single needle and short sections of yarn which are stitched into looped to form a stretchy, dense fabric quit similar to knitting. Nalbinding was in use in Bronze Age Europe and was used by the Viking to make shoe liners, short socks and mittens.

Several variants of Nalbinding stitches are known to have been used in Viking Age Europe, the simplest of them being the Oslo stitch (so called for an eleventh century mitten worked in this stitch found in the Oslo excavations). This seems to have been a fairly common stitch and at least three extant mittens have been found worked in this manner. As this stitch is fairly simple, was commonly used, and I knew someone who could teach it me, I elected to learn this stitch first.

I had attempted to teach myself Nalbinding from a book and various text and illustration based instructions several years prior to this with very little success. My second attempt with a live instructor was more successful and after a few bumps I was able to produce a passable tube of nalbound fabric. After some problems with maintaining even tension, I was able to start on my first sock.

Viking age socks were more like shoe liners than modern socks, coming up only to the ankle. These would have provided an extra layer of warmth and padding over cloth stockings of some sort and under leather shoes. Surviving socks seem to have been constructed from the toe up, unlike my socks which I worked from the top down to simplify the starting row. I plan to work future socks in the more historically accurate toe-up manner once I am more comfortable with the techniques involved.

Sources:
Walton, Penelope. Textiles, Cordage and Raw Fiber from 16-22 Coppergate. York Archeological Trust 1989.

Hald, Margrethe. Ancient Danish Textiles from Bogs and Burials: A Comparative Study of Costume and Iron Age Textiles, trans. Jean Olsen. Archaeological-Historical Series Vol. XXI. Copenhagen: The National Museum of Denmark, 1980.

Schmitt, Larry.Lessons in Nalbinding: Mittens, Mittens, Mittens! Lawrence W. Schmitt, 1997

Schmitt, Larry.Lessons in Nalbinding: Scarves, Wimples and More. Lawrence W. Schmitt, 1999.

Priest-Dorman, Carolyn. Nalebinding Techniques in the Viking Age. (http://www.cs.vassar.edu/~capriest/nalebind.html) Last accessed June 2, 2011.

Lewins, Shelagh. Nalbinding Socks: Methods of Construction (http://www.shelaghlewins.com/reenactment/naalbinding/sock_construction.htm) Last accessed June 2, 2011.

For instruction on the actual stitch, YouTube is a great resource! Just do a search for “nalbinding” and you will find lots of helpful instructional videos, one of which will explain in a way that works for you. I found the videos available from http://www.youtube.com/user/senshisteph to be helpful with Oslo stitch but there are many others.

Wednesday, May 4, 2011

A&S 50 7: Tablet Weave Two Colored Striped Band from London Dig MOL Braid 449


The original band was woven in two colors of plied silk, pink and pale yellow (possibly originally white) and had bronze bar mounts attached to it.  Twelve tablets were used, making a fairly narrow band of 8.5 millimeters.  Each tablet was threaded with two colors of silk threaded in groups of three, SSSZZZSSSZZZ and turned continuously in one direction to create a striped pattern.  The band shows one reversal of the turning direction, probably to un-twist the remaining warps.
            The cards as threaded in two colors as shown below:

A


B


C


D


S
S
S
Z
Z
Z
S
S
S
Z
Z
Z

1
2
3
4
5
6
7
8
9
10
11
12

The cards turn continually forward.  The original band shows one reversal of direction.  When enough twist has built up in the warp to prevent smooth turning of the cards, reverse direction to untwist the warp and continue turning backwards.

I had selected this band as my first attempt at tablet weaving as it seemed like a fairly simple threading and turning pattern.  For this first attempt, I used size 3 crochet cotton from DMC in two colors, a light blue and grey.  Threading the warp was quite simple using the continuous warping method described by Crocket and Lewins.  Actual weaving proceeded smoothly, with some allowance given for the learning process.  The start of the band is a great deal looser and wider than the end, which can be attributed to my inexperience.  By the finish of the band I figured out how to beat the weft down to get a smooth surface and maintain an even band width.

Overall, I am quite pleased with how this band works up and am looking forward to using the design again, perhaps for a belt or set of garters in silk, using the original pink and yellow.


Sources:
Crowfoot, Elizabeth.  Textiles and Clothing, c.1150-1450 (Medieval Finds from Excavations in London).  Boydell Press, 2001.

Carolyn Priest-Dorman.  Three Recipes for Fourteenth- and Fifteenth-Century Tablet Weaving.  (http://www.cs.vassar.edu/~capriest/3recipes.html) Last accessed Aug. 31 2010.

Crocket, Candace.  Card Weaving.  Interweave Press, 1991.


Lewins, Shelagh.  The Ancient Craft of Tablet Weaving:  Getting Started (http://www.shelaghlewins.com/tablet_weaving/TW01/TW01.htm)  Last accessed Nov. 18, 2010.

Monday, May 2, 2011

A&S 50 Six: Tablet Weave Satin Effect Band from London Dig MOL 423


The original braid was woven in fine silk and found attached to a bronze strap end which would have been used with a girdle.  Braids of this type gained in popularity and were used for belts up to the early Tudor period.  The satin pattern in accomplished by card idling – only some of the cards are turned with each pick.  While this is quite simple to do the process is actually quite time consuming and I found it very difficult to keep track of where I was in my pattern.
            The cards are all threaded with four stands of plied silk, alternating Z and S.  39 cards were used for the original band.  For my initial attempt at this band, I used size 3 DMC pearle cotton in a salmon pink and black and 24 cards total as I only had 24 cards of the same size at the time.  The cards were from Halcyon Yards, and measured 3 ¼ inches square.  The first two and last two cards were threaded in black, and the remaining 20 cards were threaded in the salmon pink, then all the cards were arranged so they alternated Z and S, as in the threading diagram below:

1


2


3


4


1
2
3
4
5
6
7
8
9
10
11
12
13
14
15
16
17
18
19
20
21
22
23
24

Z
S
Z
S
Z
S
Z
S
Z
S
Z
S
Z
S
Z
S
Z
S
Z
S
Z
S
Z
S

The cards are turned as followed:
            Cards 1, 2, 23, and 24 turn forward every turn
            First turn: All remaining even cards turn forward
            Second turn: All odd card turn forward

I found this band problematic for a number of reasons.  First, I had a great deal of difficulty keeping track of where I was in the pattern when I left my weaving (and even sometimes when I simply looked away).  A more experienced weaver might have fewer problems with this.  I suspect part of the issue is that it takes two turns for any sort of pattern to being to emerge, so it is more difficult to read your weaving and figure out which turn you are on.
            Second, the cards were far too large for my hands, making the turning much more difficult.  Smaller cards would make working with two packs easier.
            Third, I could not sort out an efficient way of handling two packs of cards.  Separating the packs out (one in front and one in back) seems the most efficient but I had trouble getting a clear shed, and again because the cards were large I still had trouble manipulating them.  I ended up turning each card individually which was quite tedious.
            Lastly, the pattern does not show at all well in cotton.  I ended up weaving only a few inches of this band because of the difficult I had with the cards and weaving itself, and the poor appearance of the band in the fiber I had chosen.  I plan to try again using silk now that I have smaller cards and a better idea of how to work with two packs of cards.

Sources:

Crowfoot, Elizabeth.  Textiles and Clothing, c.1150-1450 (Medieval Finds from Excavations in London).  Boydell Press, 2001.

Carolyn Priest-Dorman.  Three Recipes for Fourteenth- and Fifteenth-Century Tablet Weaving.  (http://www.cs.vassar.edu/~capriest/3recipes.html) Last accessed Aug. 31 2010.