Much and more has been written already about the Lengberg Castle "bras." I'm not going to rehash any of that except to say it seems fairly certain that by at least the 15th century wearing some sort of supportive undergarment *other than* a fitted gown was not unknown. I've been playing around with making one of these for the better part of a year now and here are some thoughts. I've set up a pintrest board on period undies and another on modern undies to collect images and helpful links, rather than overburdening this page.
1. It appears that "lifted and separated" was the the ideal boob shape for most of the period I am interested in. This really cannot be accomplished with a fitted gown*, which gives you more of a mono-boob shape. Furthermore there is plenty of textual evidence for breast-shaping garments (and surgery!! WTF??) in the later middle ages which suggests to me that a breast-bag garment is more likely to have been employed than a super tight gown.
2. There is more than one way to bag a breast. The "long line bra" option is but one of four breast-bag garments that were found. It seems to have gotten the most press as it looks the most like a modern bra, but looking at visual sources as well as what is available on the find themselves suggests that many means of lifting and separating were possible. Just like we have lots of bra styles today, both for fashions sake and to accommodate different anatomy, they did the same thing back then (and why ever not? People in any given period of time face the same basic challenges and needs).
3. This one is my favorite - modern bras and bra making can teach us a whole heck of a lot about how to actually construct a plausible period breast bag. Again, the basic facts of anatomy have not changed. Breasts are what they are and there are some basic rules about constructing supportive and shaping garments that do not change regardless of time period or shape being sought. This is not to say a corset-is-a-corset or that a bra-is-a-bra, but in either case the garment is being supported at the waist line in the case of a corset or at the underbust line in the case of something bra-like.
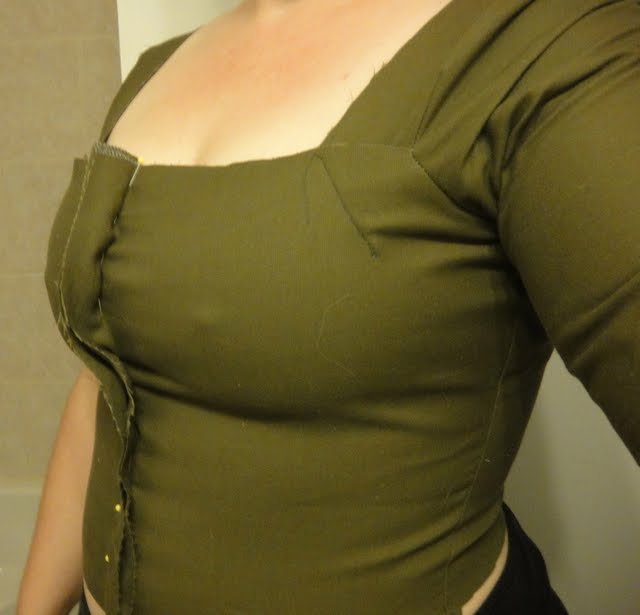
Understanding the importance of the bra band and how to get the center point of a bra to tack (that is, sit flush against the rib cage) makes fitting a period style breast bag MUCH easier. Keeping in mind that my breasts are on the heavy side (another thing I would not have known without a foray into modern bra making), the bust band must 1 - exist and 2 - be snug/tight. This makes fitting the cups or bags much easier and proper support possible. It's also what does the lifting. The separating comes from how the cups/bags are arranged and fit on the body.
Once you figure out the band, you need to take a good hard look at your breasts and figure out where the root of the breast is (towards the center? under your arm? someplace in between?) and how much space you are working with at the center front. The first version of the Lengberg bra I made had way too much space between the cups, which prevented the band from tacking and allowed my breasts to creep out from under the cups. The current version has less space, but the band is still too loose so I am not taking but I am not falling out the bottom either. Figuring out where to make adjustments to get better fit is not as obvious (or at least wasn't to me) but there is a certain logic to bra fitting and it's easier to see after playing around with actual bra patterns. There are fitting instructions for these things after all, why not apply that accumulated knowledge?
4 - Tacking. As I mentioned above, the idea of tacking is that the center portion of a bra (where the two underwires come together on a modern bar) should lay flat against the sternum. This happens when the band is snug enough and the cups are sitting on the actual breast rather than starting too far to one side or the other of the breast root. A properly fit bra that tacks is a marvel and if you have never had this happen I highly encourage you to put down the computer, go find a specialty bra shop, and get fitted. With soft cup bras, this is not as likely to happen as there is nothing rigid for the band to pull against the body, but you should still not have inches of space between the band and your chest between the cups. Some things that seem to work to get this to happen on a breast bag type garment are 1 - making sure the band is snug 2 - getting the center height and width right and 3 - making sure you are working with the right shape garment for your particular breasts.
It's all about understanding your breast shape really. Just like with outer garments, you've got to work with the body you have. The first step in a well fit garment will always be understanding the shape of the body that will occupy it.
*assuming you have sufficient breast-mass to need help in this area

Showing posts with label Supportive gowns. Show all posts
Showing posts with label Supportive gowns. Show all posts
Thursday, May 7, 2015
Wednesday, July 17, 2013
Spanish Fashion Victim

Anyway, I have the gown out and about half way put together, I'm doing this by machine partly because I have only a few days but mostly because the fabric is mainly cotton. It was either that or heavy wool coating and I'm not about to wear heavy plaid wool in the middle of July in Pennsylvania. The plaid is cotton and the solid kermit green is a cotton linen blend, since that is what they had at the fabric store in a decent selection of colors. The colors remind me of Kermit and Miss. Piggy for some reason, I'm quite pleased with them even if the whole thing leans a bit towards the obnoxious (isn't that the point though?)

What I am trying to decide at the moment is how to close the front. Based on the picture, it sort of looks like the gown is probably laced up either in front or down the sides and there does not seem to be a visible undergown. It's a little hard to tell and I have not been able to find a higher res version of this image to see if there is any more detail. Because the fabric is not so very sturdy I will be wearing a supportive layer underneath, I'm wondering how I ought to close this thing up. I'm leaning towards buttons even though I really can't find any suggestion that this is how this sort of gown would have been closed that way. It would certainly be easier for my purposes. A laced overgown over a laced undergown sounds like a big PITA.
Thursday, August 16, 2012
Boob wrangling!
Here is an interesting post with a great contemporary quote about 14th century bust supportive. It's nice to have textual evidence for something bra-like as well as supportive gowns to fit in with all the great information that's been coming out about the Lenberg bras.
It's nice to know that boob wrangling was an issue for the ladies back then too. Somehow knowing for certain that women weren't running around with things flapping in the wind back then makes me feel better.
It's nice to know that boob wrangling was an issue for the ladies back then too. Somehow knowing for certain that women weren't running around with things flapping in the wind back then makes me feel better.
Thursday, March 1, 2012
The 12 Hour Gown

So I did.
Picture Project Runway-gone-Medieval style madness, but I did it! The red wool over-gown was started Friday morning and totally finished less than 12 hours later. Nothing is glued or safety pined. Granted, the seams are serged and I already had the base pattern from making the green linen kirtle, but I'm still pretty pleased with myself. The only visible machine stitching on the outside of the gown are the buttonholes.
Unfortunately I have lost just enough weight since making the kirtle that it no longer supports me the way is should, so the whole thing will need to be taken in a bit sooner rather than later. Also, the neckline on the overgown needs to come down a bit and I will eventually want to replace the buttons with something a bit more authentic (there are plain silver shank buttons on there now, not terrible but not quite up to standard either). The green kirtle under this gown is the straight front pattern, which I find to be less flattering on my body than the curved front version. I think I look about 4 months pregnant in it, no matter what I do to suck in my gut or stand straight. This doesn't seem to be as noticeable in pictures of the curved front dress, but part of that may also be because that particular gown has a waist seem, which generally has a slimming effect on me at least. Once I get the whole thing taken in, perhaps it will be a bit more flattering.
Wednesday, August 3, 2011
Finished gowns
The commission gowns I did as a fundraiser for my local SCA group as finally done! These took longer than I would have liked, my vacation got in the way a bit as did a major cold/flu/plague and some life interruptions on the clients end as well, but it's finally done! I still owe her a shift and pair of hose, but those can get done after Pennsic. With any luck I'll get the shift done while she is at Pennsic, and get the hose at least cut out so I can fit them when she gets back.
The kirtle is an oatmeal colored linen, with long sleeves that button to the elbow and spiral lacing up the front. Right now the lace is just a piece of ribbon. Eventually it will be a nice fingerlooped cord, the client has a friend who does this so I don't need to supply that. The eyelets are all hand-bound and the bodice seams are hand finished.
The over gown buttons down the front and has angel wing or trump sleeves which fold back a bit at the wrist to expose the kirtle sleeves. I ended up with some extra fabric in the sleeve head so rather than re-cutting the sleeves I made some small pleats in the back of the sleeves. I haven't seen this done on women's fitted gowns, but I have seen it on men's and it actually made the sleeve hand rather nicely so I'm ok with the small bit of pleating. It was a better solution that loosing length in the sleeves. The seams are machine finished on the inside, and everything is hand finished on the outside.
The kirtle is an oatmeal colored linen, with long sleeves that button to the elbow and spiral lacing up the front. Right now the lace is just a piece of ribbon. Eventually it will be a nice fingerlooped cord, the client has a friend who does this so I don't need to supply that. The eyelets are all hand-bound and the bodice seams are hand finished.
 |  |  |
The over gown buttons down the front and has angel wing or trump sleeves which fold back a bit at the wrist to expose the kirtle sleeves. I ended up with some extra fabric in the sleeve head so rather than re-cutting the sleeves I made some small pleats in the back of the sleeves. I haven't seen this done on women's fitted gowns, but I have seen it on men's and it actually made the sleeve hand rather nicely so I'm ok with the small bit of pleating. It was a better solution that loosing length in the sleeves. The seams are machine finished on the inside, and everything is hand finished on the outside.
 |  |  |
Sunday, June 12, 2011
Banded kirtle
 Here is the banded kirtle (or so I've decided to call it) so far. As was pointed out, the front should dip down a little bit to more closely match at least the air filter hat picture, and probably also the Descent from the Cross gown as well, though that one is at an odd angle so it's harder to tell. I went with a square neck for this as that will work better under the gown this will eventually go under, and it also seemed a little easier to focus on one point of wierdness at a time (in this case the banding and the sleeve thing). The next iteration of this gown will have the dipped/sweetheart neck, now that I think I have the banding figured out.
 You can see on the front that the line from the facing and strap is extending right into the underarm, giving the effect of a raglan seam. The sleeve is a normal sleeve shape, the trick to the raglan line is lining up the strap with the top facing bit and the armscye just right. To make that work the front neckline has to be high enough but as it turns out once the girls are lifted up and well-supported the neckline will end up in the right place.
The back did not line up with the top facing quite as well - I need to shift it down to get it to line up right but by the time I realized it was not right fixing it would have been far more trouble than I can go through without extra fabric to re-cut anything if I need to. I think if I think more about how I put the sleeve and facings and shoulder bands together I could avoid this issue next time, but again you can see where the raglan line is coming from. It's just the shoulder strap.
Overall, I'm pretty happy with how this has come out. I still need to do the eyelets down the front and fingerloop a lacing cord, then once I can lace the whole thing up I can level the hem and finish it up. The strap thing was fairly easy to work out and fit on myself, though it would have been easier to do some of the tweaking in back with an extra set of hands (duh). One nice thing about this particular design is that you can get a really wide neck and still have useful and secure shoulder straps. Even with the sleeves in and the skirt on, nothing is shifting around or slipping off and I still have a nice wide, open neckline, which will be nice with later houppelands and early Burgundian styles.
Saturday, June 11, 2011
Supportive kirtle, attempt 1
The diagonal stitching line at the neck edge is where the strap attaches and where the facing will be at top neck edge. So far, the plan is to attach the facing directly to the bodice. That should work better than having it stick up from the main body of the bodice, and be easier to put together. Plus it will serve to reinforce the edge a bit, which is all for the good. A little more structural integrity at that top edge will help hold the girls in place, not that they are trying to escape or anything but I'm planning to cook and do work in this gown so the sturdier the better.

As far as actually putting the whole thing together goes, I think I will sew the sleeve into the underarm then attach the shoulder straps and facings. That's going to involve more handsewing in that area than I wanted to do, but it will look neater in the end. The whole thing is now cut out, complete with trapezoidal skirt pieces and lining. The plan is get the interior seams on the bodice machine stitched today, tweak the fit, and flat fell the seams by hand before I attach the skirt. I'll probably just machine french seam the skirt, flat felling seems like overkill.
Friday, June 10, 2011
More kirtle fun
I think I've got the pattern for my supporting kirtle sorted out (all by myself too! yay! And no free-range boobs!) I've decided to give the funky shoulder strap thing I posted about a couple of weeks ago a try, as this is an interesting problem and I really do like the look of the facing/strap/whatever around the neck opening.
I came across this picture which threw a bit of a wrench into things though:
 The detail is taken from the Braque Family Triptych, another van der Weyden, dated about 1450. If you look closely at the shoulder area, it looks like she's working the raglan sleeve seam again, but also a shoulder seam running down the top of the sleeve of the kirlte. Which is weird. This funny top seam doesn't extent into the shoulder strap section as far as I can tell, so it might just be some strange piecing in the sleeve? But there's a bit of white shift poking out, so maybe the kirtle is sleeveless and the seam is the shoulder seam and the strap is just a facing?
As far as the shoulder strap idea goes, that's working out pretty well so far. I'm actually getting something fairly close to the raglan type line at the underarm, where the armscye scoops up to the strap. It's not as pronounced on my pattern but if I were to raise to neckline up a bit it would be (or at least it could be if I fiddle with things a bit, I'll take some pictures later once I have things as point where it's descent).
I'm trying to decide what the best way to attach the facing at the top of the bodice to the strap and the main body of the bodice is - so far the bodice has a smooth line across the top until it dips down for the armscye. I think the easiest way to attach the straps so it looks neat and like the pictures would be to make up the top facing bit with the straps attached to that and sew them on to the top of the bodice as a single piece to finish the neck, then attach the sleeve. Or, put another way, treat the band at the top of the bodice as an actual facing and not as an extension of the bodice. It might be easier to put the sleeve in first, then sew in the facing and the shoulder band. Huh. Now I've confused myself.
I came across this picture which threw a bit of a wrench into things though:
As far as the shoulder strap idea goes, that's working out pretty well so far. I'm actually getting something fairly close to the raglan type line at the underarm, where the armscye scoops up to the strap. It's not as pronounced on my pattern but if I were to raise to neckline up a bit it would be (or at least it could be if I fiddle with things a bit, I'll take some pictures later once I have things as point where it's descent).
I'm trying to decide what the best way to attach the facing at the top of the bodice to the strap and the main body of the bodice is - so far the bodice has a smooth line across the top until it dips down for the armscye. I think the easiest way to attach the straps so it looks neat and like the pictures would be to make up the top facing bit with the straps attached to that and sew them on to the top of the bodice as a single piece to finish the neck, then attach the sleeve. Or, put another way, treat the band at the top of the bodice as an actual facing and not as an extension of the bodice. It might be easier to put the sleeve in first, then sew in the facing and the shoulder band. Huh. Now I've confused myself.
Sunday, May 8, 2011
Another mystery
I'm getting ready for my next sewing project (other than the blasted hose, which hardly rise to the level of a project IMO, except in the whole finding-help-with-pattern aspect of the thing), which will be a kirtle. So far the plan is to do this in linen, as linen is less expensive than wool, will be comfy at Pennsic, and I have some I am willing to commit to a gown at my current size.
Anyway, I've pretty well decided to go with the waist-seam method of doing this, with trapezoidal skirt panels similar to those shown in the MOL book, as that will be much easier to fit on my self with minimal-to-no outside help. Which brings me to the questions. The bodice. I've been looking at paintings to get the best idea I can of where all the seam lines should be and have run across something strange (to me anyway). In nearly all of the artwork there is a facing or something around the neck that I don't tend to see included on the reproductions of these gowns. You can see it quite clearly here, in a detail from Rogier van der Weyden's Descent from the Cross:
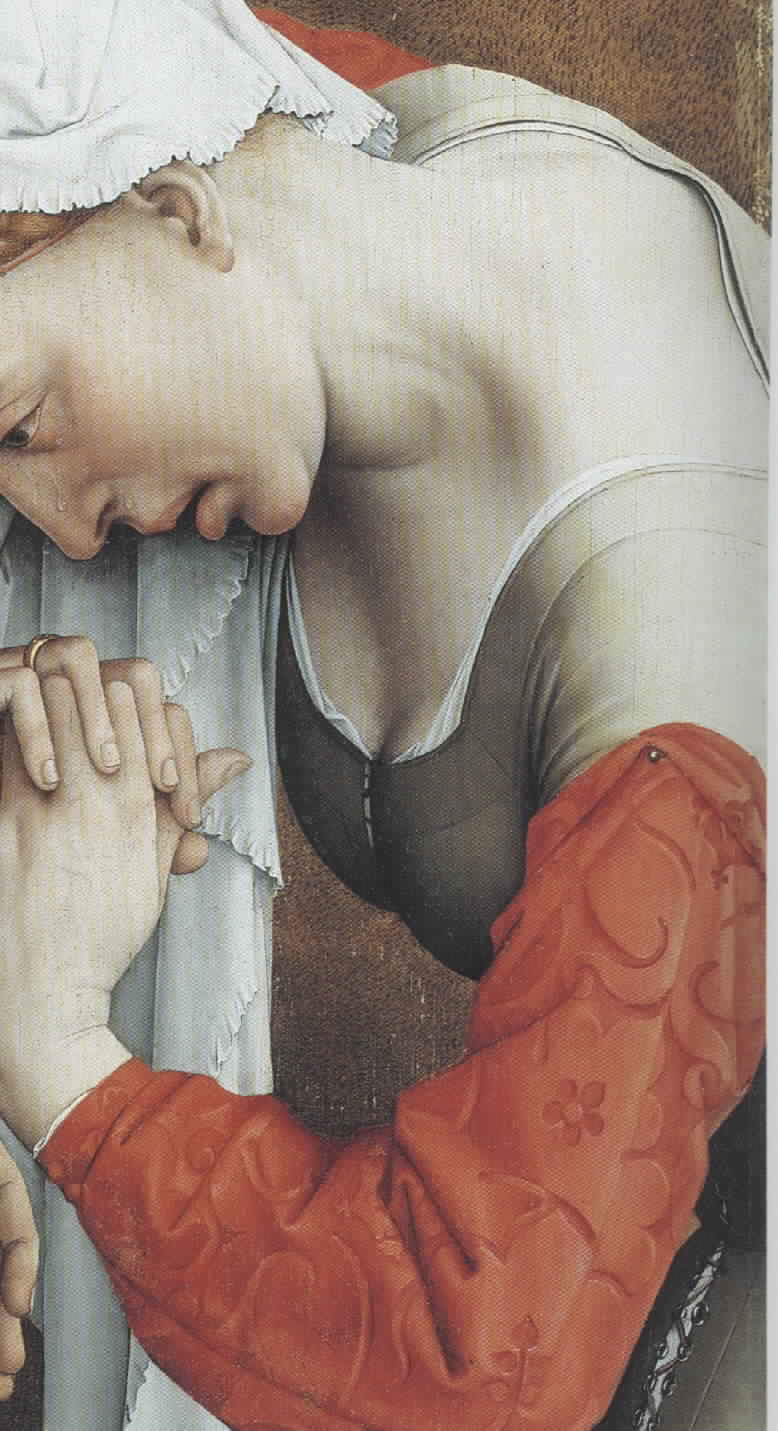
It also looks like there is a small raglan-type seam at the arm. I can't be quite sure if it's just in the facing piece, or if that's actually actually how the sleeve is shaped. It (the raglan-looking seam I mean) would actually make sense if the facing bit was a narrow shoulder strap extending from the back, or cut separately and attached to both front and back, rather like what you see on some later period bodices. In a larger view of the picture, you can see the same angled seam front and back. One thing there clearly is NOT is a seam at the top of the shoulder. Again, this isn't the only place I've seen this sort of seaming in paintings, it seems rather more typical than exceptional, though I've found examples showing a regular shoulder seam as well. (the other thing I really like about this picture is that is appears she's using both eyelets AND lacing rings, with the transition between the two at the waist)
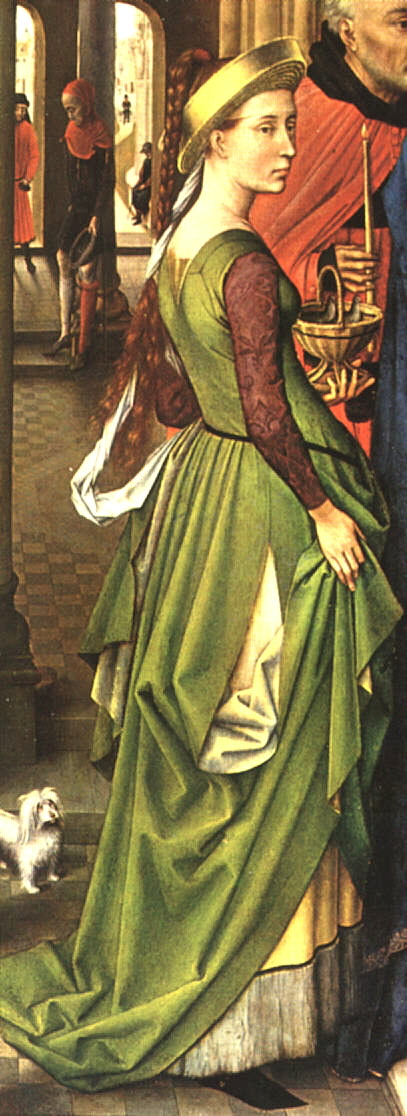
Here's a good back view of this sort of gown, another van der Wyden, this one a detail from "The Presentation at the Temple." Here you can see that the angled seem goes down all the way into the armscye at least:
So, what does all this mean? Is it a sort of raglan sleeve? Or just a separate strap bit? Is the seam around the neck a facing or just a line of stitching or something else? If the strap is separate, I can see where the extra bit around the neck opening would be helpful (it would be helpful regardless really). Should I try this? Or just do the easy seam-over-shoulder bodice?
Anyway, I've pretty well decided to go with the waist-seam method of doing this, with trapezoidal skirt panels similar to those shown in the MOL book, as that will be much easier to fit on my self with minimal-to-no outside help. Which brings me to the questions. The bodice. I've been looking at paintings to get the best idea I can of where all the seam lines should be and have run across something strange (to me anyway). In nearly all of the artwork there is a facing or something around the neck that I don't tend to see included on the reproductions of these gowns. You can see it quite clearly here, in a detail from Rogier van der Weyden's Descent from the Cross:
It also looks like there is a small raglan-type seam at the arm. I can't be quite sure if it's just in the facing piece, or if that's actually actually how the sleeve is shaped. It (the raglan-looking seam I mean) would actually make sense if the facing bit was a narrow shoulder strap extending from the back, or cut separately and attached to both front and back, rather like what you see on some later period bodices. In a larger view of the picture, you can see the same angled seam front and back. One thing there clearly is NOT is a seam at the top of the shoulder. Again, this isn't the only place I've seen this sort of seaming in paintings, it seems rather more typical than exceptional, though I've found examples showing a regular shoulder seam as well. (the other thing I really like about this picture is that is appears she's using both eyelets AND lacing rings, with the transition between the two at the waist)
Here's a good back view of this sort of gown, another van der Wyden, this one a detail from "The Presentation at the Temple." Here you can see that the angled seem goes down all the way into the armscye at least:
So, what does all this mean? Is it a sort of raglan sleeve? Or just a separate strap bit? Is the seam around the neck a facing or just a line of stitching or something else? If the strap is separate, I can see where the extra bit around the neck opening would be helpful (it would be helpful regardless really). Should I try this? Or just do the easy seam-over-shoulder bodice?
Subscribe to:
Posts (Atom)