This particular bit of tablet weaving was really annoying me, I've been getting thing together for KASF next weekend and realized that since I did the snartemo trim for the DH I have not managed to tablet weave anything useable. Which is just sad and pathetic. Partly I am afraid of silk, it's expensive though not hard to come by if I order it. But so expensive!! And who wants to use up pretty, pretty (and expensive) silk on something that comes out badly?
My Laurel had recently had some good success using bamboo instead of silk for some weaving, it's not quite the same but has a similar hand and drape, so when I was home in November I stopped at Village Spinning and Weaving and got some 10/2 bamboo in a nice reddish brown color. At $14 for 900+ yards, that's a pretty good savings over a similar amount of silk. I've got plenty to play around with and screw up. So last night I warped up enough to give the MOL 142 band another try. This was supposed to be a fillet, to which I will eventually sew some nice pewter beads which look like belt fittings, much like the original once had.
Well, after weaving a few inches I can safely say my problem with the first band was most definitely the stupid cotton! Getting a neat selvedge without weird little lops poking out just wasn't working before, and now it's not a problem. The whole thing is much smoother and neater and overall I am a lot happier with how it's looking. Suffice it to say, I'm going to have to get more of this stuff for playing around when I am afraid of the silk. And I'm not a lot less hesitant to warp up some double face trim, to get started on that project and make a pair of garters! Yay for progress!
I'll post some pictures of the new band once I have a bit more done. It's only going to be long enough to go around my head so I don't expect it to take too long to do.

Saturday, January 28, 2012
Friday, January 27, 2012
Perugia towel research
I'm finally starting to make some headway on my long-delayed Perugia towel project. This is a Very Good Thing Indeed, as I think it will be a fun challenge and produce something useful and (hopefully) beautiful in the process.
I'm starting to compile my visual sources on a pintrest board, a new (to me anyway) tool that I find wonderfully useful for this sort of research and also totally addictive. What a great way for visual people like me to keep links organized! Hurray!
Anyway, I did the indigo dying for the cotton contrast bands yesterday with very good results. The blue came out nice and bright and even, so that's ready to go. I have 3 tubes of 40/2 linen ready to go, which should be more than enough for one napkin sized towel. I'm just starting to wonder if the 40/2 is too small. 20/2 is definitely too big, but I can't seem to find anything in between. Last year I was given a tube of what I think is 30/2, but I'm not sure and can't find more anywhere anyway. Gah. Hopefully the 40/2 will work, that's the best I'm going to get. Having to work at 48 EPI or small is a little terrifying, especially when I get to thinking about the pickup part (the blue bands are all done with a pickup stick, by hand), but this is supposed to be a challenge after all.
If you are at all interested in these towels, here are some on-line sources that might be of use to you:
http://larsdatter.com/perugia-towels.htm - tons of links to extant towels and art work with towels in it
Perugia Towels - a blog about Perugia towels and the weaving techniques used to make them. Lots of useful information
Bibliography of Sources - Thora Shaprtooth's bibliography of sources on Perugia-wares. Very helpful.
Affordable reproductions from Historic Enterprises. Sort of makes me wonder why I want to make my own sometimes...
Thursday, January 26, 2012
A&S 50: 47- Indigo dye silk and cotton - modern method
 |
| Fibers before dying |
Picking up where I left off with my
last attempt at dying with indigo (working with wool and linen), I decided my
next attempt should focus on cotton and silk fibers. The cotton will eventually be used as the
pattern weft for a Perugia towel and the small amount of silk will probably be
used for some tablet weaving experimentation.
As has already been discussed,
indigo is a close chemical relative of woad, one of the earliest known
dyestuffs used in Europe. It is unique
in the universe of dyestuffs in that it requires no mordant to produce bright,
colorfast shades of clear blue. This
makes the dye process relatively simple, in that the fibers to be dyed require
no pre-treatment, however development of the dye vat can be a very complicated
process as all oxygen must be removed from the water in order for the indigo to
process and adhere to the fibers.
Having attempted to use a
chemical-free method of developing the vat and failed miserably, this time
around I opted to use the simpler, modern method relying on color run remover. While not a period process, this poses
several distinct advantages; first the smell is limited to that given off by
the indigo alone, and second the dying entire process can completed in a few
hours rather than a few days, thus further limiting the unpleasant smells. I can finish my dying and air the house out
while my husband is as work, and he will be none the wiser to the day’s noxious
activities! (Did I mention the indigo
stinks?)
 |
| Stinky, stinky indigo paste |
The process:
Materials:
- A total of 8 oz of fibers (I dyed 2 oz of cotton, .5 oz of silk, and approximately 4 oz of handspun alpaca and still had usable dye in the vat)
- 10 grams indigo, ground as finely as possible (my indigo is in chunk form so I ground it myself in a morter)
- 1 tsp washing soda
- 1 oz color run remover
- Small jar
- A crock pot that will never ever have food in it again
- Spoon
 |
| "bloom" of scum after vat has processed |
I set fibers to soak in warm water.
While fibers were soaking, I ground my
indigo and added it to the washing soda in a small jar. I mixed this with a small amount of boiling
water to make a paste and stirred to dissolve all the particles. I then added water to my crock pot sufficient
to cover half my fibers at a time and the color run remover and set it to “low”
to warm up. Windows were opened and the
kitchen fan was turned on to start airing thing out as the indigo stink was
already getting bad.
After 30 minutes, I added the
indigo to the crockpot carefully, trying not to introduce any air bubbles in
the process. There was grit in the bottom
of the indigo jar, so I spooned a bit of the dye vat water into jar to get this
out and added it to pot. I gave it all a
gentle stir, and let the whole thing sit for 45 minutes to develop.
A thick scum of indigo had formed
on top of my vat so it was difficult to tell if the dye has turned the
greeny-yellow I was looking for, but with some gentle poking it looked all
right. This bloom of scum is apparently
normal and cannot be avoided. Not sure
how the dye book authors get their nice clear vats for the pictures, but there
you go. The cotton and silk went in
first and set for 20 minutes. They came
out beautifully, with a deep rich blue on the cotton and a vibrant blue on the
silk. I had a few white spots where I
had tied my skeins too tightly, but I repositioned the knots and dip dyed those
sections for about 10 minutes and the skeins are more even now.
 |
| Finished yarns, alpaca, cotton and silk |
The alpaca went in for 20 minutes
after the cotton and silk were finished and came out a grayish blue. This is I think because it started out a
natural tan color rather than white. Again,
the take up was a little sparse where I had tied the skeins too tightly.
Learnings:
- I need to tie my skeins more loosely to get more even dye take up
- You can stir the vat! Just really really carefully
- Indigo stinks, did I mention that already?
Sources:
Dean, Jenny. Wild
Color. Watson-Guptill Publications,
1999.
Bingham, Gayle. Woad
Dying. Medieval Textiles issue 29.
Sept. 2001. (http://www.elizabethancostume.net/dyes/medtex.pdf)
Last visited Nov. 18, 2010
Kolander, Cheryl.
Dying with Indigo – Natural Fermentation Vat. (http://www.aurorasilk.com/info/indigo_tutorial.shtml)
Last visited Nov. 18, 2010.
Priest-Dorman, Carolyn.
Colors, Dyestuffs, and Mordants of the Viking Age: An Introduction
(http://www.cs.vassar.edu/~capriest/vikdyes.html)
Last visited Nov. 18, 2010.
Wednesday, January 25, 2012
A project for the DH
The DH does sometimes come to events. Not often, and mostly local ones, but he does come with me. So he needs cloths to wear that meet my own personal standard of authenticity but also don't take up so much of my time and precious fabric that I resent them not getting worn very often. Or as often as I would like them to get worn.
Anyway, he came with me to our local 12th night celebration this weekend, and something about that event and my glee at receiving my fabulous turn shoes in the mail has got him wanting new cloths to wear. He wants a G63. For those of you not familiar with this term, this refers to a specific men's garment dug up in Greenland that dates to the later part of the 14th century. This is fine with me as it fits in well with my own persona and most of my own garb, and it's a garment I've been wanting to make anyway. Plus he will look good in it.
I'm wondering though, there is some weirdness with the sleeve shaping, namely a (seemingly) random vertical seam at the elbow and triangular elbow gore filling out a space where the bottom half of the sleeve is not quite as wide as the top half. There is also the usual gore at top of the sleeve typical of the Greenland gowns. I'm wondering if this elbow seaming has any actual purpose or was done due to fabric constraints? It's a pretty full sleeve so I don't think the elbow gore is there for movement, besides which it's the wrong shape, or at least appears to me. If I have the right sized fabric, would it be wrong, from an authenticity point of view, to simplify this by eliminating the elbow piecing and making this a two-piece sleeve like all the others?
At least he's willing to wear proper chauses and braies with this thing, that makes it so much more fun me! I've got to find him some better shoes though. Ordering some off-the-shelf probably won't work to well for him though as his feet are quite wide and all the turnshoes I've found so far run a little narrow. We'll figure something out I'm sure.
 |
| Image after Norlund, from M Carlson |
I'm wondering though, there is some weirdness with the sleeve shaping, namely a (seemingly) random vertical seam at the elbow and triangular elbow gore filling out a space where the bottom half of the sleeve is not quite as wide as the top half. There is also the usual gore at top of the sleeve typical of the Greenland gowns. I'm wondering if this elbow seaming has any actual purpose or was done due to fabric constraints? It's a pretty full sleeve so I don't think the elbow gore is there for movement, besides which it's the wrong shape, or at least appears to me. If I have the right sized fabric, would it be wrong, from an authenticity point of view, to simplify this by eliminating the elbow piecing and making this a two-piece sleeve like all the others?
At least he's willing to wear proper chauses and braies with this thing, that makes it so much more fun me! I've got to find him some better shoes though. Ordering some off-the-shelf probably won't work to well for him though as his feet are quite wide and all the turnshoes I've found so far run a little narrow. We'll figure something out I'm sure.
Saturday, January 21, 2012
A&S 50: 43 MOL band 142

The original band fragment was found attached to a plaited
hair piece and would have been used in styling the hair. The silk band shows evidence of having had
metal plaques or other ornaments sewn on to it on intervals. The band would have been worn with the artificial
hair hanging down the sides of the face in looped braids, a fashion popular in
the 1340s.
The structure of the band closely resembles plain tabby
weave. This effect is achieved by
threading the tables through two holes diagonally opposite each other and
turning the cards ¼ turn, alternately turning the cards forward and backward The original was 26 tables wide, with two edge
tables on either side threaded through all four hole S-direction. These edge tables were turned continuously forward. The band was woven in plied silk and measures
10 mm in width with 46 weft picks per centimeter.
My first attempt at this band was done in purl cotton
using 26 tablets. The turning pattern is
quite simple however I found the thread to be quite difficult to work
with. I was never able to get an even
selvedge or anything close to the dense weft pack seen in the original
band. After much wringing of hands of
gnashing of teeth, and some consultation with more experienced tablet weavers,
I determined that the difficulty lay in my choice of fibers. The cotton is simply too sticky to work well
with this particular weave. I was able
to weave enough of the band to get a general idea of what the weave looks like,
but will need to use silk or something with a softer hand if I wish to make any
useable length of this band.
Sources:
Crowfoot, Elizabeth. Textiles and Clothing, c.1150-1450
(Medieval Finds from Excavations in London). Boydell Press, 2001.
Crocket, Candace. Card
Weaving. Interweave Press, 1991.
Lewins, Shelagh. The
Ancient Craft of Tablet Weaving: Getting
Started (http://www.shelaghlewins.com/tablet_weaving/TW01/TW01.htm) Last accessed Nov. 18, 2010.
Gaslee, Sarah. Basic
Tabletweaving. (http://www.stringpage.com/tw/basictw.html)
Last accessed Nov. 18, 2010.
Friday, January 20, 2012
A&S 50: 33-Rosette Twill

For
this project, I decided to make napkins using two colors of weft on the same
warp. Using ivory cottolin warp set at
24 ends per inch, I wove two lengths of the same pattern using tan weft and
light green weft. Unlike some of my
previous twill experiments, this time I used a floating warp to ensure a neat
selvedge, which was a big help.
Learnings:
- Floating warps really do make a huge difference! My selvedges not only are free of the weird floaters I was getting on the Greenland twill, but they are much more even. It took some getting used to and slowed me up a bit at first, but once I got used to working with them it was worth the extra effort.
- Patterns like this are far less forgiving of mistakes in tredling than plain twill. You can see every little mistake. My usual strategy of warping up twice what I actually needed too to get two usable napkins proved to be a good one here, as I had quite a few tredling mistakes at the beginning.
- I need to do some work on color combining. I was surprised that the tan and cream pattern had better contrast that the green and cream. This is not at all what I would have thought would have happened. I suspect that doing white-on-white would have a better effect that I had initially thought as well, given how nicely the cream/tan combo came out which bodes well for my Perugia project.
Bender-Jorgensen,
Lise. North European Textiles until AD. 1000. Aarhus
University Press (December 1992)
A&S 50: 14 Learn Fingerloop Braiding

Fingerloop
braiding is a method of weaving narrow braids or cords using loops, or bows, of
thread held on the fingers. This method
of making cords reached its height of popularity between 1200 and 1600 in
Europe, but fingerlooped cords were used much earlier and continue to be used
in some parts of the world today. In the
middle ages, fingerlooped cords could be found on a wide range of objects, from
purses to hairnets to seal tags. As
these cords are so useful, particularly for closing pouches and the fronts of
supportive gowns, I decided that it behooved me to learn to make at least a few
of the simpler sorts of fingerlooped cords.
Using
the naming conventions from Tak V Bowes Departed I have attempted and am
now reasonably comfortable with five different fingerlooped cords, “A Lace
Baston,” a two-colored cord from the Harley manuscript dating to 1475, “This
Flat String,” another two colored cord from To
Make Pursestrings dating to c. 1600, “Two Strings at Once” also from Harley, “A
Broad Lace of V Bowes,” from Harley, and “Round Lace of V Bowes” from Harley. All are distinct, with the except of the Lace
Baston and the Round Lace of V Bows, which are worked in exactly the same
manner save that the Lace Baston used departed bowes, that is bows in which two
colors have been joined together. All of
these cords use only five bowes.
More
complex cords are possible and many are described in the extant braiding
manuals which use more than five bowes, some of which require two people to
manipulate the bowes. I have not yet
attempted any of these more complex braids but am looking forward to finding a
braiding partner so that I can give some them a try!
Learnings:
- Braiding is not that hard once you get into the rhythm of it
- Small dogs and fingerlooping do not mix at all well. Nor do curious cats
- The phone will inevitably ring in the idle of a long braiding session
- You can make much longer cords by working your braid from the middle of the bowe. It’s not as scary as it sounds, it just takes some time and patience to sort out the bowes when you start back up from the center to work in the opposite direction. Your mileage may vary working on more complex braids but it works well with these five simple ones. This could be avoided if you had a second person to tighten up the braiding for you with a sword beater or some kind as you worked
Sources:
Benns,
Elizabeth et. al. Tak V Bowes Departed.
Soper Lane. London, 2006.
Crowfoot,
Elizabeth. Textiles and Clothing, c.1150-1450 (Medieval Finds from Excavations in London). Boydell Press, 2001.
Goddard,
Andy. Fingerloop Braiding (http://www.bumply.com/Medieval/braiding01.html)
Priest-Dorman, Carolyn. Sample Fingerlooped Braids from a
Fifteenth-Century Manuscript (http://www.cs.vassar.edu/~capriest/fingerloop.html)
Goslee,
Sarah, Fingerloop Braiding (http://www.stringpage.com/braid/fl/fingerloop.html)
Swales,
Lois et. al.. Fingerloop Braids. (http://fingerloop.org/)
Monday, January 16, 2012
The finished Venetian Coat and 12th Night report

12th Night was quite a bit of fun. I was a little worried about the drive down there, I have not been a car for that long since my surgery in August, but I was ok coming and going and am only a little sore today. Given all the walking we did on Saturday and how cold it's been, that's not surprising at all.
There were quite a few more merchants there this year than last, which was really a nice surprise. Eadric the Potter was set up, and I got a really beautiful 14th century ceramic cookpot for camp. Eadric does amazing work and is very knowledgeable, if you are not familiar with what he does you should check our his website and his Etsy shop.
I also found a new guy to buy reasonably priced reproduction buckles from! Hurray! Thorthor's Hammer does lovely work, and as I said is quite reasonably priced, which is novel for metal workers in this area. I got a really pretty little heart shaped annular brooch for $8. Score! Plus he has fibulae for Roman that don't cost an arm and a leg, so I will be able to replace the buttons on my tunica exterior.
Aside from shopping, I did enter my Eyelet Brick Stitch bag of Doom into the A&S display, along with the lampworked rosary, neither of which had made it to 30 Year or WOW last year. It was a little hard to watch people Picking Up The Bag (!!!) but nice to see that they appreciated the work that went into. I was awarded a silver nautilus in evening court for it too! For those of you not in Atlantia (or in the SCA) this is an arts and sciences award given out for an extraordinary achievement in the arts.
Now I've got to get myself together to KASF, it's only 2 weeks away! Gah! I'm not making anything new, or competing, but my display is a mess. I need to get organized and make sure I have all my A&S 50 stuff in some kind of order.
Thursday, January 12, 2012
Coat Progress and new costume resource
The coat and camica are done! Yay! The client came last night for a fitting last night and the coat itself fit well and she was quite happy, but I had failed to up underarm gussets in the camica, which turned out to be desperately needed, so I put those in this morning. That's what happens when you make a thing in 3 days with no chance for a fitting. It's much better now, and we were able to get it placed well enough to see that the neck draping will work perfectly. I may actually have the neck a little too wide, but that should be easily solved with a few pins. It will work out perfectly if she ever decides to do an actual Italian gown.
 Sadly, in the joy of finishing the blasted project, I failed to take a picture. Not that it fits properly on my dress form anyway, about the only thing that would would be a costume from Downton Abby. I will get a picture of the whole thing this weekend though.
In other later-period costuming news, Kendra at Demode posted yesterday about a fantastic resource for those of you/us interested in 16th century costume. She found a scanned PDF of a book by Lucas de Heere with some really fantastic illustrations of contemporary costume, a couple of which I have not seen before (and I have done a lot of research into this period from my Faire days). What's really great about de Heere is that he's drawn common people, not just the aristocracy.
In other later-period costuming news, Kendra at Demode posted yesterday about a fantastic resource for those of you/us interested in 16th century costume. She found a scanned PDF of a book by Lucas de Heere with some really fantastic illustrations of contemporary costume, a couple of which I have not seen before (and I have done a lot of research into this period from my Faire days). What's really great about de Heere is that he's drawn common people, not just the aristocracy.
Saturday, January 7, 2012
Turkish Coat Progress!

 The coat is coming along nicely! Last night I did the fitting and everything fit, which was a relief. Not that I don't trust my measuring and patterning skills, but it's always a bit scary when there is so little time to fix major problems. The sleeve looked great, I am very glad I went with the more fitted shoulder and sleeve shape. I think it will make a huge difference in the overall look of the finished coat, especially in the fabric, which is rather on the stiff side.
So, today I put the rest of the coat together, got the button holes made (by machine, I really think they should be button loops but I don't have time to make them that way), and tonight I will be doing the hand sewing. I have to sew on the trim, finish sewing on the buttons, and sew the hem. Not so bad really.

Any ideas?
Friday, January 6, 2012
New turn shoes

Not much else going on to report...I made very little notable progress on the Turkish coat yesterday. I've decided to go with the Greenland/grand asiette style sleeve, as this makes more sense to me and will look better. The sleeves are cut, I've got the sleeve opening cut, the facings (I'm not lining the coat, it's made from upholstery polyester and she will roast to death with a lining, I did not pick the fabric) are attached and sewn down. Tonight I will fit the coat and figure out where the side gores need to be, tweak the waist and side seams, and mark the hem and hopefully finish this thing over the weekend. Then I can make the camica and be done! Hurray! Oh...the trim. There is trim. And buttons. Which I do not have yet. Sigh. It's always something.
Thursday, January 5, 2012
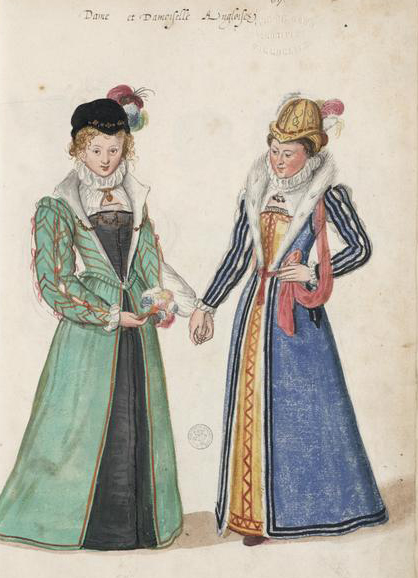
Venetian Coat Sleeves
Work is coming along on the Venetian coat. I've got it cut out (always an important first hurdle to overcome) and the center back gore is put in. I went with a basically rectangular construction, based on the pattern for Ottoman style coats given at the Renaissance Tailor because this seems plausible and I don't really have time to do a great deal more research. I did however skip the weird underarm gore thing, partly because I don't have time to figure this out and also because it does not make sense that this is how the Venetian version of the coat would be cut.
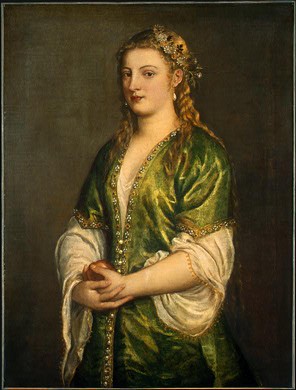
Here is my thinking...the lady in the Titian portrait is clearly NOT wearing actual Turkish clothing. The fabric is plain satin, which as far as I know was not a big thing in the Ottoman Empire at the time, the trim is wrong, and the fit is more constructed that what you see in the few illustrations of contemporary coats I've looked at. So, my thought is this is an Italian interpretation of what the Ottoman's wore, and thus cut more like Italian cloths. Given that, I've cut the body of the garments in two rectangles with triangular gores at the sides and center back, which squares with how similar robes are cut in Janet Arnold (sort of, it's at least plausible and makes good use of the fabric).
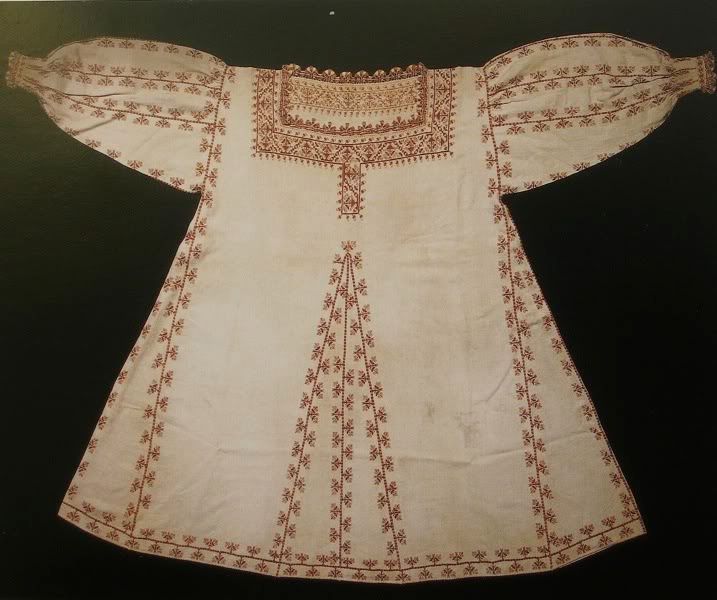
 Which brings me to the sleeves and upper body. The original coat the lady I am making this for made is cut just like your basic early period tunic, with honking big gores under the arms (see the picture). This is all well and good, but produces a much looser look around the upper body than you see in the Titian painting, and as far as I know wasn't a commonly used construction method in the 16th century. So...what to do? A shaped armscye? Something more like the grand asiette style sleeve I've used in my fitted gowns, but looser fitting? Clearly some sort of set in sleeve is called for, the question is weather I want/need to use the gore in the back, and how set in it should be.
Here is my thinking...the lady in the Titian portrait is clearly NOT wearing actual Turkish clothing. The fabric is plain satin, which as far as I know was not a big thing in the Ottoman Empire at the time, the trim is wrong, and the fit is more constructed that what you see in the few illustrations of contemporary coats I've looked at. So, my thought is this is an Italian interpretation of what the Ottoman's wore, and thus cut more like Italian cloths. Given that, I've cut the body of the garments in two rectangles with triangular gores at the sides and center back, which squares with how similar robes are cut in Janet Arnold (sort of, it's at least plausible and makes good use of the fabric).

Monday, January 2, 2012
Acid dye fun and Venetian dresses

 So acid dye is Not Period, but I went and saw the Muppets and got inspired by all the fun Muppet-colored dye possibilities. Multi-colored rovings always remind me of Fraggles for some reason actually, usually not in a good way, but I think these turned out pretty well. For my first attempts at dying roving anyway, I'm pretty happy with the results. I think they will spin up into nice, good-Fraggle looking yarns.
 I've got a total of 8 ounces in the each colorway, so there should be enough to so something of real significance with either color. Not a sweater, my dye pots aren't large enough for sweater quantities of roving anyway, but scarves and mittens and hats and things are certainly workable. Next up, more indigo! I need to do some cotton for my long-delayed Perugia towel project and some silk to compare the results.
Subscribe to:
Posts (Atom)